

The box I used is made from reconstituted paper but this technique will work on many different surfaces and particularly lends itself to working on wood. The paint is Annie Sloan Chalk Paint..colour Versailles which is a soft light mossy green available from Rustiques but Paperartsy Fresco Finish Paint works just as well.
Step 1...
 Using a soft bristle large brush or a piece of Cut and Dry cover the box with one coat of paint...because the box is made from wet paper which has been compressed...it can bubble but don't worry once it's dry it will flatten out again....the secret is not to over-work it or you will damage the surface. The paint doesn't take very long to dry but if you are impatient like me....you can dry it with a heat gun.
Step 2...
The next step is softening the colour down a little and giving the box a shabby distressed look using Old White.

And here is the box suitably distressed.....


Step 3...
Now it's time to have fun with stamping....it is important to make sure that the paint is thoroughly dry or you will end up with an inky mess...the stamped images are not going to be as crisp as stamping onto smooth card but it's the slightly rough uneven texture of the box that helps to achieve that shabby chic look. First I stamped with Hero Arts...Cling Dots inked with TH Distress Ink...Vintage Photo randomly around the edge of the box and on the lid followed by the Text Stamp from Stampers Anonymous: Tim Holtz Collection..Papillion...inked with Versamark Onyx Black.

 And no Timmie Project would be complete without a touch of distressing around the edges with Vintage Photo...


And a little tip for doing the edges of the lid and sides of the box....lay the box down on the stamp and press down working your way around..


Step 4...
If you're still with me....it's time to play with the Vagabond....die cut 2 Weathered Clocks...colour with Distress Ink Vintage Photo and the hands with Walnut Stain....

sprinkle with Distress Embossing Powder,..Brushed Corduroy....heat until set...leave to cool and then rub off the excess powder

leaving you with a rusty old metal look....

Step 5...
This is the faffing bit and you can miss out this part if you wish but I quite like the effect it gives....attach the clocks to white scrap paper and cut out.....colour lightly with Distress Ink Vintage Photo...and before you bombard me with e-mails about using the die cut pieces that fall out....believe me girls I've been there...done it...got the T Shirt...that is taking faffing to extremes...one that will have you tearing your hair out. Time to stick the clocks down...colouring over the face again with more Vintage Photo before fitting the hands...

Step 6...
Nearly there folks....first the wording....


Step 7...
finally the embellishments...stamp three butterflies from Hero Arts...Antique Engravings onto scrap card...colour with Vintage Photo and cut out....


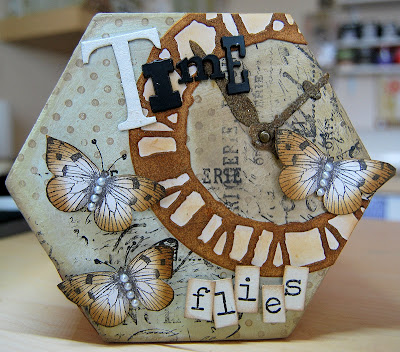


using Tim Holtz Grunge Alphabet coloured with Paint Dabber...Snowcap and letters from Idea-ology Alpha Parts...

and Hero Arts...Typewriter Letters cut to make Letter Tiles....

finally the embellishments...stamp three butterflies from Hero Arts...Antique Engravings onto scrap card...colour with Vintage Photo and cut out....

decorate with pearls...

Woohoo..hoo...hooo the finished box....


Crikey was that a marathon or what.....I hope you enjoyed the tutorial and will have a go at making a Timmie Altered Box...if you do please send me a pic...I would love to see your version. Don't know about you but I think we all deserve another cuppa....catch up with you all tomorrow for the winner of the Fiskars Give-Away and perhaps a sneaky peek or two.
Hugs Kath xxx
Morning Kath
ReplyDeleteWow!!! What a wonderful post.
I love your altered box.
Thank you so much for the tutorial and talking us through it all.
What a fantastic finished look .. .. love it!!!
Hope you are keeping well Kath.
Love Jules xx
Thank you so much for sharing this tutorial with us. Such a beautiful box. Hope you and Buddy have a great day. Hugs. Anesha
ReplyDeleteGreat tutorial Kath - will have to ry it, thank you. Maary G
ReplyDeleteBrilliant tutorial,Kath....thanks so much.....love the box.
ReplyDeleteTotally gorgeous Kath. Have to arrange a visit soon and get to Rustiques for some of that paint!
ReplyDeleteHugs
Ann
xxx
Very enjoyable tutorial and the finished box is beautiful.
ReplyDeleteEveline.
Thanks for sharing your project technique Kath but still hoping I will get to a class to see irl. Holidays have been in way!
ReplyDeleteFabulous project Kath - thanks for the tutorial. I have loads of those boxes (really tiny ones) that I bought in Hobbycraft's New Year sale...thoguth they'd be great for little gifts...but they've been sitting 'naked' in my cupboard since then...so thanks for the inspiration! :0)
ReplyDeleteHelen x
Kath the box is amazing, the colours and elements work so perfectly! Thanks for the step by step
ReplyDeleteJoey x
Beautiful Kath! Some stamps and a box need to be bought and I'm having a go. Thanks so much for the inspiration! :)xxx
ReplyDeletegood morning this is gorgeous!!!! i don,t now what to say..... you have great talent!!!!!
ReplyDeletexx petra
HI Kath
ReplyDeleteSorry its been so long since my last visit...havnt been blogging very much in the last few months due to things at home :(
I love this tutorial you explain the different steps so well i love the base layer looked so effective
hope you and buddy are well x
Emma xxx
the altered art box is stunning - truly inspirational . I will have to look in my stash later and have a go myself !
ReplyDeleteGood morning Kath. This is a lovely post. Clear tutorial and a fab-u-lous result. It is gre-art (great with an art twist....) love to buddy and thank you for the inspiration. XX Sharne
ReplyDeleteFabulous box and a fabulous tute!
ReplyDeleteThanks for sharing your hard work Kath :)
xoxo Sioux
Hi Kath
ReplyDeleteGreat tutorial TFS - you clearly took a lot of effort to do that for us and it is sooooo appreciated....
Love to Buddy and big hugs
Tina
X
Beautiful box Kath I so need a trip to Rustiques.
ReplyDeleteWOW - thanks for sharing your wonderful project Kath. You are a star.
ReplyDeleteHugs, Sandra
wonderful!!!Need to find some extra time.....or a housekeeper....
ReplyDeleteHi, Kath! I jumped over here from the Hero Flockr group to see how you made this fabulous box! Thanks for the tutorial - the results are amazing. Will have to give this a try someday soon!
ReplyDeleteWOW!! Kath this is stunning!! what an inspiration you are I must find the time to play and create, this is fabulous
ReplyDeletehugs
laney
Kath...your altered box is gorgeous...love the butterflies but I definitely think that it's too much work for me.
ReplyDeleteHave a great day!
Linda
Thanks for the great tutorial Kath. Your altered box looks amazing.
ReplyDeleteKat xx
Beautiful, Kath! Thanks for the detailed tutorial. Love how it all came together.
ReplyDeleteGood Morning Kath, Your instructional post is wonderful and so clear. I love that you included so many pictures. You are an exceptional teacher.Thank you so much for taking the time to share your project with us.
ReplyDeletePlease give Buddy a great big hug for me.
Hi Kath and Buddy,
ReplyDeleteI love your altered box- it`s fabulous.It`s been a while since I was last able to comment on your blog - Blame Mr Bloggy!!
Love,Elspeth
Wonderful tutorial - it has so many elements that can be used in other projects. I just love the step by step with all of the materials and processes listed. Thank you for putting this together. The box is beautiful!
ReplyDeleteThat looks like hard work Kath, but wow its amazing. Love it so much, very very creative.
ReplyDeleteHi Both. I,m a bit late on the go today.Great tutorial Kath and fantastic box.
ReplyDeleteHope you ae having a good day.
Kathleen x
Oh, what a beautiful box!
ReplyDeleteI like it so much.
Thank you!
Wow - a great tutorial Kath and a fabulous finished project!
ReplyDeleteLove Lynda xxx
Thanks for this fabulous tutorial Kath - I feel totally inspired!
ReplyDeleteEnjoy your evening.
Debs xx
This is lovely Kath, you have achieved a great vintage look. Laura
ReplyDeleteHi Kath
ReplyDeletefab tutorial your box looks gorgeous hun, sue,x
Hi Kath beautiful and thanks for the smashing tutorial. Hugs x ChrisB
ReplyDeleteThis is just gorgeous Kath.....absolutely amazing! Thanks for sharing your ideas :-)
ReplyDeleteHugs
Carole x
Hi Kath and Buddy, Wow, I am always so amazed that wonderful people like yourself can come up with these fab ideas on how to make art. Not only do you come up with the idea, but you are so generous to share your time and talents in a step-by-step picture tutorial. Great job. I am working on a source for the A.S. paints here in the States, so when I get those, the box will be a fun project. Thanks again. Linda S. in NE
ReplyDeleteThis is brilliant - love the soft colours & learnt lots of tips along the way. I've never tried anything like this but love the shabby chic effect. Thanks for all your hard work putting the tutorial together - yes those die-cut recycled would have me tearing my hair out (& that's from someone who punches bits out from all her offcuts of card, in theory after every project......but that's another story).
ReplyDeletePaula (PEP)
Fantastic post Kath. Thank you so much for taking the time to put this together.
ReplyDeleteYour post last week inspired me to buy some stuff to 'have a go' and I've since lost my nerve. I'm going to follow your instructions and see what happens.
Thank you so much for giving me the courage to give it a try.
Nxxx
Thank you for the fine tutorial. Love the box so I ha make one to myself.
ReplyDeleteThanks
Absolutly `Fabulous` my friend TFI:) x
ReplyDeleteWow, Kath, this is so beautiful. Thanks for the tips and techniques! Hugs, Dawn
ReplyDeleteWOW! This is such a beautiful project!!!
ReplyDeleteThank you for sharing!
Team Craftwell
blog.craftwellusa.com