Thursday, August 31, 2023

Simon Says - Retro Flowers Layering Stencil Set

Hi my friends, I'm sharing a card I made with the Retro Flowers 6" x 6" Layering Stencils from the Simon Says September Bee Happy Card Kit. The kit is still available to buy at time of writing but you can also purchase individual items from the kit HERE.

The stencil set has 4 stencils which are numbered in order of use for easy reference and also have grid lines to match the stencils up with your cardstock panel. However, I switched the order around because I wanted to use Distress Grit Paste for the flower heads and that meant that I would have to use Stencil 1 last.
I began by applying a light coat of Antique Linen Distress Paint to an A2 panel of Distress Watercolor card and once the paint was dry, spritzed lightly with Unravelled Distress Mica Stain.
I applied Mowed Lawn and Rustic Wilderness Distress Oxide inks through Stencil 2 using Simon Says Blending and Detail Round Blending Brushes.
I moved on to Stencil 4 which is the large and small flower centres and applied Wild Honey and Spiced Marmalade Distress Oxide inks using the Detail Round Blending Brush.
I decided not to use Stencil 3 to add the small flowers, instead leaving the small flower centres to create a splatter look on the panel. I applied Distress Grit Paste through Stencil 1, sprinkled lightly with Fossilized Amber Distress Embossing Glaze and heat set once the paste had dried.
I was disappointed that the centres on the large flowers and the splatters looked very faded so I scribbled over them with a Distress Embossing Pen, sprinkled with Fossilized Amber Distress Embossing Glaze and heat set.
I die-cut the CZ Design Scripty Hello also included in the kit from Simon Says Black cardstock, trimmed to create a negative banner and fixed to the bottom of the panel.
I placed the die-cut word into the negative space and used as a template to place the inside sections of the letters.
I added Ranger Glossy Accents to the large flower centres to create more dimension and added dots using a Sakura Black Glaze Pen. 
I trimmed the panel, added to an A2 panel of Simon Says Black Glossy cardstock, also included in the kit and fixed to an A2 white card blank.

Woohoo, buckle up my crafty friends, STAMPtember begins tomorrow over at Simon Says Stamp so make sure you tune into the first STAMPtember YouTube Livestream on Simon Says Stamp Channel tomorrow, Friday 9am PT, 12pm ET and 5pm UK when Heidi, Simon's Momma will be sharing inspiration, news, big prizes and all the STAMPtember excitement. Have fun with whatever you are making
Hugs Kath xxx

Wednesday, August 30, 2023

Tim Holtz/Stampers Anonymous Sketchy Leaves Trio

Hi my friends, I'm sharing the trio of cards I made for the YouTube Live launch of Tim Holtz/Stampers Anonymous Halloween collection of stamps and stencils using Sketchy Leaves and the Shattered Background with some of the newly released Distress Embossing Glaze colours. If you missed the Live, you can check out all the new products and inspiration from the Makers over on Tim's YouTube Channel HERE or Blog HERE.
Before we start on the technique, I used both my Stamping Platforms (Tim Holtz Regular and Travel versions) so that I could position the Brushstrokes Circle and Sketchy Leaves stamp on separate lids and leave them there for repeat stamping.

I began by trimming Distress Watercolor, Black and Kraft HeavyStock card to create 3 - 4" x 5.1/4" panels. I inked the Tim Holtz/Stampers Anonymous Shattered Background with Vintage Photo Distress Archival ink and stamped on to the Distress Watercolor and Kraft HeavyStock panels. I cleaned off the stamp, applied Picket Fence Distress Paint using a mini round blending tool and stamped on to the Black HeavyStock panel.
I dried the panels with my heat tool, placed the first panel in the left hand corner of my stamp platform, positioned the large circle from Tim Holtz/Stampers Anonymous BrushStrokes in the centre of the panel, picked up with the lid and applied Picket Fence Distress Paint on the stamp as before. I reapplied the paint and re-stamped until I was happy with the coverage. I repeated this step on all 3 panels, cleaned the stamp immediately to remove the paint before it dried but leaving the stamp in the same position on the stamp platform.
For the next step, I placed the first panel in the corner of my second platform, positioned the Sketchy Leaves stamp in the centre of the panel and stamped 3 times, inked with Black Soot Distress Archival to get a really dark image. I repeated this step on the other panels.
I moved the panels back to the other stamp platform, inked the BrushStrokes circle with Versamark ink, sprinkled with Distress Embossing Glazes, tapped my fingers lightly on the back of the panel to mix and blend the powder and heat set and repeated this process with the other two panels.
I reinked the BrushStrokes circle with Versamark ink and sprinkled with Ranger Clear UTEE and heat set. I reinked the stamp again, sprinkled more Distress Embossing Glazes to intensify the colour, heat set and finally repeated with a final application of UTEE to create a dimensional clear very glossy finish.
I added strips of Idea-ology Halloween Design Tape and stitched the panels on to Distress Black HeavyStock trimmed to 4.1/4" x 5.1/2".
To finish I fixed the panels to A2 white card blanks.

The cracks were unintentional and happened when I flexed the panel before fixing to the card front but hey I don't mind them either and after cleaning everything up, no way was I starting over. In the words of my adorable Professor "you get what you get and you don't throw a fit".


Have fun and happy making with your Stampers Anonymous Halloween goodies
Hugs Kath xxx

Tuesday, August 29, 2023

A Bee Happy Trio

Hello my friends, I've been having fun with the Simon Says Stamp September Be Happy Card Kit. This kit is jam packed with lots of products to make a variety of cards and at the time of writing is still available to buy or if you wish you can purchase the individual items from the kit HERE.

I made 3 cards using the Bee Happy stamp set, the Criss Cross Floral Embossing Folder and Paper Rose Be Happy 6" x 6" papers and die-cut elements, all included in the kit.

I embossed one of the Paper Rose patterned papers with the Criss Cross Floral Embossing Folder. trimmed to 4" x 5.1/4", fixed to a A2 Black card blank and lightly sanded the embossed detail with the Tim Holtz Sanding Disk included in the Kit. I inked the bee, crown and sentiment with Simon Says Embossing Ink, stamped on to a black tag, sprinkled Simon Says White Detail Embossing Powder on the bee and sentiment and Ranger Liquid Platinum on the crown and heat set. I fixed the tag to the card using the foam squares included in the kit. I fussy cut around the sunflower Paper Rose die-cut elements (not a big fan of white edging on die-cuts) and fixed in place with Distress Collage Medium. I decorated the card with Gold Mix Confetti, added a black twin bow to the tag and added a panel of white card inside for the message. 


I trimmed Paper Rose patterned paper to 4" x 5.1/4" and fixed to an A2 white card blank. I inked the honeycomb stamp with Hickory Smoke Distress Archival ink, stamped on to a strip of the Paper Rose patterned paper left over from the first card, tore to reveal the white core and fixed to the bottom of the card. I fussy cut the sunflowers as before from the die-cut elements and fixed to the card with Distress Collage Medium and foam squares under the larger sunflowers to create dimension. I stamped the small bee from the stamp set, inked with Simon Says Intense Black Ink, on to the seal die-cut element, fixed to a scrap of paper, fussy cut and fixed to the card with foam squares. To finish I added Trinity Stamps Creamy Vanilla Heart Sprinkles.


I trimmed the Paper Rose Black Hexagon paper to 4" x 5.1/4" and fixed to an A2 white card blank. I inked the daisy layering stamp with Simon Says White Pigment ink, Wild Honey Distress Oxide and Hickory Smoke Distress Archival and the sentiment with Hickory Smoke and stamped on to a scrap of Simon Says Stone Cardstock. I trimmed to leave a small border and applied Simon Says White Pigment Ink with a sponge applicator tool around the edges. I stamped the bee on to a die-cut circle, inked with Hickory Smoke Distress Archival and repeated the White Pigment ink on the edges.
To finish I applied shimmer to the bee wings and flower centres using a Wink Of Stella Clear Glitter Pen.
Have fun with whatever you're making
Hugs Kath xxx

Monday, August 28, 2023

Tim Holtz/Ranger Distress Christmas Release

Hi my friends, woohoo exciting news, Tim Holtz and Ranger have just released a Christmas bundle of delicious products, 6 new Distress Mica Stains, Snowfall Grit Paste is back again and Texture Paste Sparkle. Join Tim on his YouTube Channel on Saturday 2 September 9am PT, 12pm ET and 5pm UK for a fun festive demo with the new products.

After I made my swatches, I had lots of fun using two of the new Distress Mica Stains, Frozen Fog and Juniper Berry and Snowfall Grit Paste to make a Winter Wonderland Christmas card with lots of shimmer and icy sparkle.


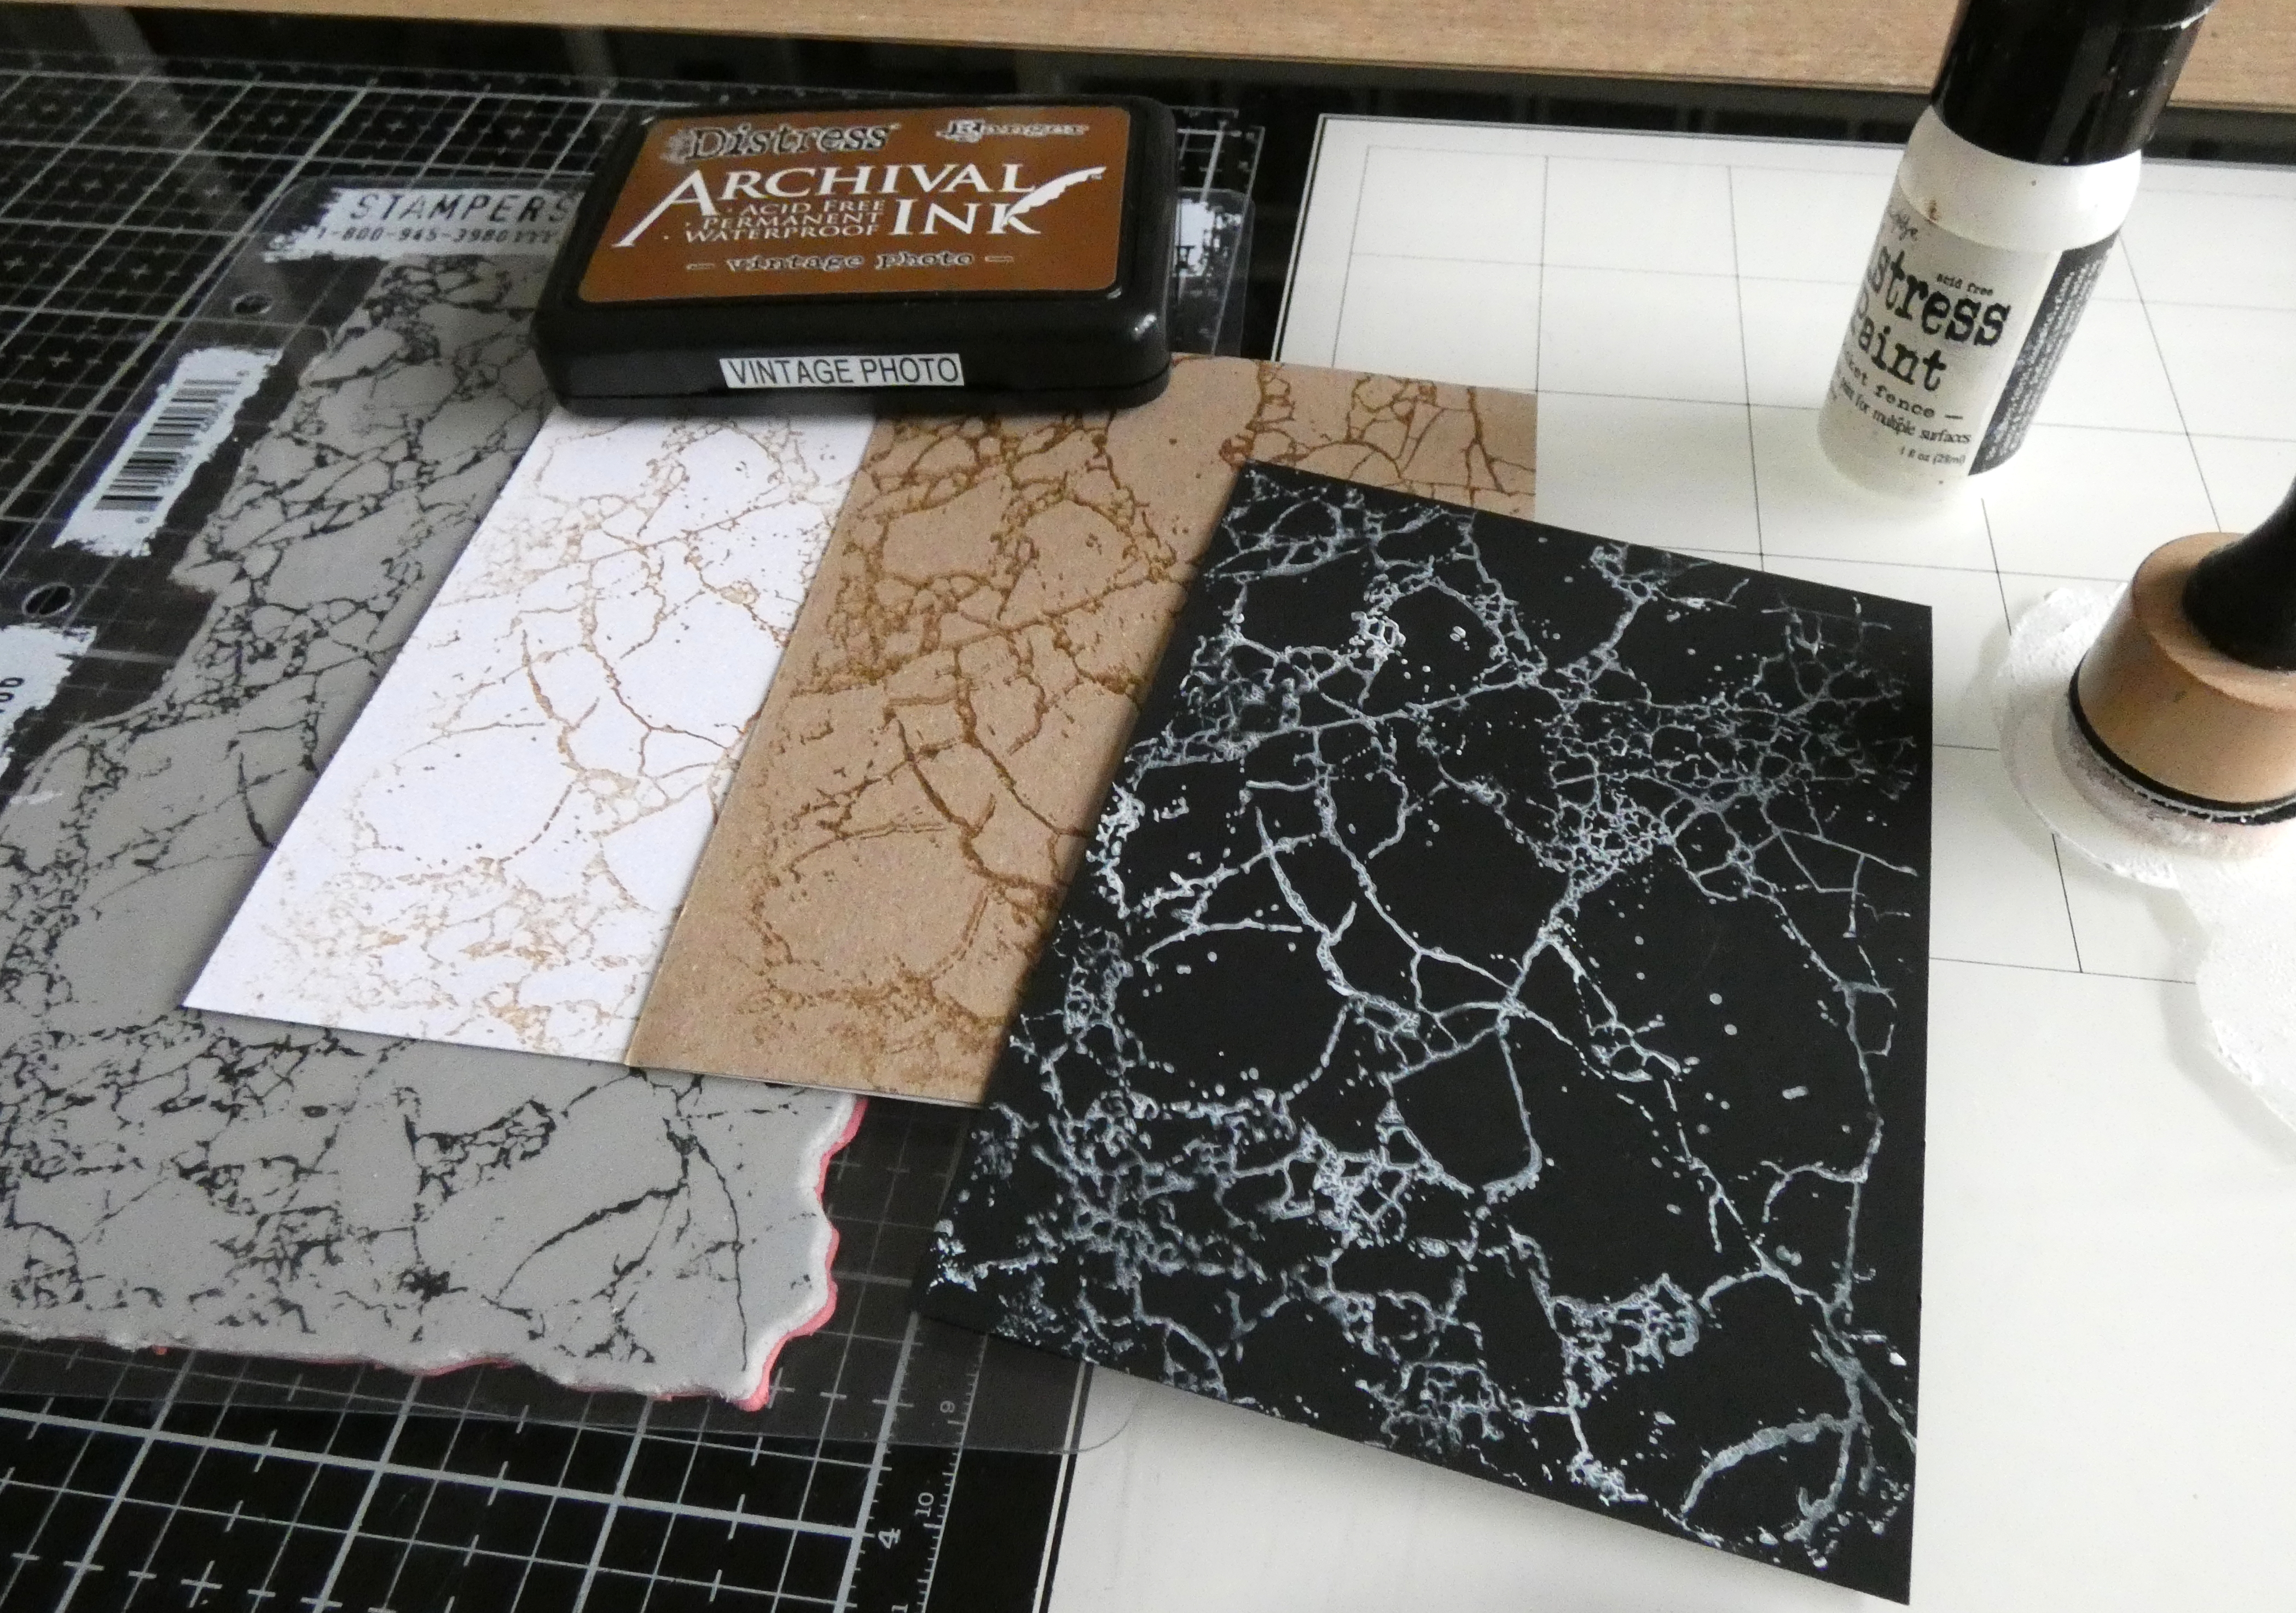
I began by spritzing Frozen Fog and Juniper Berry Distress Mica Stains on to an A2 panel of Distress Black Heavystock followed by a spritz of Faded Jeans Distress Oxide ink, dried and spritzed on some droplets of water.
Check out that delicious shimmer
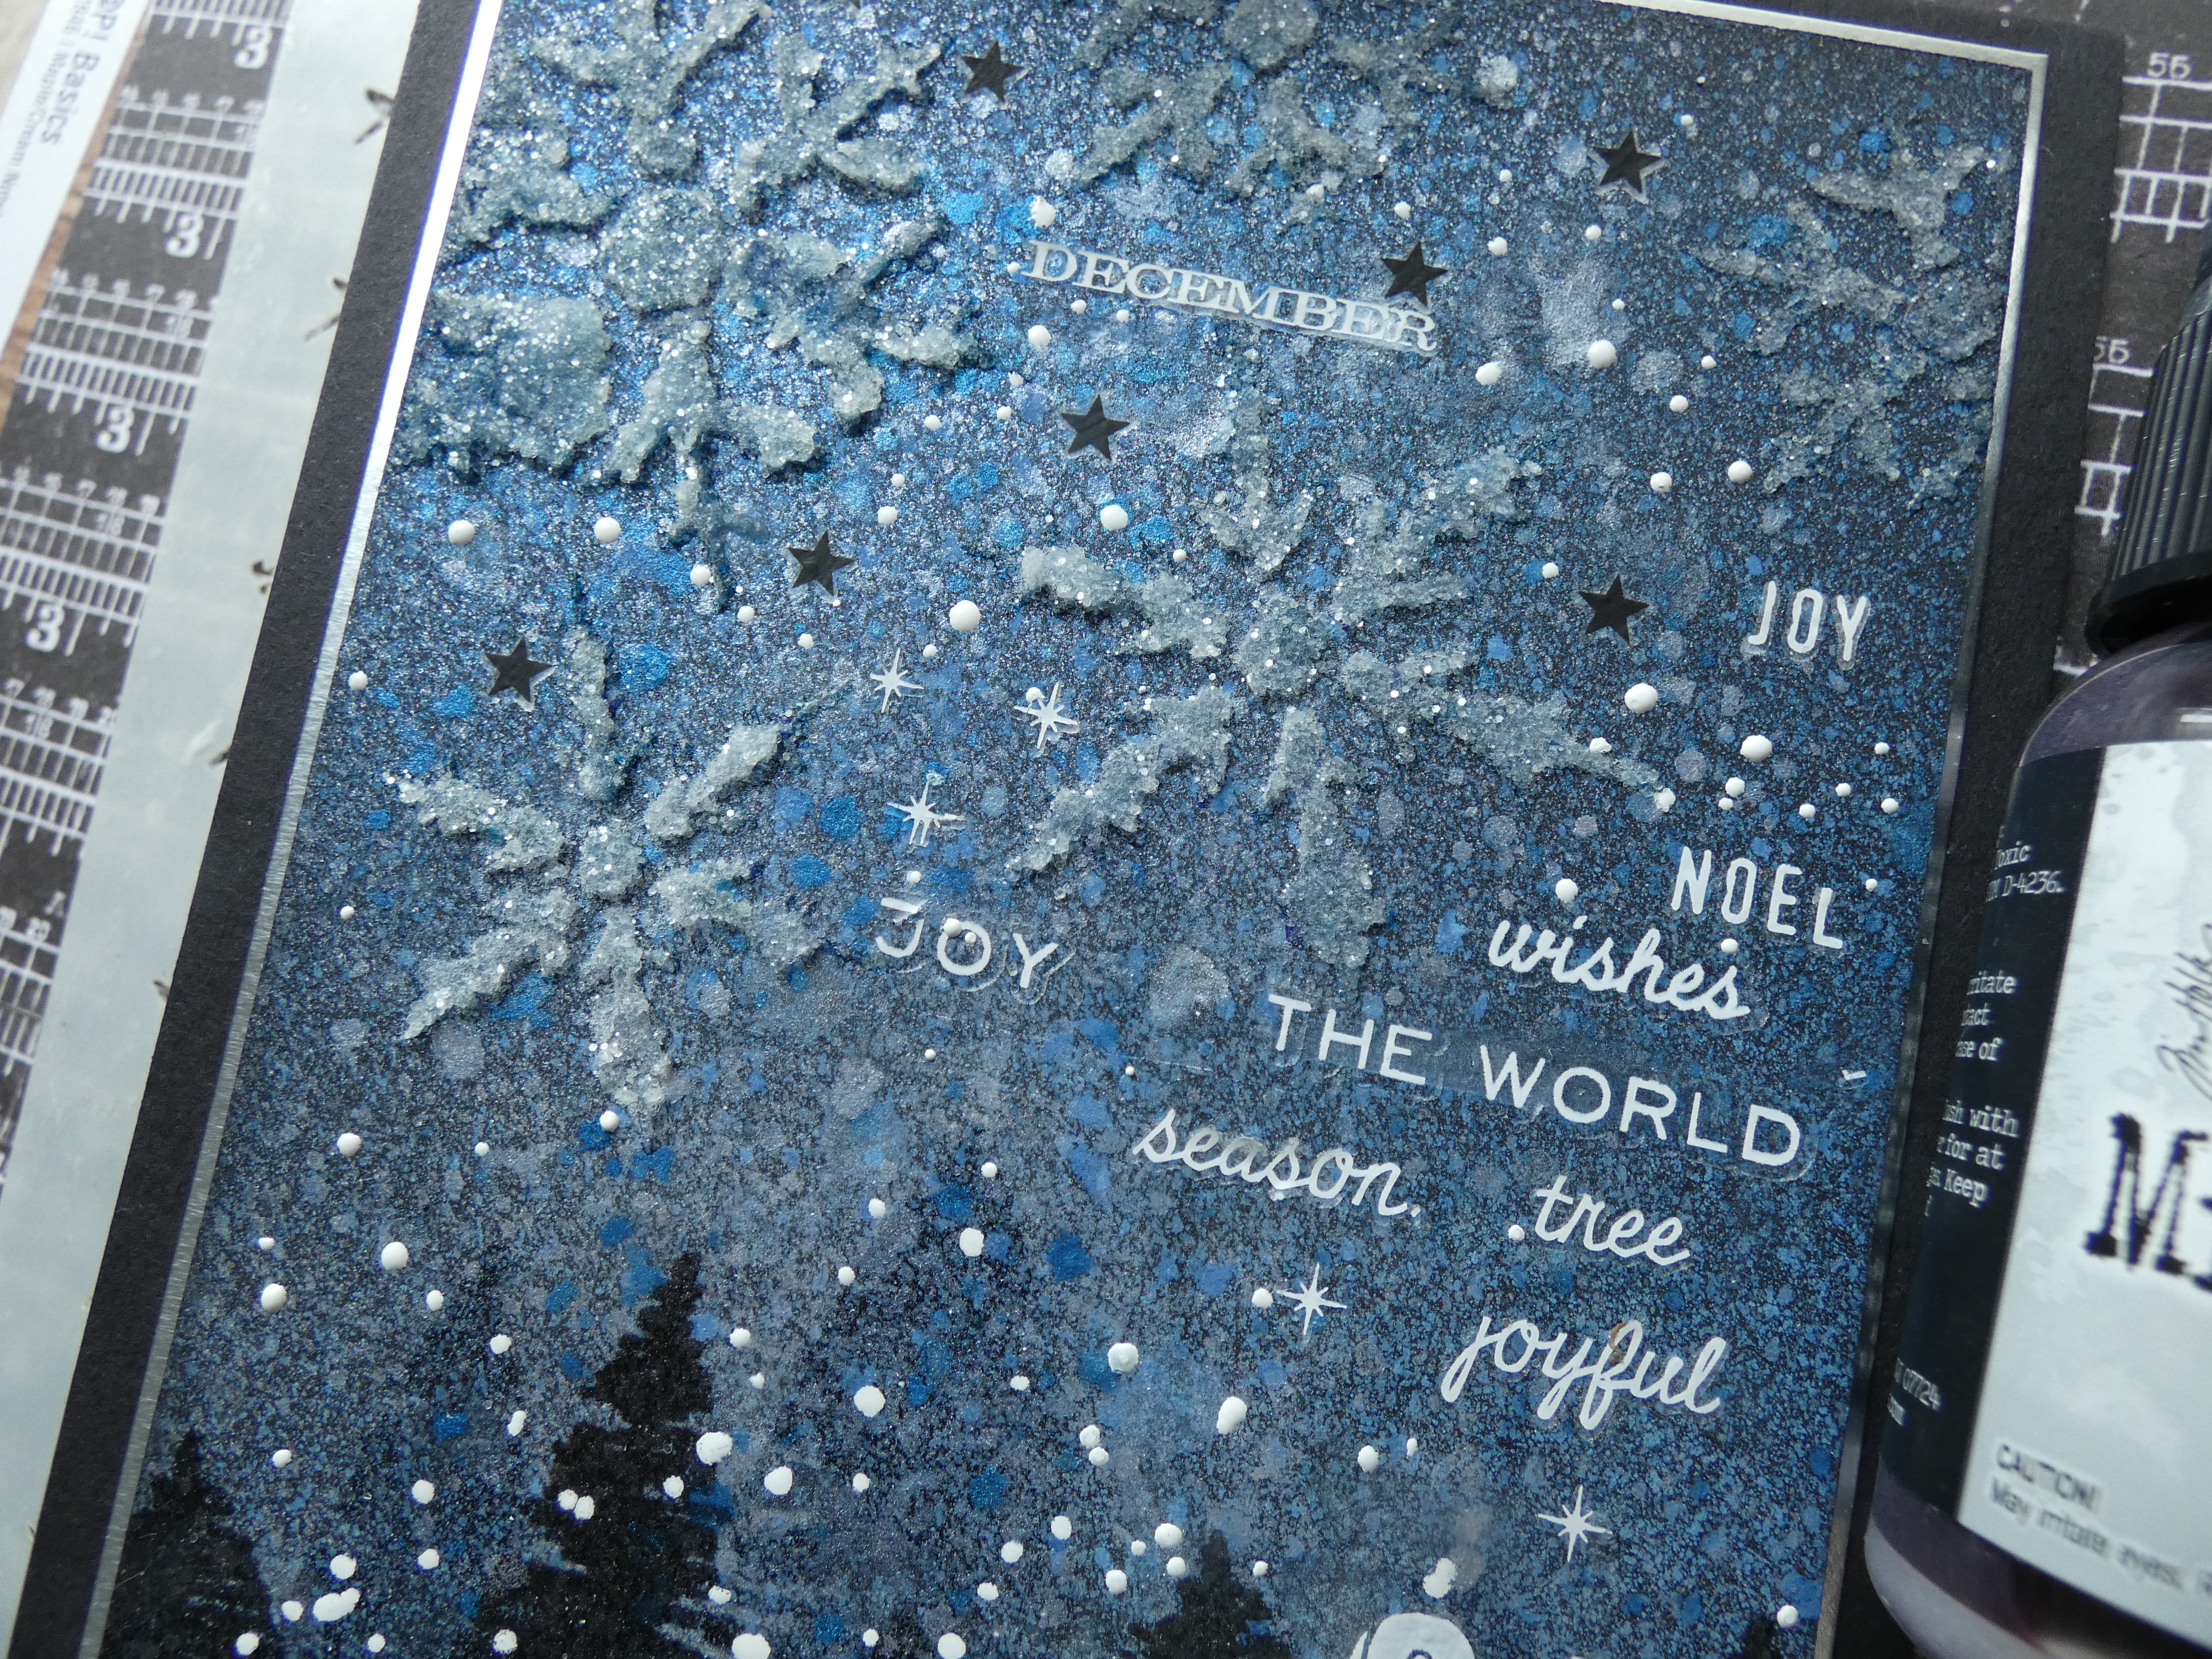
I stamped the tops of Tim Holtz/Stampers Anonymous Bottlebrush Trees, inked with Versamark ink, along the bottom of the panel, sprinkled with Simon Says Clear Embossing Powder and heat set. I re-stamped the trees to fill in the gaps inked with Black Soot Distress Archival, sprinkled again with clear embossing powder and heat set. I added splatters using the nozzle from Dina Wakley's White Gloss Spray.
I applied Distress Snowfall Grit Paste through Tim Holtz/Stampers Anonymous Snowflakes Layering Stencil.
Once the paste was dry, I added more splatters of Dina Wakley's White Gloss Spray and Idea-ology White Christmas Remnant Rubs from my stash, sadly now discontinued.
To finish, I trimmed the panel to 4" x 5.1/4", matted on to Simon Says Matte Silver card trimmed to be 1/8" larger and fixed to a black A2 card blank.


But, there's more exciting news, Ranger have re-released the limited edition Christmas Distress Mica Stain Sets 1 - 4 from previous years, so if you missed out, now is the time to grab them.
Happy Crafting and have fun
Hugs Kath xxx

Simon Says - Sparkle and Shine

Hi Everyone...welcome to another week on the Simon Says Stamp Monday Challenge Blog. Thank you for joining us for last week's challenge and we hope you can join us this week too because


and the theme for this week is...
SPARKLE AND SHINE
I created a Halloween Shaker Card with Tim Holtz/Sizzix Moonlight, Mischievous and Bold Text 2 Thinlits and used Distress Mica Stains from the Halloween 2023 release, Spellbound Mini Layering Stencil from Set 56 with Distress Texture Paste and Distress Rock Candy Glitter and a mix of gold, blue and clear sequins to add lots of sparkle and shine.


I trimmed Distress Watercolor card to 5" x 7" and spritzed with Chipped Sapphire Distress Spray Stain, Winter Frost and Phantom Mist Distress Mica Stain and added splatters of Unravelled Distress Mica Stain.
I die-cut the panel using Tim Holtz/Sizzix Bold Text 2 Thinlits and added a piece of acetate behind the die-cut aperture.
I fixed the letters on the edges back in place on the acetate temporarily, applied Distress Texture Paste Opague through the Tim Holtz/Stampers Anonymous Spellbound Mini Layering Stencil from Set 56, sprinkled with Distress Rock Candy Glitter and removed the die-cut letters.
I fixed foam tape on the back of the panel
I added a selection of gold, clear and dark blue sequins from my stash into the section behind the Bold Text words.
I coloured the area that would show through the aperture on a 5" x 7" white card blank with Squeezed Lemonade Distress Oxide ink, added a few splatters of Unravelled Distress Mica Stain and fixed the card to the panel.
I die-cut Tim Holtz/Sizzix Moonlight Thinlits from Distress Watercolor card. I spritzed Squeezed Lemonade Distress Spray Stain and Unravelled Distress Mica Stain on to my Tim Holtz Media Surface Mat, spritzed with water and dragged the die-cuts through the inks, dried, tapped back into the inks repeatedly and dried. I applied a thin layer of Glossy Accents over the detailed die-cut with my finger and sprinkled with Distress Rock Candy Glitter.
I fixed the base of the moon to the card using Distress Collage Medium and added the second layer popped up on black foam  squares to create dimension. I die-cut the cats 3 times from Distress Black Heavystock using tim Holtz/Sizzix Mischievous Thinlits, layered and fixed in place with black foam squares and added the extra die-cut cat heads also popped up on foam squares.


You can find all the products I used over at Simon Says Stamp, just click on the links below


Why don't you pop over to the Monday Challenge Blog and check out the amazing creations from my very talented Design Team mates and as always you have until Monday 8am Ohio time...1pm UK time...2pm CET to join in with the chance to win a $25 voucher to spend online at Simon Says Stamp


You can also follow Simon Says Stamp on Instagram
and if you use Instagram...
please add #sssmchallenge to your entry uploads so we can see them on there too

I look forward to seeing what you create this week...
Have Fun and Happy Crafting
Hugs Kath xxx