Hi my friends, I'm back to share the 2nd project I made for the YouTube Live launch of Tim Holtz/Sizzix Christmas 2023 release, so many gorgeous die sets to choose from but I went for another home decor project using Reindeer Sleigh, Forest Shadows and Festive Gatherings Thinlits and of course, how could I resist adding some Christmas magic with Idea-ology Tiny Lights. If you missed the Live, you can catch up with all the fabulous products and amazing projects from the Makers on Tim's YouTube Channel HERE and Blog HERE.

I placed the Tim Holtz/Tonic Studio Media Surface Mat on my workdesk, the perfect surface when things are going to get very inky. I trimmed Distress Watercolor card to 8" square to create the background for the Shadow Box from my stash and fixed the largest Tim Holtz/Stampers Anonymous Moon Mask in place temporarily with low tack tape. I smooshed Iced Spruce and Evergreen Bough Distress Oxide inks on to the media mat, spritzed with water and pulled the panel through the inks, dried slightly and repeatedly tapped the panel back into the remaining droplets of ink until I was happy with the background. I removed the mask, re-activated the inks around the moon with water, let the colour run into the moon and dried.
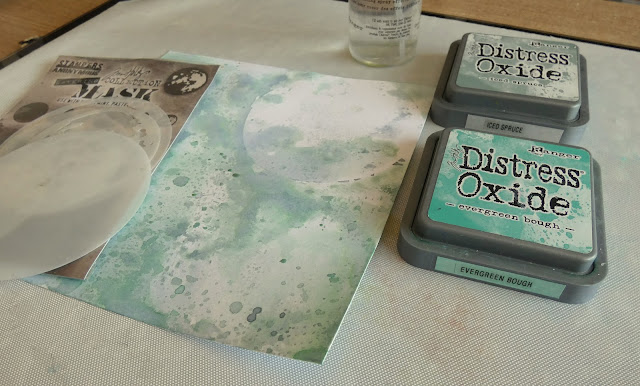
I placed sentiments from Tim Holtz/Stampers Anonymous The Great Outdoors on a Tim Holtz Grid Block, inked with Evergreen Bough Distress Oxide ink and stamped randomly on the background to create a subtle tone on tone effect.
I die-cut the Tim Holtz/Sizzix Falling Stars Thinlits using my Tim Holtz/Sizzix Switch machine which has a nice big platform which allowed me to angle the die and only cut the top left hand corner. I then die-cut the Reindeer Sleigh Ride Thinlits.
I added vellum to the back of the panel over the die-cut sections and die-cut the Reindeer Sleigh Thinlits again 3 times from Distress Black KraftStock. I layered the die-cuts to create dimension, sanded the edges lightly to reveal the kraft core and fixed back into the negative space popped up on black foam squares.
I coloured panels of Distress Watercolor card with Evergreen Bough, Rustic Wilderness and Pine Needles Distress Oxide inks and die-cut 3 times using Tim Holtz/Sizzix Forest Shadows Thinlits. I trimmed and fixed together with foam tape to create several layers of trees to fit across the shadow box.
I die-cut the Reindeer Sleigh rooftops from Idea-ology Black KraftStock, Silver Sparkle Classic Cardstock and Distress Watercolor card, sanded the edges as before, assembled and again trimmed to fit the shadow box
I fixed the tree layers in place, popped up with foam squares
I fed the Idea-ology Tiny Lights through the Shadow Box backing panel and using the decorated panel as a guide, fixed the two sets of lights in place, using my hot glue gun, to illuminate the stars, Santa and his sleigh, the forest trees and the rooftops.
I trimmed strips of Silver Sparkle Classic Cardstock to fit on the inside frame of the Shadow Box, fixed in place with Distress Collage Medium. I fixed the decorated panel to the backing panel using 3D foam to allow clearance for the Tiny Lights, added to the Shadow Box and fixed the rooftops die-cuts popped up on foam tape to add more depth to the scene.
I trimmed strips of Idea-ology paper from a Christmas Backdrops pack, mitred the corners (woohoo, check me out, it sounds as though I know what I'm doing) and fixed to the front frame using Distress Collage Medium.
I trimmed strips of Distress Watercolor card, coloured and stamped in the same way as the background and fixed to the outside edges of the Shadow Box.
I tested the lights and added an Idea-ology Christmas Droplet for Rudolph's nose and Christmas Label Stickers.
I secured the backing panel and fixed the Tiny Lights battery packs in place with hot glue.
As a finishing touch, I die-cut greenery from Distress Black KraftStock and Silver Sparkle Classic Cardstock using Tim Holtz Sizzix Festive Gatherings Thinlits, fixed in place on the bottom right corner of the Shadow Box and added Idea-ology Silver Idea-ology Droplets.
I rubbed Sterling Foundry Wax over the details on an Idea-ology Christmas Word Plaque using my finger, heat set, added Idea-ology Silver Droplets and fixed to the top frame using Distress Collage Medium.
Happy Crafting and it's never too early to make a start on your Christmas projects, have fun.
Hugs Kath xxx


Wow! Such an amazing project full of eye catching details.
ReplyDeleteAbsolutely beautiful and the lightening is a really eye catcher x
ReplyDeleteSuch a beautiful piece Kath. xx
ReplyDeleteI usually favor your florals but this shadowbox is amazing!
ReplyDeleteThis really caught my eye in the live! Thank you for your tutorial!!
ReplyDelete