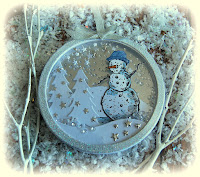
I also changed it up a little bit this time, using Sizzix Circle dies and the gorgeous images from Tim Holtz/Stampers Anonymous Tattered Christmas...
You will need 12 Circle Frames for each ornament and here comes Tip No 1. I used washi tape to hold the dies together for yesterday's ornament and was constantly having to replace it, so this time I used parcel tape, dusted the back with my anti-static powder tool and it lasted through 24 cuts and I suspect would have been good for lots more.
I fixed the silver circle to the white cardstock circle and layered up 5 frames. I fixed some sequins and white stars die cut with Tim Holtz/Sizzix Snowglobe 2 Thinlits to the background. I fixed 3D foam tape behind where the first snowbank will be and sprinkled in more sequins. The foam tape will make sure the loose sequins stay in the top half of the shaker.
I added the first acetate circle using Ranger Medium Matte, stamped the bottom section of the Tattered Snowman on to the snowbank with Black Soot Archival ink, fixed it in place and added the trees die cut with Tim Holtz/Sizzix Home From The Holidays Thinlits.
I added stars die cut from the silver Metallic Kraftstock to the trees but forgot to photograph that step and Tip No 2...poke all these teeny die cuts into a bowl until you are ready to use them, otherwise and I know from experience, they have a habit of going walk-about.
I stamped the Tattered Snowman image on to Distress Watercolor card with Black Soot Archival Ink and Distress Faded Jeans Oxide ink, die cut using the matching Framelits and fussy cut his hat.
I layered up 5 more frames, added another snowbank, a sprinkling of sequins and the second acetate circle. I added 2 more frames and the final frame which was cut from white cardstock covered with Stick-It. I removed the Stick-It and sprinkled the frame with Nuvo Snow Glow Sparkling Dust and added silver Metallic Kraftstock and white die cut stars to the acetate...
and finished off with a Silver Metallic Trimmings hanger and bow.
Hugs Kath xxx
I used exactly the same techniques for the Tattered Santa/Gift Ornament and will be keeping this one for my own tree which is decorated in traditonal red and gold...
I hope I've inspired you to look out your scrap pieces of cardstock and make some ornaments to decorate your tree. I'll be back on Friday to share another project for the Tim Holtz Holiday Inspiration Series 2017...until then...
Happy CraftingHugs Kath xxx


Kath these are gorgeous, no wonder your making lots for friends, never made one myself, but after seeing all this I am inspired to have ago....thanks for the tute...xx
ReplyDeleteThese are fabulous Kath, love the scenes you have created with these shaker baubles.
ReplyDeleteHugs
Linda xxx
I can't even say how much I love these ornaments!!!
ReplyDeleteI love them all. What super gifts for friends & family.
ReplyDeleteToni xx
Absolutely so clever, and oh so so so cute! LOVE these. PINNED!
ReplyDeleteYou are definitely on a roll, my dear and talented friend! These look so professional, I reckon you will be taking orders soon from high end stores!! They really are beautiful, I just adore that Father Christmas, he has such a lovely face. Hugs, Anne xxx
ReplyDeleteAnother oh so cute and fun ornament. I am delaying my package mailing until I can make ornaments, not so inspired. pinned for sure. thanks as always for sharing.
ReplyDelete