Monday, July 29, 2019

Simon Says - Bright and Cheerful

Hi Everyone...welcome to another week on the Simon Says Stamp Monday Challenge Blog Thank you for joining us for last week's challenge and we hope you can join us this week too because

and the theme for this week is...
BRIGHT AND CHEERFUL
I created a page in my Dylusions Small Creative Journal using favourite colours of Distress Oxide inks with the Splotches Mini Layering Stencil from Set 9, Tim Holtz/Stampers Anonymous Media Marks 1, Blockprint and Sizzix Alphanumeric CutOut Lower Thinlits

I began by applying a coat of Dina Wakley White Gesso on the pages
and blended Abandoned Coral, Fossilized Amber, Spiced Marmalade and Evergreen Bough Distress Oxide inks randomly on the background using the Splotches Mini Layering Stencil from Stencil Set 9
I inked the leaf stem image from Tim Holtz/Stampers Anonymous Media Marks 1 with Black Soot Distress Archival and stamped directly on to the pages. To fill the gap at the centre of the journal, I stamped the image on to Idea-ology Plain Collage Paper, painted around it with a wet brush, teased apart and fixed in place with Distress Collage Medium Matte.
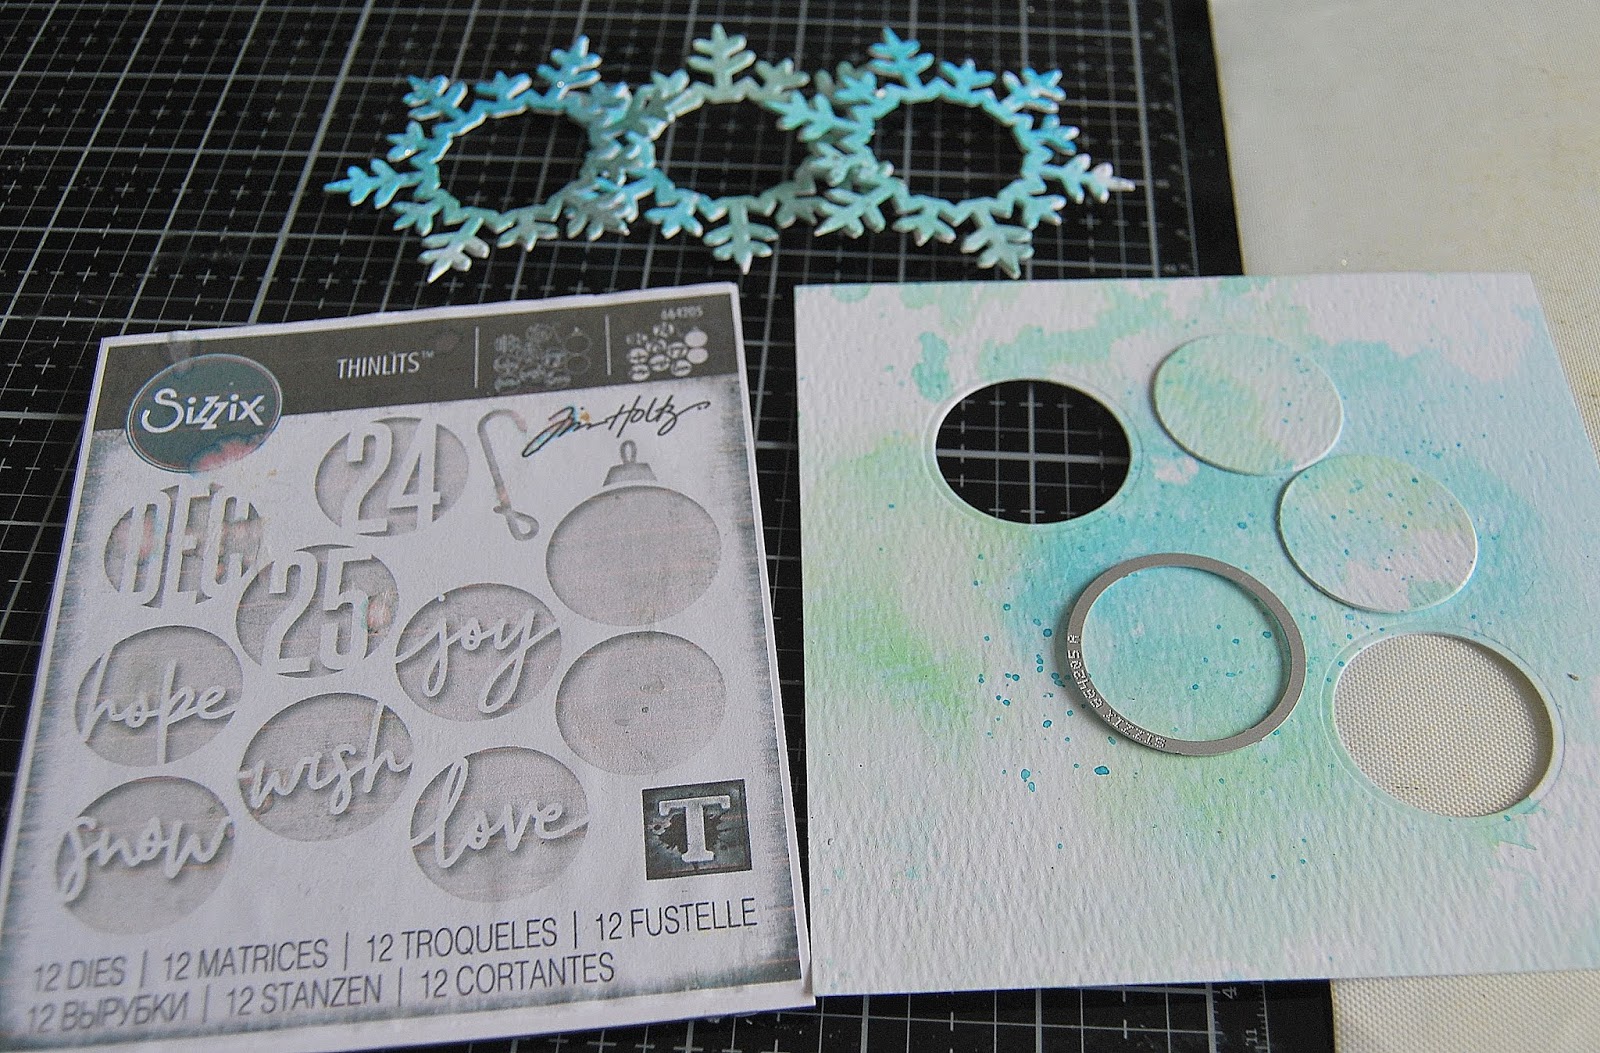
I stamped the circle image from the stamp set, laid the stencil back in place, used a Sharpie Black Fineliner pen to outline some of the circles and added dots with a Sakura Black Gelly Roll Pen.
I stamped more of the images from the stamp set using Black Soot Distress Archival, Spiced Marmalade and Evergreen Bough Distress Oxide inks and stamped the letters from Tim Holtz/Stampers Anonymous Blockprint inked with Evergreen Bough
I fixed Tim Holtz/Sizzix Adhesive Sheets to scraps of Classic Kraft Stock and die-cut using Sizzix Alphanumeric CutOut Lower and CutOut Script Thinlits


You can find all the products I used over at Simon Says Stamp, just click on the links below

Why don't you pop over to the Monday Challenge Blog and check out the amazing creations from my very talented Design Team mates and as always you all have the chance to win a $50 gift voucher to spend at Simon Says StampYou have until Monday 8am Ohio time...1pm UK time...2 pm CET to join in...

You can also follow Simon Says Stamp on Instagram
and if you use Instagram...
please add #sssmchallenge to your entry uploads so we can see them on there too

I look forward to seeing what you create this week...
Have Fun and Happy Crafting
Hugs Kath xxx


** Where available I use compensated affiliate links which means if you make a purchase I receive a small commission at no extra cost to you. You can find my affiliate and product disclosure HERE.

Friday, July 26, 2019

Tim Holtz/Sizzix Chapter 3 - Let It Snow

Hi folks, I'm sharing the last of the projects I made for the Facebook Live launch of the Tim Holtz/Sizzix Chapter 3 release and if you missed the Facebook Live, you can check out all the amazing dies and inspirational projects over on Tim's blog...Halloween HERE and Christmas HERE
Today's card was made using Tim Holtz/Sizzix Circle Words, Wreath Snow, Festive Things Thinlits and Handmade BigZ XL Die and with all that sparkly glitter, I should have known my camera would have a hissy fit.

I began by trimming Distress Watercolor card to measure 5.1/2" square. I smooshed Cracked Pistachio, Broken China and Evergreen Bough Distress Oxide inks on to my Glass Media Mat, spritzed with water and dragged the panel through the inks to pick up the colour.
I die-cut 3 snowflakes from Distress Watercolor card using Wreath Snow Thinlits and tapped them into the ink left over on my Glass Media Mat.
I placed them in my Splatbox, spritzed with Distress Resist Spray and dusted with Distress Vintage Platinum Glitter using the Glitter Duster.
I die-cut 2 circles from the watercolor card panel using the larger circle from the Circle Words Thinlits.
I placed the panel on to white cardstock cut to the same size and fixed the negative circles in place with Distress Collage Medium Matte.
I die-cut the mittens from Distress Watercolor card and Classic Kraft Stock using Festive Things Thinlits and fixed to the die-cut circle using Tim Holtz/Sizzix Mini Foam Adhesive.
I die-cut a frame using the two circle dies from Circle Words and another frame using the larger circle and snow word dies.
I fixed the die-cut snowflakes over the circle apertures and added the the die-cut frames. I sprinkled the panel with Stampendous Shabby White Embossing Enamel and heat set from underneath until it was melted.
I fixed Tim Holtz/Sizzix Adhesive Sheet to a scrap of white card, removed the backing and sprinkled with Distress Vintage Platinum Glitter. I laid the backing sheet back in place and burnished with a scoring tool. To prevent the glitter from sticking to the foam on my BigZ die or indeed taking up permanent residence on my workdesk, the cubbyhole floor, my clothes or my hair, I applied a coat of Distress Collage Medium over the top and let it dry before die-cutting. It will look cloudy at first but once the Collage Medium dries, the glitter will return to it's beautifully sparkly self but will stay on the card where it belongs. I dispense the Collage Medium Matte on to my glass media mat because your brush may pick up some of the glitter and you don't want to be dipping a glittery brush back into your pot of Collage Medium.
I die-cut the letters using the Handmade BigZ XL die and fixed in place with Distress Collage Medium Matte. I drew around the edge of the panel with a Versamark Pen, sprinkled with the Vintage Platinum Glitter and then applied Distress Collage Medium Matte over the whole panel to seal in the glitter.


I die-cut the mittens, coffee cup and stars from white card and Classic Kraftstock using the Festive Things Thinlits and fixed in place with Distress Collage Medium Matte and Mini Foam adhesive. I finished by matting the panel on to panels of white card and Classic Kraftstock and fixed to a 6" square White Card Blank. 

Have a great weekend whatever you are planning. It's been a tough week without my Furry Partner but weather permitting I'm hoping to have a big tidying-up session in the garden and I'll see you all on Monday to share my DT Project for Simon Says Stamp Monday Challenge.
Hugs Kath xxx


*** Where available I use compensated affiliate links which means if you make a purchase I receive a small commission at no extra cost to you. You can find my affiliate and product disclosure HERE

Thursday, July 25, 2019

Tim Holtz/Sizzix Chapter 3 - Happy Haunting Shaker Card

Hi folks, I'm back to share another Halloween sample I made for the Facebook Live launch of the new Tim Holtz/Sizzix Chapter 3 dies release. If you missed the Facebook Live, you can check out all the amazing goodies and the fabulous inspirational projects on Tim's blog...Halloween HERE and Christmas HERE. And the good news is, all the Chapter 3 products are available to buy NOW from your favourite retailer.
Today's project is a spooky Happy Haunting Shaker card using the Skull & Crossbones BigZ die with Frightful Things and Regions Beyond Thinlits and using Dimensional Domes to create the shaker element.

I began by trimming Distress Watercolor card to create a 4.3/4" x 6.3/4" panel and die-cut the apertures using the larger of the two globe circle dies from Regions Beyond Thinlits
I smooshed Carved Pumpkin and Wilted Violet Distress Oxide inks on to the craft mat on my Tim Holtz Glass Media Mat, spritzed with water and dragged the card through the ink, dried, spritzed with water and tapped back into the ink to pick up the remaining droplets of ink.
I fixed Tim Holtz/Sizzix Adhesive Sheet to Black Classic Kraft Stock, sanded to reveal the kraft core and die cut the spiders web using the Frightful Things Thinlits. Adhesive Sheets really are a game-changer when it comes to fixing intricate die-cuts, no mess, no faffing around trying to apply teeny dots of adhesive, just remove the backing and you're good to go.
I added Black Soot Distress Oxide ink around the edges of the panel and apertures using a Mini Round Blending Tool. I trimmed a second panel of Simon Says Stamp #120 Ultra White Card to the same size, placed it behind the coloured panel, traced around the circles with a pencil to ensure correct placement and die-cut using the smaller globe circle die from Regions Beyond
I fixed the panels together using Distress Collage Medium Matte. I die cut a bone 3 times from white Card using the Skull & Crossbones BigZ die and layered to create dimension. I coloured the bone with Antique Linen and Black Soot Distress Ink using a mini round blending tool and fixed in place with Tim Holltz Mini Foam Adhesive. I  used my Tim Holtz Craft Pick and Sakura Black Micron Pen to create faux thread hangers, added the spiders from Frightful Things Thinlits die-cut from Black Classic Kraft Stock and splatters of Black Soot Distress Paint.
I applied Distress Collage Medium Matte to 3 scraps of Black Classic Kraft Stock, to provide a sticky surface for the Prima Mini Art Stones to adhere to because, if you've used them before, you'll know they are inclined to fly everywhere. I die-cut the ghost, skull and bones from white card using Frightful Things Thinlits and fixed the ghost and skull in place with Tim Holtz/Sizzix Mini Foam Adhesive. I left the bones loose to create the shaker element, carefully sprinkled extra Mini Art Stones on each square, removed the adhesive backing from the Dimensional Domes and quickly, with fingers crossed, placed them on top and pressed firmly around the edges to make sure they were secure.
I fixed the Dimensional Domes behind the apertures using Distress Colllage Medium Matte and added Idea-ology Chit Chat Stickers
I finished off by matting the panel to a 5" x 7" card blank covered with Purple Classic Kraft Stock, sanded to reveal the kraft core.
The Chapter 3 dies are available to buy from your favourite retailers now so if you want to get ahead with your Seasonal makes, I would suggest you don't tarry, just saying. I'll be back tomorrow to share the last of my Facebook Live makes.
Hugs Kath xxx


*** Where available I use compensated affiliate links which means if you make a purchase I receive a small commission at no extra cost to you. You can find my affiliate and product disclosure HERE

Tuesday, July 23, 2019

Tim Holtz/Sizzix Chapter 3 - Circle Words

Hi folks, I'm sharing a shaker card I made for the Facebook Live launch of Tim Holtz/Sizzix Chapter 3 release using the Circle Words Thinlits. If you missed the Facebook Live, you can check out all the must-have products and inspirational samples on Tim's blog...Halloween HERE and Christmas HERE.

I began by die-cutting Tim Holtz/Sizzix Branches from Mixed Media Heavystock, added Distress Grit Paste randomly to create the look of snow and set aside to dry.
I trimmed Distress Watercolor card to create a 5" x 7" panel, smooshed Weathered Wood Distress Oxide on to a piece of plastic, spritzed with water, laid on to the card panel and pressed with my fingers, allowing the ink to absorb into the card.
 I dried the ink and repeated the process with Faded Jeans and Stormy Sky
I stamped the snowflake image from Tim Holtz/Stampers Mini Swirly Snowflakes inked with Weathered Wood on the panel.
and added splatters of White Gesso
I die-cut the panel using Tim Holtz/Sizzix Circle Words Thinlits, retaining the waste pieces.
I used the circle words and the larger of the two circle dies to create a frame for each aperture, die-cut from Distress Watercolor card and fixed in place with Distress Collage Medium Matte.
I laid the panel on to a piece of white cardstock , marked where the apertures would be with a pencil and fixed scraps of Sizzix Adhesive Sheet  to cover each aperture. I then puzzled pieced the waste back in place.

I stitched around the edges of the front panel and also stitched down to each aperture to create the bauble hangers using Silver Sparkle thread.
I smooshed the 3 colours of Distress Oxide inks along with Black Soot on to my Glass Media Mat, spritzed with water and painted on to the Branches die-cut, drying between layers until I was happy with the result
I flipped the front panel over and fixed a scrap of acetate to cover each aperture. I added Sizzix Mini Foam Adhesive around each aperture and the edges of the panel, added Ice Crystal sequins and fixed the back panel in place. I fixed the branch on the front of the panel using Distress Collage Medium Matte.
I coloured a scrap of Distress Watercolor card with Faded Jeans Distress Oxide ink using the direct to paper technique, applied a thin coat of Distress Collage Medium Matte and dusted with Distress Clear Rock Candy Glitter. Once it was dry, I die-cut the bauble hangers and fixed in place above the Circle Words with Sizzix Mini Foam Adhesive.
I finished off by adding a Silver Sparkle thread bow to the branch
Ice Crystal Sequins on the Circle Words and snowflakes and fixed the panel to a 5" x 7" white card blank
I have scheduled two more posts for this week to share the last of the projects I made for the Facebook Live Chapter 3 release because I'm back in the cubbyhole and keeping myself busy making secret stuff, just the distraction I need at the moment to get me back in the crafty swing.

Toodle-oo for now
Hugs Kath xxx


*** Where available I use compensated affiliate links which means if you make a purchase I receive a small commission at no extra cost to you. You can find my affiliate and product disclosure HERE