Hi folks, I'm sharing the last of the projects I made for the Facebook Live launch of the Tim Holtz/Sizzix Chapter 3 release and if you missed the Facebook Live, you can check out all the amazing dies and inspirational projects over on Tim's blog...Halloween
HERE and Christmas
HERE
Today's card was made using Tim Holtz/Sizzix Circle Words, Wreath Snow, Festive Things Thinlits and Handmade BigZ XL Die and with all that sparkly glitter, I should have known my camera would have a hissy fit.
I began by trimming Distress Watercolor card to measure 5.1/2" square. I smooshed Cracked Pistachio, Broken China and Evergreen Bough Distress Oxide inks on to my Glass Media Mat, spritzed with water and dragged the panel through the inks to pick up the colour.
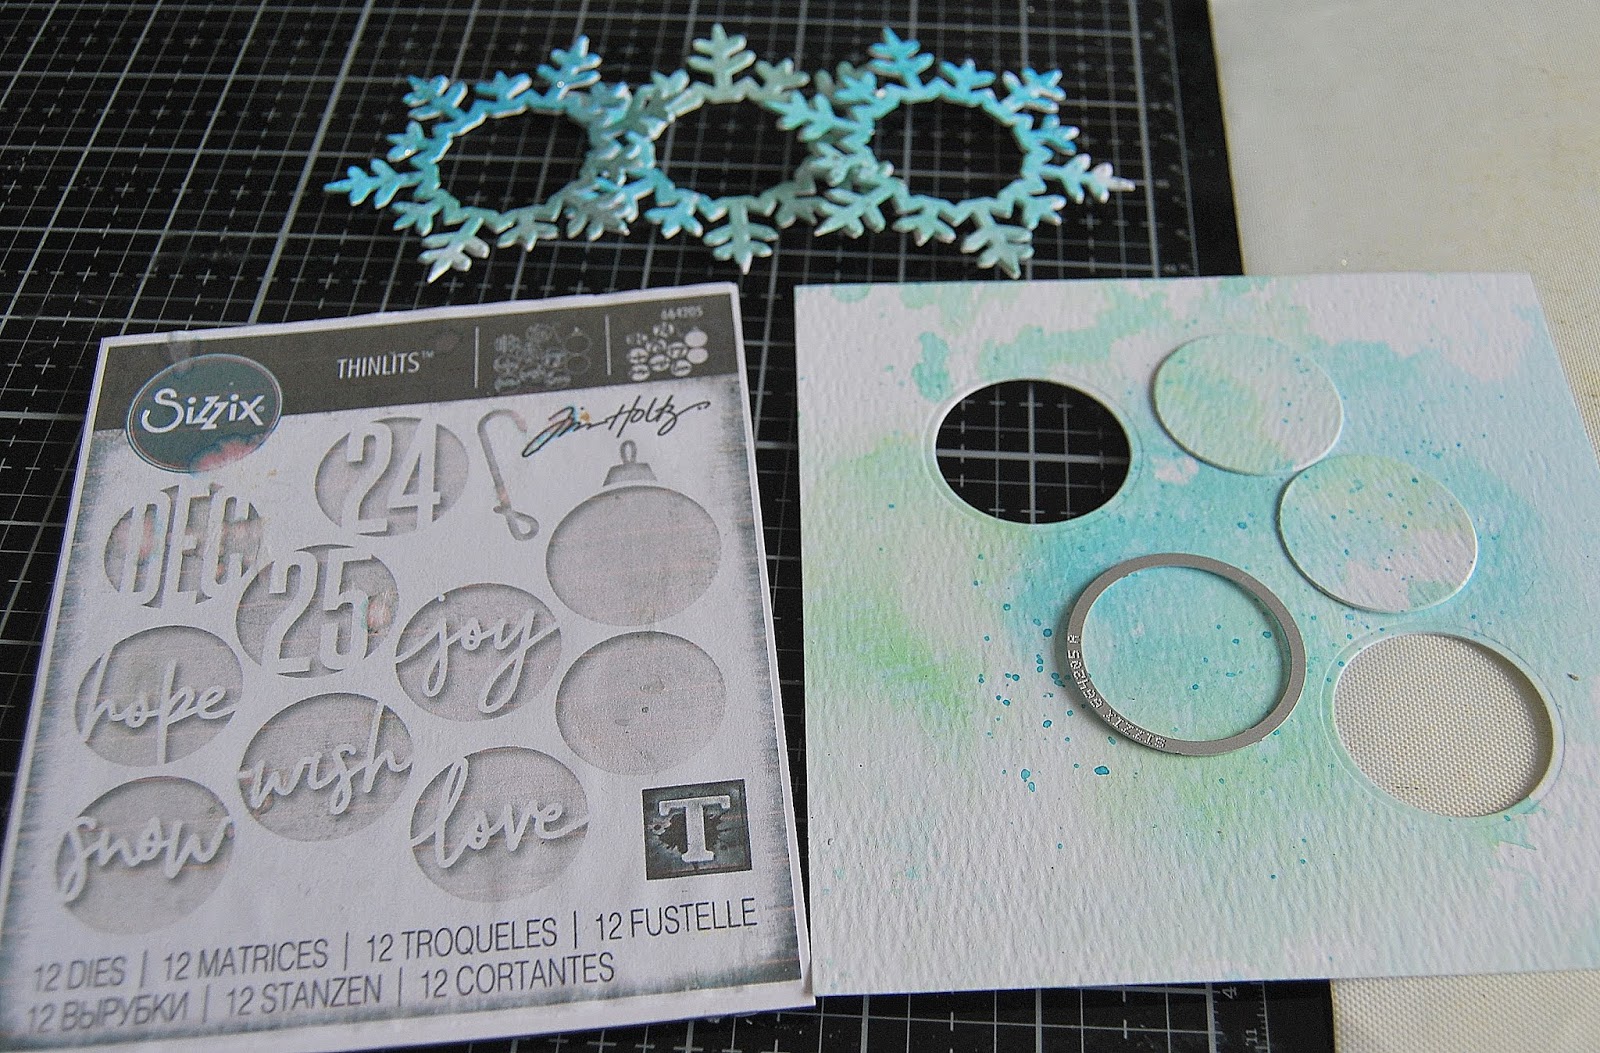
I die-cut 3 snowflakes from Distress Watercolor card using Wreath Snow Thinlits and tapped them into the ink left over on my Glass Media Mat.
I placed them in my Splatbox, spritzed with Distress Resist Spray and dusted with Distress Vintage Platinum Glitter using the Glitter Duster.
I die-cut 2 circles from the watercolor card panel using the larger circle from the Circle Words Thinlits.
I placed the panel on to white cardstock cut to the same size and fixed the negative circles in place with Distress Collage Medium Matte.
I die-cut the mittens from Distress Watercolor card and Classic Kraft Stock using Festive Things Thinlits and fixed to the die-cut circle using Tim Holtz/Sizzix Mini Foam Adhesive.
I die-cut a frame using the two circle dies from Circle Words and another frame using the larger circle and snow word dies.
I fixed the die-cut snowflakes over the circle apertures and added the the die-cut frames. I sprinkled the panel with Stampendous Shabby White Embossing Enamel and heat set from underneath until it was melted.

I fixed Tim Holtz/Sizzix Adhesive Sheet to a scrap of white card, removed the backing and sprinkled with Distress Vintage Platinum Glitter. I laid the backing sheet back in place and burnished with a scoring tool. To prevent the glitter from sticking to the foam on my BigZ die or indeed taking up permanent residence on my workdesk, the cubbyhole floor, my clothes or my hair, I applied a coat of Distress Collage Medium over the top and let it dry before die-cutting. It will look cloudy at first but once the Collage Medium dries, the glitter will return to it's beautifully sparkly self but will stay on the card where it belongs. I dispense the Collage Medium Matte on to my glass media mat because your brush may pick up some of the glitter and you don't want to be dipping a glittery brush back into your pot of Collage Medium.

I die-cut the letters using the Handmade BigZ XL die and fixed in place with Distress Collage Medium Matte. I drew around the edge of the panel with a Versamark Pen, sprinkled with the Vintage Platinum Glitter and then applied Distress Collage Medium Matte over the whole panel to seal in the glitter.
I die-cut the mittens, coffee cup and stars from white card and Classic Kraftstock using the Festive Things Thinlits and fixed in place with Distress Collage Medium Matte and Mini Foam adhesive. I finished by matting the panel on to panels of white card and Classic Kraftstock and fixed to a 6" square White Card Blank.
Have a great weekend whatever you are planning. It's been a tough week without my Furry Partner but weather permitting I'm hoping to have a big tidying-up session in the garden and I'll see you all on Monday to share my DT Project for Simon Says Stamp Monday Challenge.
Hugs Kath xxx
*** Where available I use compensated affiliate links
which means if you make a purchase I receive a small commission at no extra
cost to you. You can find my affiliate and product disclosure HERE


Stunning card Kath so much detail and can only imagine how empty the cubby hole must feel but he is still watching you in spirt
ReplyDeleteI am so glad that you 'enabled' me to buy that die set, I am looking forward to using it. If I can make a card half as stunning as this one I will be happy.
ReplyDeleteI wish I could say some words of comfort, I know how hard it is for you. No consolation but I am thinking of you and hope each day gets easier for you my lovely friend. Big hugs, Anne xxx
You card is beautiful Kath! I love this idea about the collage medium over the glitter, that’s so smart, and you may even see more glittery projects from me as a result! I’ve been thinking about you and I am sure that it must be so difficult. Hopefully a good spot of gardening will distract your brain for a bit! xxx
ReplyDeleteGenius! Putting Collage Medium over the glitter to seal it. Love the sparkle, hate the mess glitter makes, even after the project is finished. Thinking of you in your time of loss...
ReplyDeleteAnother fabulous Christmas card, love the background and design. Have a wonderful weekend.
ReplyDeleteHugs
Linda xxx
So beautiful Kath the background is stunning as always you put your heart into card making l hope things ease for you sending lots of love x
ReplyDeleteThis is a beautiful card Kath! The colors are just gorgeous and I love all that glitter on it. Thanks for sharing the tip on using the glitter. 😍😍😍
ReplyDelete