So let's start off with the card on the right
I added Sizzix Adhesive Sheets to Red and the kraft side of Classic Kraft Stock
and added the self adhesive die-cut deer, houses, larger stars and birds back into the negative spaces, just like doing a jigsaw puzzle
I added Sizzix Adhesive Sheet to the back of white cardstock and die cut the sentiment 4 times using Tim Holtz/Sizzix Christmas Ribbon Thinlitsand I'm sharing a little tip for lining up this beautiful script sentiment. I place the first die-cut back into the negative space which holds it in place and prevents it from getting distorted. I then remove the adhesive sheet backing from the next die-cut and nudge it into place with my trusty Tim Holtz Craft Pick and press down to make sure it's secure before repeating the process with the others.
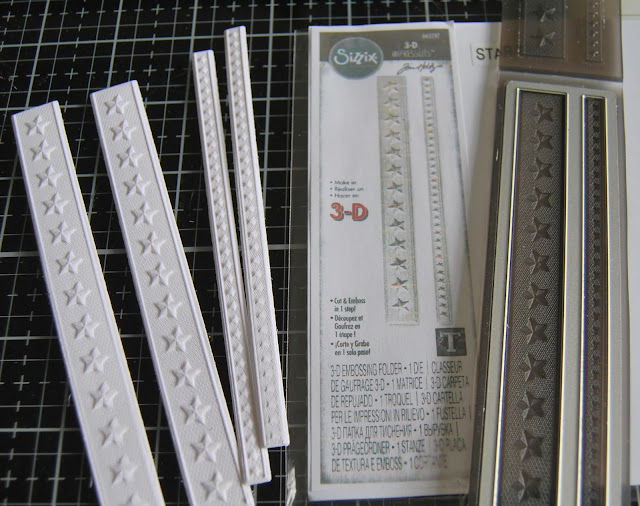
I embossed and die cut white cardstock using the Tim Holtz/Sizzix Star Trim 3D Impresslits
and wow, wow, wow check out the beautiful textured detail behind those very dimensional stars.
I trimmed a piece of acetate to be the same width but slightly longer than the panel, scored at 5.1/2", folded over the top edge of the panel and fixed on the back of the panel with Ranger Wonder Tape.
I added the sentiment on the front of the acetate and added extra waste die-cuts popped up on Tim Holtz/Sizzix Mini Foam Adhesive to create dimension and to make the acetate stand away from the panel.
I added Ranger Wonder Tape to the top edge of the panel underneath the acetate to hold the acetate down at the top and fixed the 3D Impresslits Star Trims on top of the acetate panel using Distress Collage Medium Matte.
and matted the panel on to a 4.1/2" x 5.3/4" White card
The pile of die-cut waste on my workdesk was becoming bigger so I made another card.
I die-cut a panel from white cardstock backed on to white cardstock and puzzled pieced the different colours of waste into the negative spaces
and added the sentiment die-cut from Classic Kraft Stock with Tim Holtz/Sizzix Handwritten BigZ XL and Label Letters Thinlits
I applied a coat of Distress Collage Medium Matte over the panel to ensure that everything will stay in place and coloured the edges with a Vintage Photo Distress Crayon, blending it out with a damp finger. I matted the panel on to Red Classic Kraft Stock and a Kraft Card Blank and added twine and a bow.
But I had only made a very small dent in the mountain of waste so I created some tags using Tim Holtz/Sizzix Stacked Tags Thinlits, added some snowbanks, Christmas Remnant Rubs and a generous spritzing of Distress Clear Rock Candy Glitter using the Glitter Duster.
And the obsession continues, I managed to sneak in one last play before I set this amazing "more bang for your buck" Nordic Winter die aside and have fun with the rest of the release and will be sharing tomorrow.
And the obsession continues, I managed to sneak in one last play before I set this amazing "more bang for your buck" Nordic Winter die aside and have fun with the rest of the release and will be sharing tomorrow.
Hugs Kath xxx

*** Where available I use compensated affiliate links
which means if you make a purchase I receive a small commission at no extra
cost to you. You can find my affiliate and product disclosure HERE


Love the Nordic Winter die; love your super cute cards and gift tags. If ever there was "bang for your buck," it must be this die! Thanks, Kath, for a bunch of great ideas for using this die, for the inspiration, and great tutorials.
ReplyDeleteThese are fabulous Kath, loving the designs and step by step instructions.
ReplyDeleteHugs
Linda xxx
Amazing!! Loving the rustic woodsy designs. Thanks for sharing your talent and also the step by step instructions!!
ReplyDeleteI love the die even more now, seeing your makes close up - they are exquisite my friend! The acetate idea is such a clever way to add the sentiment without detracting from the design too. Hugs, Anne xx
ReplyDeleteThese cards Kath are stunning x
ReplyDeleteLove this Kath. What a great showcase of the versatility of this die. I am so inspired. -- Mary Elizabeth
ReplyDeleteWonderful cards and tags. I purchased this die recently, and after reading this post, I am inspired to start using it. Thanks for sharing your creativity.
ReplyDeleteThese are fabulous cards! Thank you for sharing the details.
ReplyDelete