


Trim white cardstock to measure 8.¼” x 11"
On the short side score at ½” 3” and 5.½”

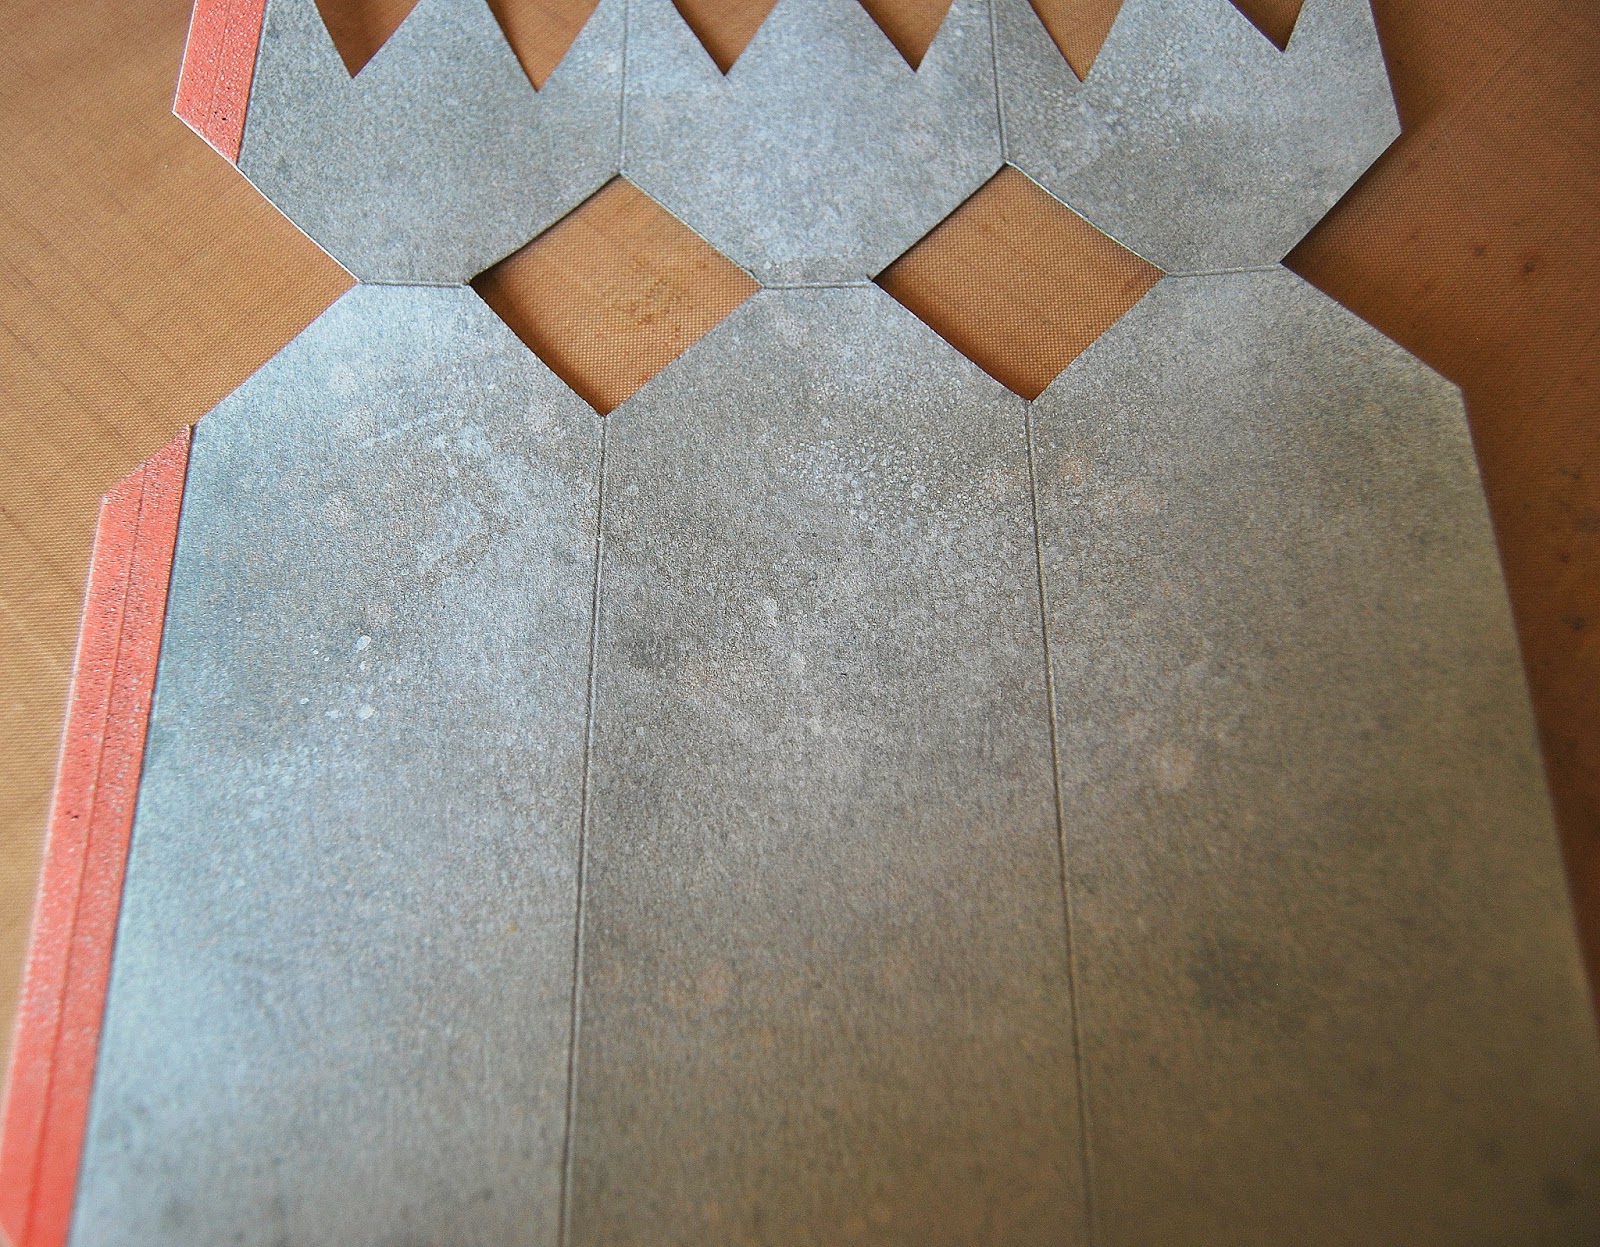
On the long side score at 3” and 9”

Cut away the 2 outer panels. Mark the centre of the middle panel, score from the edges to the centre and trim to leave a small flap at each side which will create the bottom of the box

Cut out 2-1" squares from cardstock to use as templates...line the square up with the scored lines and mark with a pencil. Mark the centre of the other square and trim to create a triangle...use to mark the zig zag effect at the top of the box. Cut out with a craft knife and erase any pencil marks.


Now that we've got the mechanics out of the way it's time for the fun part..spritz Iced Spruce Distress Spray Stain on to your craft mat.

Pick up the colour with a baby wipe and swipe on to the box with circular motions until covered...then dry with a heat tool...

Spritz with Iced Spruce, Brushed Pewter and Picket Fence drying between each layer until you are happy with the colour...

Stamp the reindeer from Styled Woodlands with Potting Soil Archival Ink onto a piece of white cardstock 3 times.

Cut out the reindeer leaving a small border all round and fix in place. Stamp the pine cone branches at the neck of the box.


Add dots of Glossy Accents to the Pine Cone Branches and create lines between the reindeer and Sprinkle with Festive Berries Distress Glitter

Cut out a small tag, stamp the pine cone branch with Potting Soil and the sentiment with Red Geranium Archival Ink, ink around the edges with Iced Spruce Distress Ink

Gather the neck of the box together and tie with Red Ribbon, decorate with the tag and jingle bells


If you decide to make your own Christmas Cracker box...please e-mail me a link so that I can come and have a look and phew I think we all deserve another cuppa after that little marathon.
See you all tomorrow
Hugs Kath xxx
What a fabulous tutorial, love the finished box x
ReplyDeleteThe box is fantastic....but I think I better start now to make it for Christmas 2015. :) The tutorial is great by the way!
ReplyDeleteLove this box thanks for the step by step tutorial on how you created it . Will be adding to my fav.list .
ReplyDeleteКруто!Мне очень понравилось!
ReplyDeleteCool! I loved it!
This is fantastic Kath, in fact it's a cracker lol . I've just bought a load of a Distress Sprays and once my workshop is done etc, I am planning on having a okay with them. I'm so going to have a go at this and thank yuk for doing a very easy to follow tut. Love you xxx
ReplyDeleteokay, this is seriously clever. Love the sewing part - genius move. And the background, and the stamping, well really everything Kath. Fantastic!
ReplyDeleteHi Kath great project and many thanks for step by step.x
ReplyDeleteThank you for the super tutorial Kath. What a beautiful cracker box - TFS.
ReplyDeleteToni xx
Fabulous tut Kath, this is brilliant. Thanks for sharing. Your cracker looks so festive x
ReplyDeleteThank you Kath that was fab. The detail is awsome. X
ReplyDeleteWhat a fabulous cracker Kath! I love, love, love it! You are one clever lady, I am definitely going to try this one... Hugs, Anne xx
ReplyDeleteOh wow Kath, this is just perfect! Thank you for the brilliant tutorial! x
ReplyDeleteThank you Kath for a lovely gift idea for the festive period. I will definitely give it a go and let you have a look.
ReplyDeleteLesley
Great project, thank you
ReplyDeletePositively awesome tutorial Kath. I adore the stitching in the snow and those glitter accents. Jenny x
ReplyDeleteI think this must have been a lot of work, but the result is beautiful!
ReplyDeleteLiselot
Cool for yuletide.....love it Kath!!! Fab tutorial too. Hugs Ann xx
ReplyDeleteWhat an amazing tutorial Kath - Will have to have a go at this. I love your effort - superb!
ReplyDeleteSarah x
!WOW! Fantastic tutorial and thank you for sharing this your finshed cracker is absolutely stunning the elements used are just perfect and the sentiment and ribbon just finish it off to perfection!! one very talented lady who l'm so pleased to know as a blogging friend x
ReplyDeleteWOW,this is amazing and so effective and pretty.Well done with the tutorial and thanks for sharing.xx
ReplyDeleteWow Kath, I will have a go at this one soon. I saw your bag and card in the fiskars email and recognised it as yours. Fantastic work!
ReplyDeleteBeautiful cracker Kath, lovely details and thanks for the tutorial - l just need to find time to give it a go x Susan x
ReplyDeleteThanks for the tutorial Kath, sorry not been around. Not blogged since September until yesterday. Love and crafty hugs xChriSb
ReplyDeletewhat a wonderful project! so creative and inspiring ^.^ thank you very much for sharing
ReplyDeleteAwesome box, fabulous tutorial, love the colors and those new stamps are awesome !
ReplyDeleteSuch a gorgeous creation - thanks for generously sharing your tutorial!
ReplyDeleteRebecca.
x