It all started out with a background I had left over from playing with the Sizzix 3D Foundry Texture Fade and Alcohol Inks. I coloured Idea-ology Gold Metallic Kraftstock with Valencia, Mushroom and Gold Mixative Alcohol Inks, spritzed back and front with water and ran it through my Big Shot 3 times. I then used the Idea-ology Sanding Grip to remove colour and highlight the detail
and wow the shimmer from the cardstock and Gold Mixative is amazing
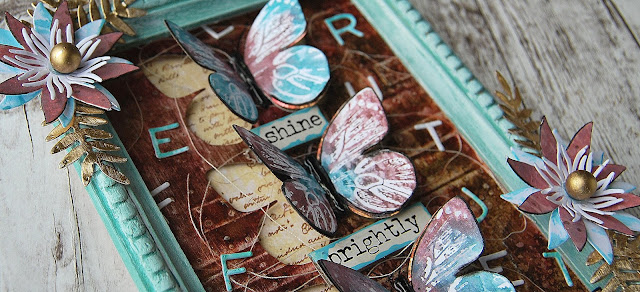
I die cut the butterfly using Tim Holtz/Sizzix Flutter Framelits with the Sizzix Dimensional Cutting Plate. This plate will replace your usual top cutting plate and when the groove on the plate is lined up with the centre of the butterfly, it will leave that section uncut, allowing you to bend up the wings to create dimension. I then flattened down the butterflies and stamped the matching image from Tim Holtz/Stampers Anonymous Flutter with Black Soot Archival, basically to add the antennae. On reflection, it would have been easier and more sensible to stamp first and then die cut but you live and learn in this crazy world of crafting.I coloured the matching butterfly stamp with Peacock Feathers and Aged Mahogany Distress Markers, spritzed the stamp with water and stamped on to Distress Watercolor card.
I die cut the butterflies and added the die cut bodies cut from cardstock coloured with a Black Soot Distress Marker
I coloured a panel of Distress Watercolor card with Antique Linen Distress Ink by dragging the ink pad over the card, flicked on droplets of water, stamped the script stamp from Tim Holtz/Stampers Entomology with Ground Espresso Archival ink and trimmed to fit behind the Alcohol Ink panel.I coloured a scrap of Distress Watercolor card with Peacock Feathers and Aged Mahogany Distress Inks, spritzed with water to remove some of the colour and die cut the word using Tim Holtz/Sizzix Alphanumeric Thinlits. I applied a coat of Distress Collage Medium Matte all over the background, added white thread and the left over letters from the die cut panel, adding some extras cut from white card.
Then I moved on to the Idea-ology Framed Panel, using only the frame, which I painted with a mix of Evergreen Bough and Broken China Distress Paints, because I was all out of Peacock Feathers which has now been added to my shopping list.
I drybrushed and used my finger to add White Gesso all over the frame.
I coloured scraps of Distress Watercolor card with Peacock Feathers and Aged Mahogany Distress Oxides using mini round blending tools and spritzed with water.To match up with the shimmery gold background, I spritzed the card with Distress Tarnished Brass Mica Spray
and die cut a selection of flowers and leaves from Distress Watercolor card coloured with a hint of Broken China Distress Paint, the aged mahogany card and Gold Metallic Kraft Stock using Tim Holtz/Sizzix Funky Floral 3 Thinlits.
I fixed the frame to the panel popped up on Tim Holtz/Sizzix Mini Foam to create dimension, fixed the flowers and leaves in place on the frame with Glossy Accents and added an Idea-ology Bauble Finding coloured with Gold Mixative to the centres of the flowers. I used a fabulous trick from Tim to colour the baubles...add a drop or two of Gold Mixative to a plastic cup, toss in the baubles, swirl them around and then tip out on to a paper towel. I then sprayed the cup with Rubbing Alcohol and used a paper towel to clean out the residue and my cup is ready for next time.
I cut an Idea-ology Quote Chip in half, tapped Broken China Distress Paint around the edges with my finger and fixed between the butterflies with Glossy Accents. I added Glossy Accents to the butterfly bodies, fixed the Flutter panel to white card and popped up on strips of Tim Holtz/Sizzix Mini Foam.
Have fun whatever you are creating today and I'll see you all soon
Toodle-oo for now
Hugs Kath xxx


Wow, Kath, this is stunning!!!! hugs to Buddy. Anesha :)
ReplyDeleteWOW! Kath this is fabulous! I love the design and gorgeous background with the beautiful floral embellishments.
ReplyDeleteHugs
Linda xxx
Stunning home decor piece Kath x Love the details
ReplyDeleteAnnie x
Absolutely beautiful work Kath and especially love the detailed tutorial. x
ReplyDeleteIt really is good to see the Dimensional Cutting Pad in use again, I had nearly forgotten about it! Your frame is stunning, from the 3D backing to the gorgeous butterflies and those beautiful flowers - I LOVE this so much Kath!! Hugs, Anne xx
ReplyDeleteKath, this is so pretty with perfect color choices. I always have trouble cutting out the centers of the flowers that you used (Funky Florals 3) even when I use a metal shim and wet the paper. They just don't cut all the way. What kind of paper do you use for your flower centers? I'm assuming it isn't watercolor paper because that would be way too thick. Thanks for your help. I love the flower centers but haven't been able to get them to cut so the whole floral set sits on my desk unused.
ReplyDeleteSTUNNING,in every way.xx
ReplyDelete