


It's the first challenge of October, and the design team are showcasing the fabulous products from Tim Holtz. I'm sure you will all have some of his awesome products in your crafty stash and I can't wait to see what you will choose to use!!
This week we are welcoming the lovely Tenia Nelson, aka Jazzy Paper Designs into the Designer Spotlight. If you haven't visited Tenia's blog before then you are in for a real treat! Please pop by to say 'Hi' and leave some love!
The theme for this week's challenge is...
TAG IT


if you're a regular visitor to the cubbyhole, you'll know that I store all my Tim Holtz Layering Stencils in tag books, so when the new Christmas Stencils arrived, I couldn't resist playing with the gorgeous Glorious Gatherings and Music and Advert Christmas release stamps from Tim to create a home for the new boys.


I used the backing sheet from the Falling Stars Layering as a template and trimmed two covers from Sizzix Mat Board

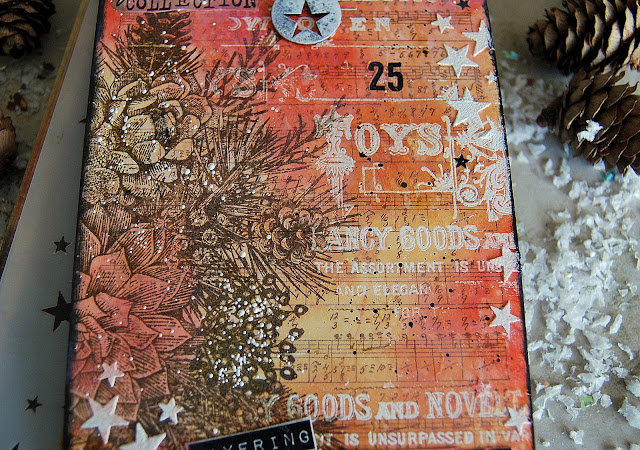
I trimmed a piece of Distress Mixed Media Heavystock to fit and coloured with Antique Linen, Old Paper Distress Oxides, Tea Dye and Rusty Hinge Distress Inks using the smooshing, drying, picking up the remaining droplets, spritzing etc etc technique that we are all now familiar with.

I stamped the Music background from Tim Holtz/Stampers Anonymous Music and Advert with Walnut Stain Distress Oxide ink.

and the Advert background randomly on the tag with Versamark and heat set with Ranger Superfine Distress Oxide ink. I then added Walnut Stain Distress Oxide to darken the areas with the embossing and wiped the ink off the embossing with a soft cloth.

I added Candied Apple Distress Oxide and more Rusty Hinge Distress Ink to the background using mini round blending tools
 I stamped Tim Holtz Glorious Gatherings with Ground Espresso Achival Ink, applied Ranger Texture Paste Opague through the Idea-ology Falling Stars Stencil and while it was still wet, sprinkled with Ranger Superfine White Embossing Powder and heat set once the Texture Paste was dry. It is important to let the paste dry before applying heat or it will bubble and distort.
 I added the typography cut from the Layering Stencil backing sheet and Idea-ology Christmas Remnant Rubs
 I fixed the panel to the front cover using Distress Collage Medium Matte and covered the back of the front cover and both sides of the back cover with left over papers from last year's Christmas Paper Stash Pad.
 I sprinkled Stampendous Frantage Chunky White Embossing Powder, heat set from underneath and coloured the edges of the covers with Black Soot Distress Paint using the dabber top.

 I added a double crinkle ribbon bow to the book ring and Idea-ology Christmas Tokens coloured with Picket Fence Distress Paint and hung from Eclectic Elements White Thread


Why don't you pop over to the Monday Challenge Blog and check out the amazing creations from my very talented Design Team mates and as always you all have the chance to win a $50 gift voucher to spend at Simon Says Stamp. You have until Monday 8am Ohio time...1pm UK time...2 pm CET to join in...

You can also follow Simon Says Stamp on Instagram
and if you use Instagram...
please add #sssmchallenge to your entry uploads so we can see them on there too

I look forward to seeing what you create this week...
Have Fun and Happy Crafting
Hugs Kath xxx
I do love how you store your stencils - this cover for your Christmas ones is fabulous!!! Gorgeous colours, stamping and stencilling, I just love everything about it! Hugs, Anne xxx
ReplyDeleteThis is fabulous, love the layers and wonderful design.
ReplyDeleteHugs
Linda xxx
LOVE this Kath!! Such fabulous storage for your stencils!! Absolutely GORGEOUS!!!
ReplyDeleteHope you have a lovely week
Luv
Lols x x x
Super gorgeous!!! Great idea to have a binder for just Christmas stencils too. I love the whole design.
ReplyDeleteSo beautiful Kath love the colours xx
ReplyDeleteOh my, so many layers of everything! Coloring, stamping, embossing, stanciling, this is so reach in details and patterns. I love the warm autumn colors, too. Hugs, Macarena
ReplyDeleteJust stunning! This tag cover for your stencil storage is just too beautiful. I love the layering of the stamps - especially the advert in white - and the glowing colours are amazing. Completely inspired (to shop for starters, and then to play, some day soon when I have some time!), thank you.
ReplyDeleteAlison x
Gorgeous tag book, it really captures the feel of Christmas and it's such a clever idea to create this specifically to hold, and store all the layering stencils! It's lovely Kath... Hugs x
ReplyDeleteYou are so skilled at using different mediums! I always enjoy seeing your creative processes and I think the idea to make a tag book was genius! You're always using that clever noggin of yours to invent new and interesting projects!
ReplyDeleteThis is such a brilliant idea to store stencils, Kath. Love the beautiful colors and texture on the background you created. All the details are amazing. :)
ReplyDeleteThis is so beautiful Kath! I love all the layers and the wonderful colors you used. Your stencil storage is so pretty! And organised!
ReplyDeleteSuch a clever stencil storage!!! Might steal your idea!!!
ReplyDeleteThis is amazing, Kath! So pretty and fabulous idea to story your tags! Hugs, Sandra
ReplyDeleteAs always a wonderful and clever project! love how you used new Christmas stamps! Barbara
ReplyDeleteBeautiful work! Thank you for sharing the details.
ReplyDelete