Sunday, April 7, 2024

Tim Holtz/Sizzix - Vault Watch Gears

Hello my friends, I'm back to share the cards I made for the Tim Holtz/Sizzix YouTube Live launch of the Vault 2 Collection using the Vault Watch Gears Thinlits.

Let's start off with the Shaker Card.
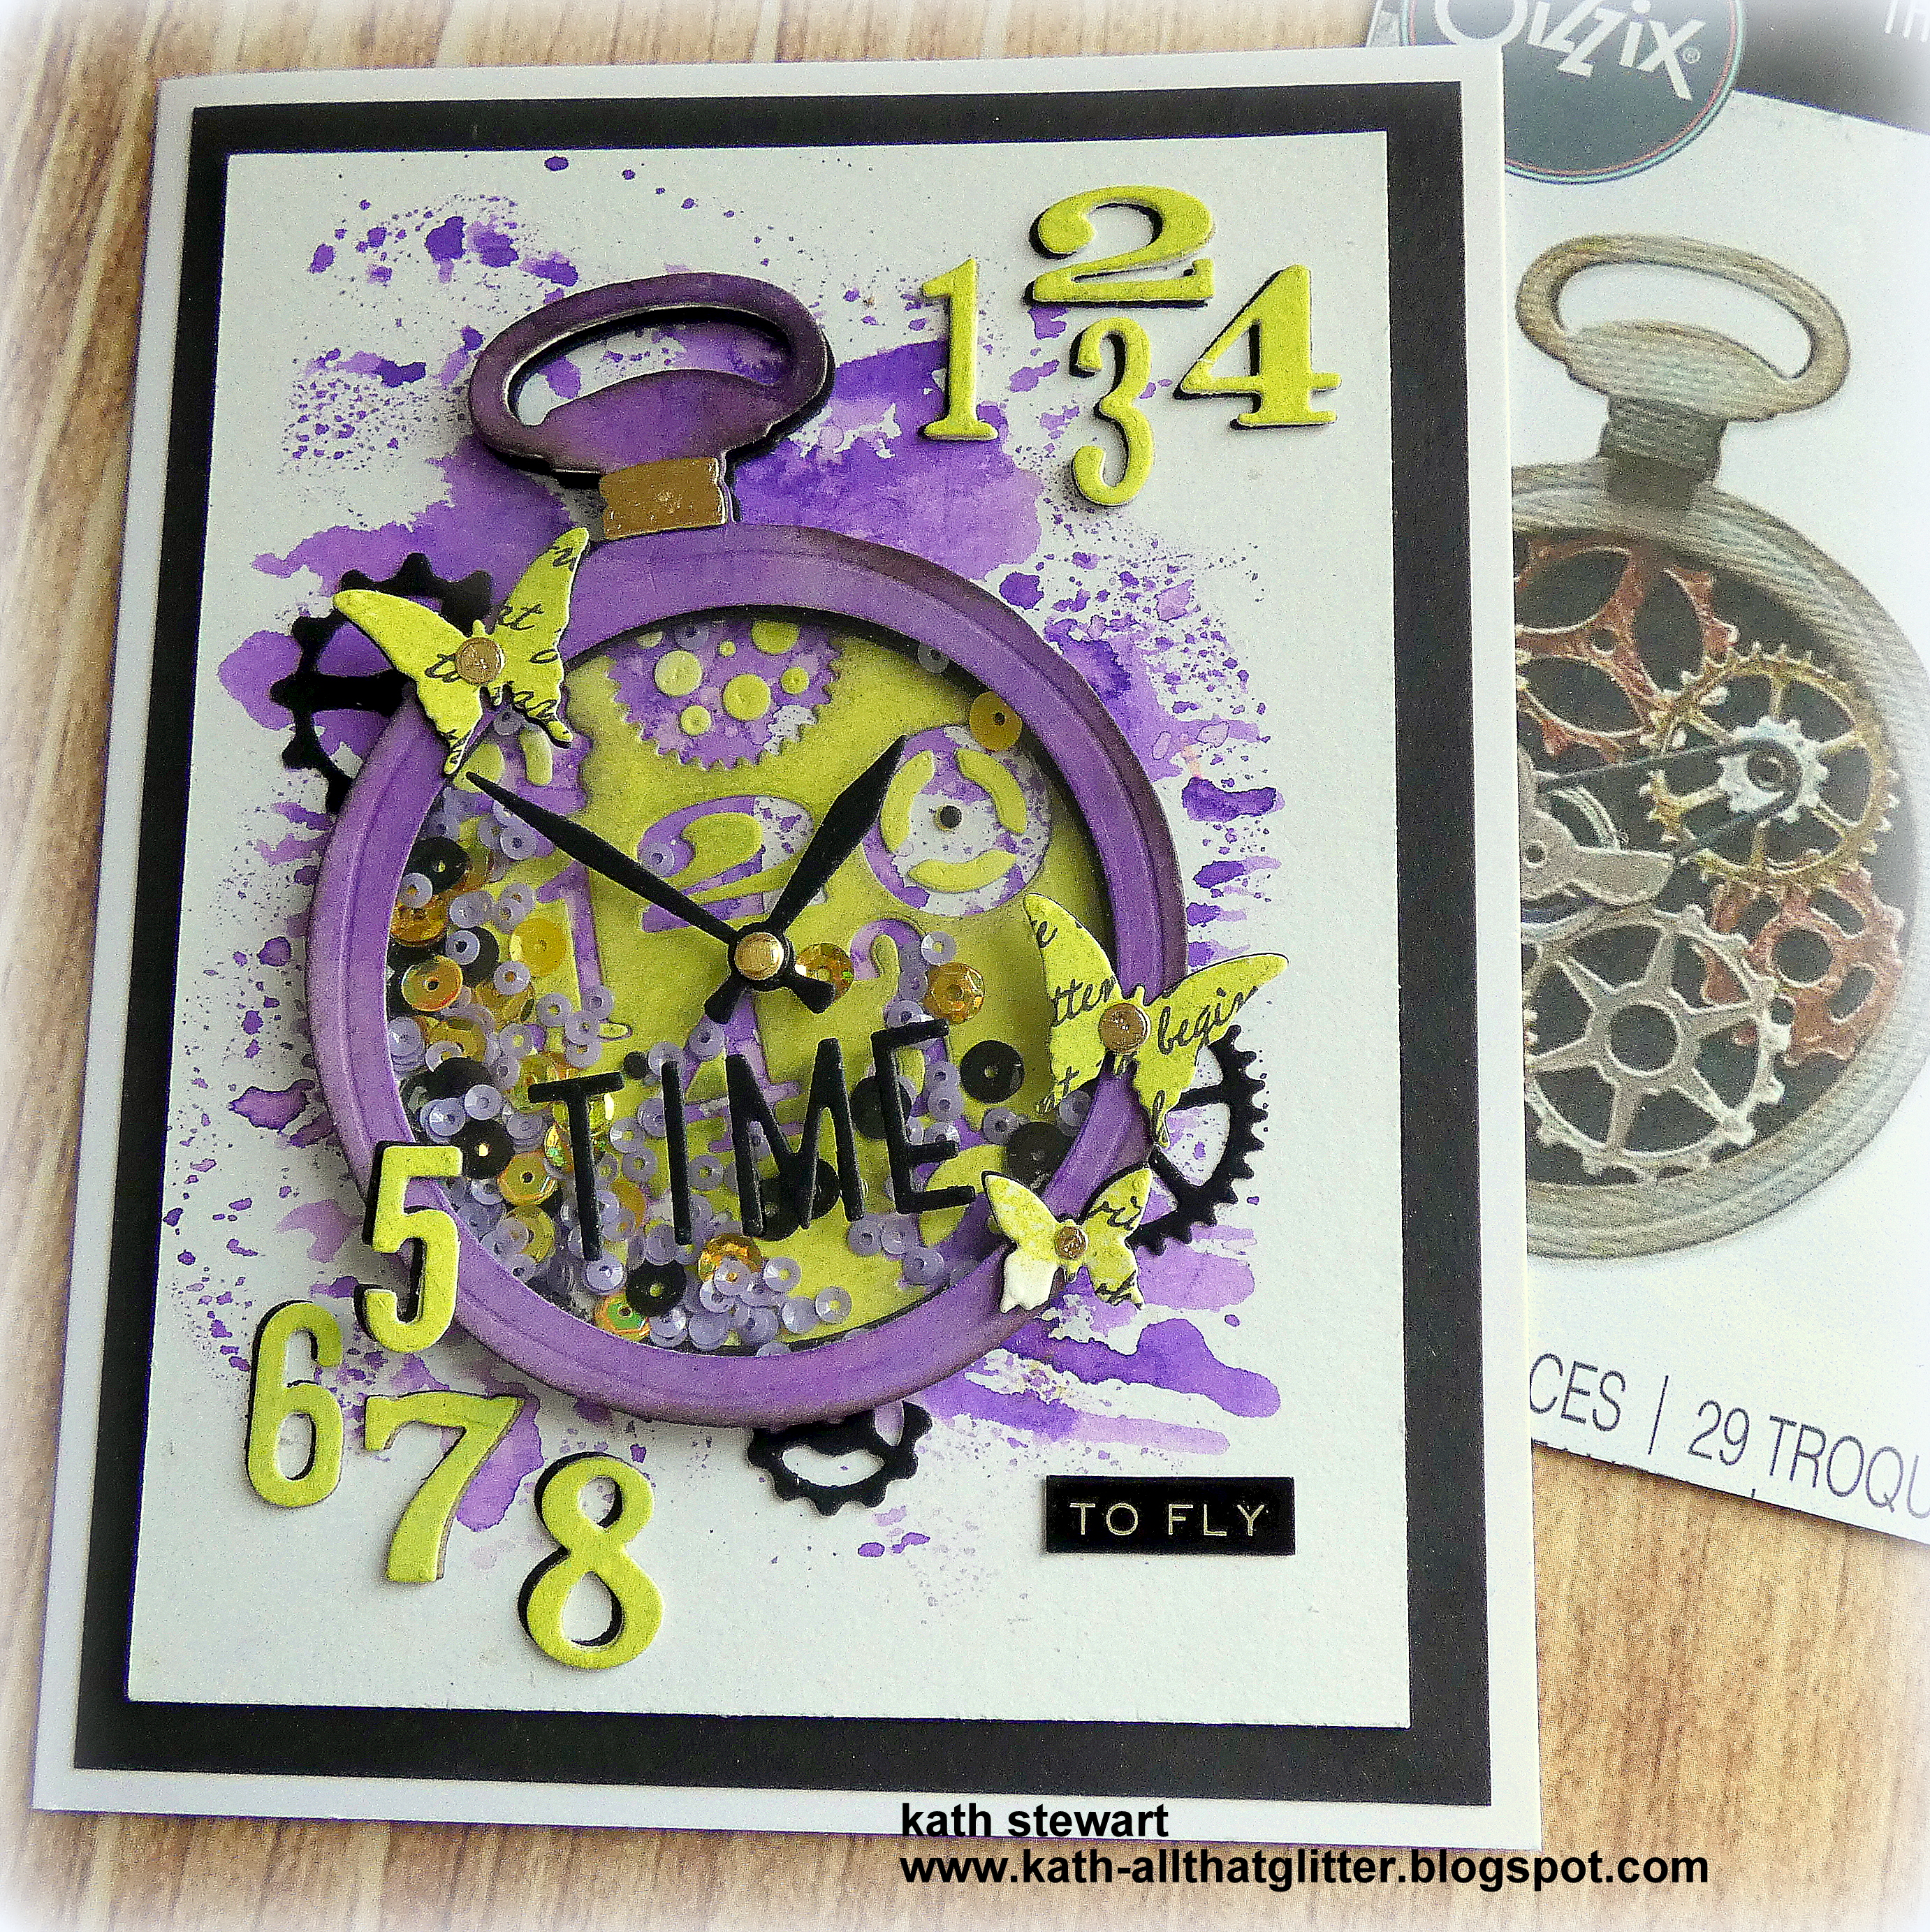
I die-cut the watch from Idea-ology Backdrops Vol 5 using Tim Holtz Vault 2 Watch Gears Thinlits and shaded the edges with Villainous Potion Distress Oxide ink using a Distress Tiny Blending Tool.
I die-cut again from Distress Watercolor card and coloured the inner circle with Twisted Citron Distress Oxide. I smooshed Villainous Potion Distress Oxide ink on to my Media Mat, spritzed with water, tapped an A2 panel of Distress Watercolor card repeatedly on to the ink. I die-cut the numbers and gears from the Twisted Cirton circle and fixed to the background with Distress Collage Medium.
I fixed acetate behind the watch, die-cut the watch 3 more times from Distress Black HeavyStock and layered to create dimension. I added black foam strips around the edge, sprinkled a mix of lavender, gold and black sequins on to the background and pressed the die-cut watch into place.
I die-cut the gears, numbers and watch hands using Vault Watch Gears and alphabet using Vault World Travel Thinlits from Distress Black HeavyStock and fixed in place with Distress Collage Medium. I die-cut the numbers again from the Distress Watercolor card coloured with Twisted Citron Distress Oxide and fixed, slightly offset on the black number die-cuts.
I stamped the left over Twisted Citron card with script from Tim Holtz/Stampers Anonymous Nature's Walk, inked with Black Soot Distress Archival and die-cut the butterflies using Vault Boutique Thinlits, fixed to Distress Black HeavyStock die-cut butterflies, fixed in place with Distress Collage Medium and added fall out circles from one of the gears die-cut from Idea-ology Gold Metallic KraftStock. I added a black twine bow to the top of the watch.
To finish I added an Idea-ology Metallic Sticker, matted the panel on to Distress Black HeavyStock and fixed to a white card blank.
I'll be back tomorrow to share the second card, in the meantime have fun with whatever you're making.
Hugs Kath xxx

Saturday, April 6, 2024

Tim Holtz/Sizzix Vault 2 World Travel Thinlits

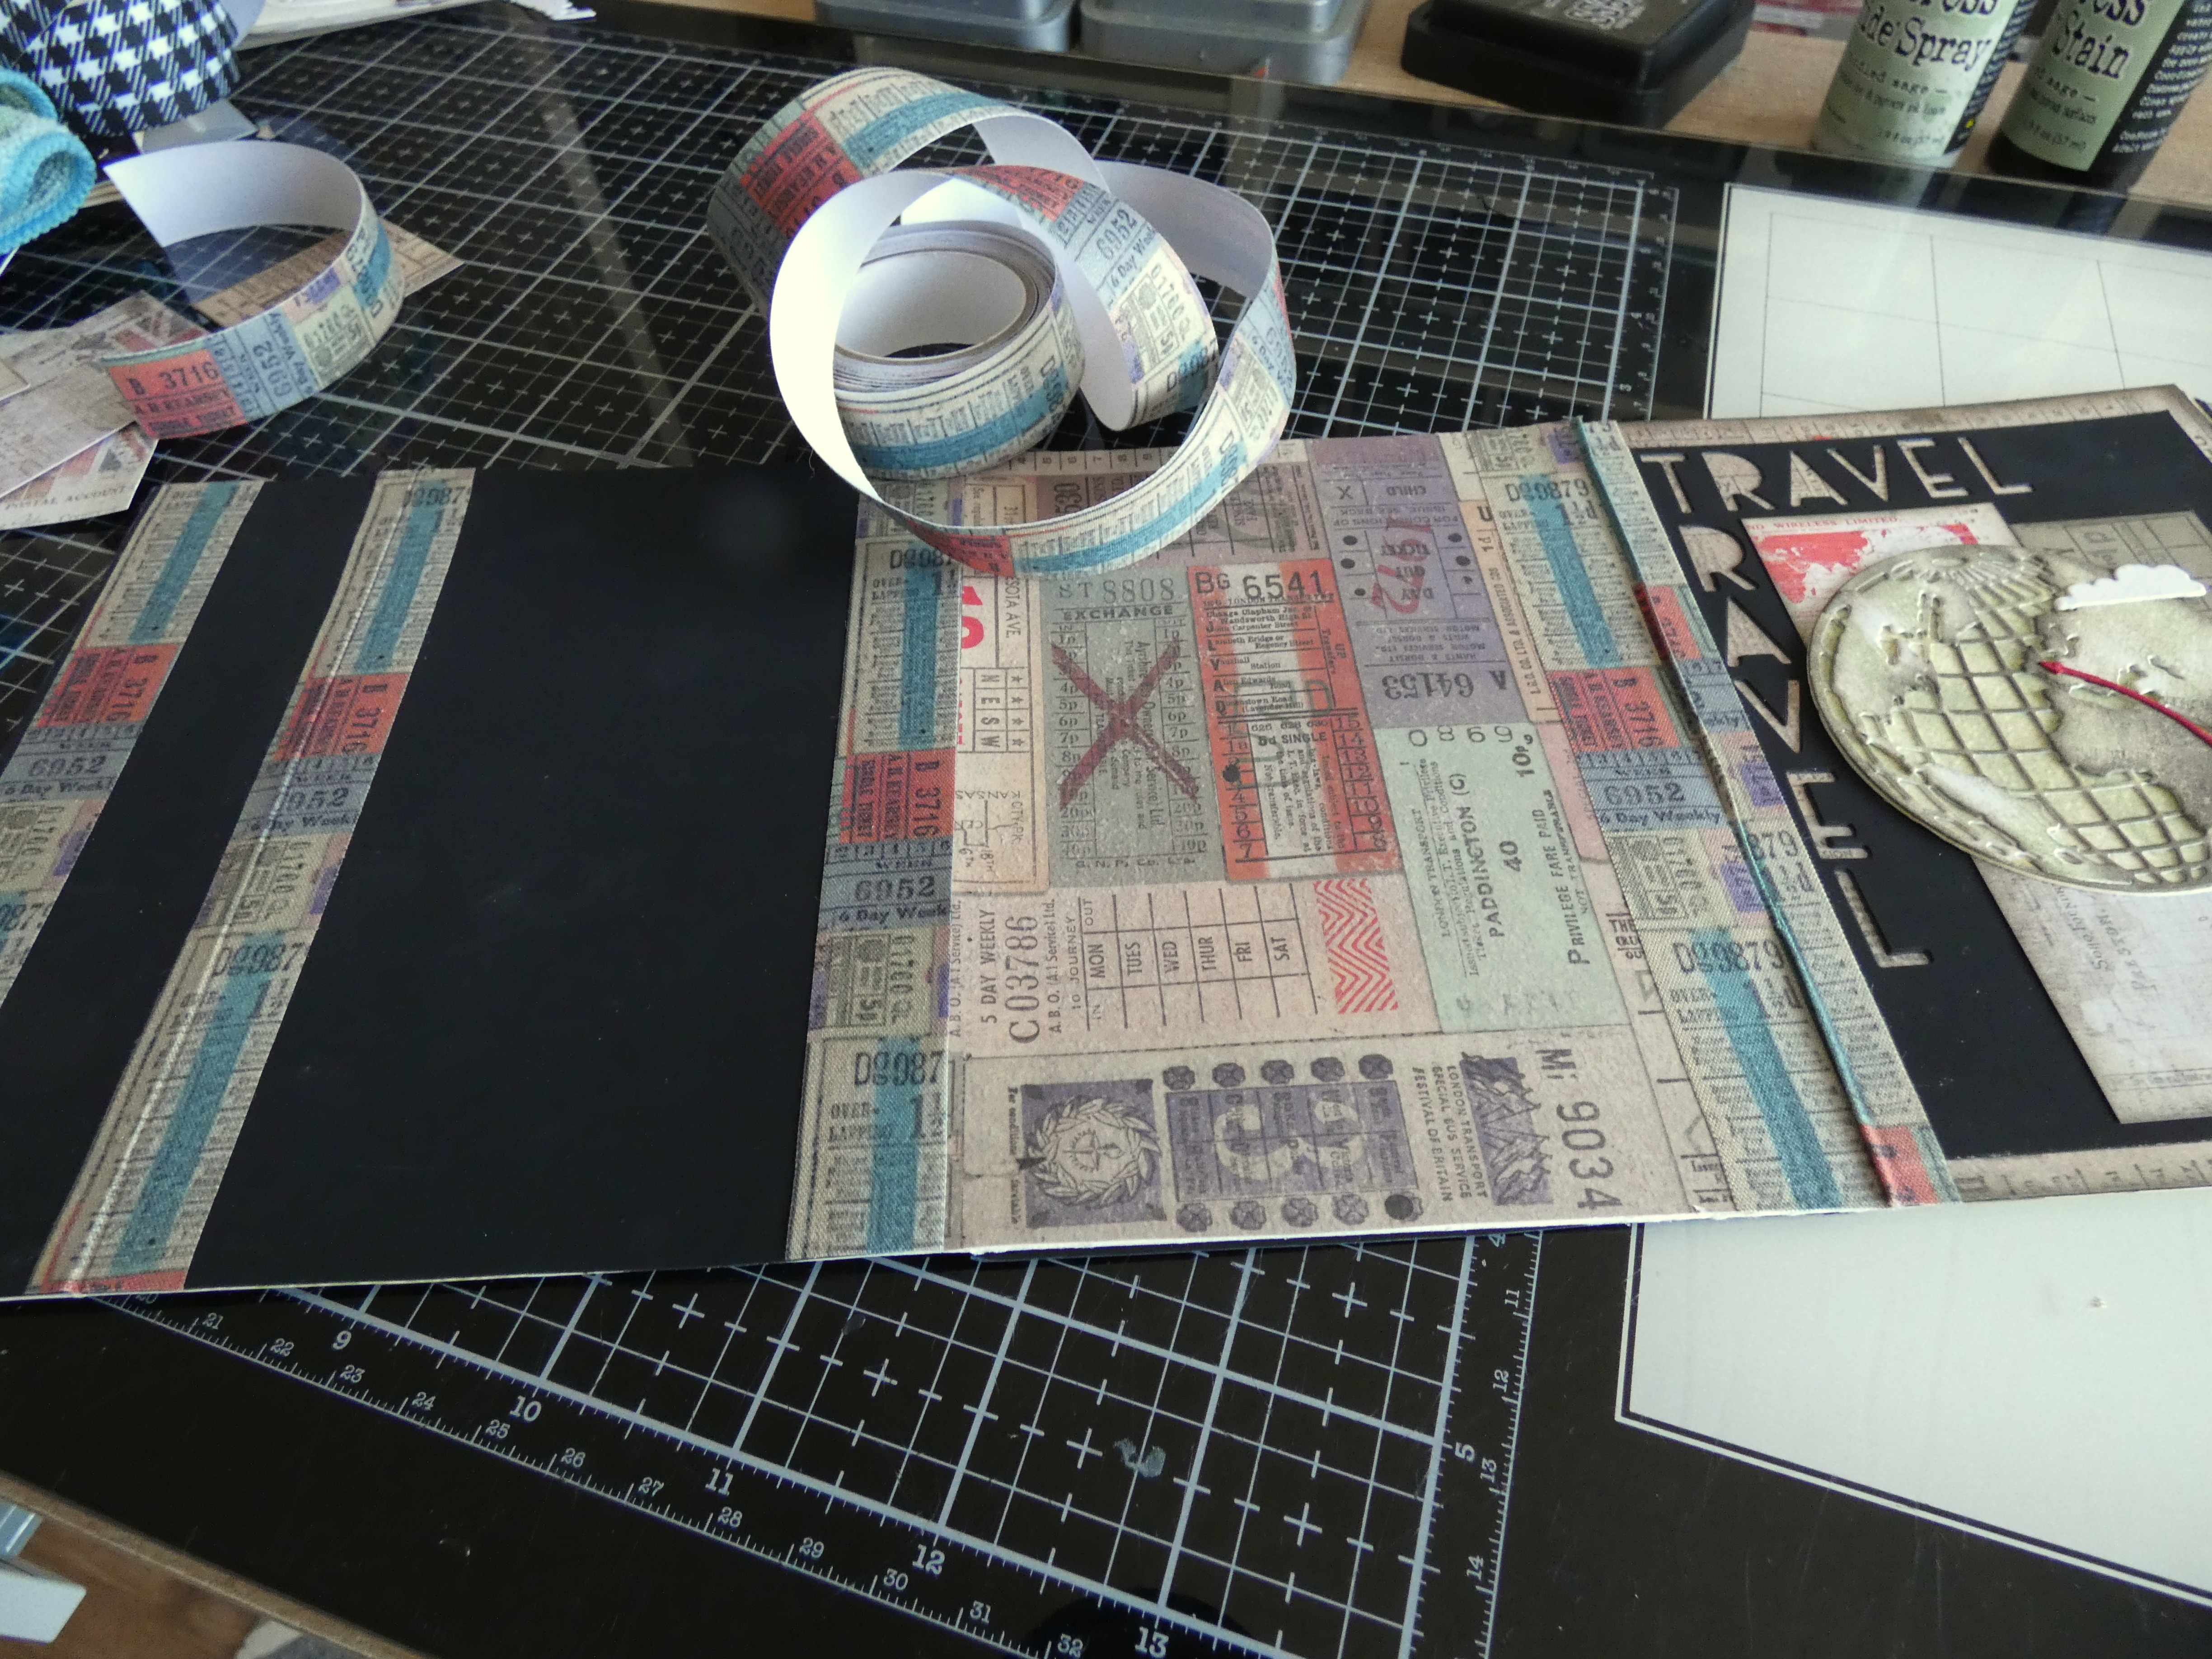
Hello my friends, if you just watched the YouTube Live launch of Tim Holtz/Sizzix Vault 2 Thinlits Collection, I'm sure you'll agree that Tim has done it again, bringing back a great selection of old favourites from the vault, resized and reimagined. I had a lot of fun decorating an Idea-ology Accordion Folio to create a travel wallet to keep all your important travel documents safe in one place, using the Vault World Travel Thinlits. . If you missed the Live, you can catch up with the new release and amazing projects from the Makers on Tim’s YouTube Channel or Blog.


I began by covering the front panel on the Accordion Folio with paper from the Idea-ology Correspondence Paper Stash pad.
I opened up the Accordion Folio and covered each section with either the Correspondence paper, Distress Black HeavyStock and strips of Idea-ology Agenda Linen Tape.
I flipped it over and coloured the back panels by spritzing Bundled Sage Distress Spray Stain and Distress Oxide Spray on to my Media Mat and tapped into the inks repeatedly until I was happy with the coverage. I die-cut the globe from the Vault World Travel Thinlits and used as a stencil to apply Scorched Timber Distress Ink using a Distress Tiny Blending Tool. I added Distress Black HeavyStock and Idea-ology Agenda Linen Tape to the inner flaps.
I trimmed Distress Black HeavyStock to be slighty smaller than the front cover, die-cut using the alphabet from the Vault World Travel Thinlits and fixed in place with Distress Collage Medium.
I die-cut the Globe twice and coloured with Bundled Sage Distress Oxide ink using the ink pad with the direct to paper technique.I applied Scorched Timber Distress Ink using the Distress Tiny Blending Tool to add shading and assembled.
I trimmed panels from the Correspondence paper, inked the edges with Scorched Timber Distress Ink, fixed to the front panel with Distress Collage Medium and added one of the globes. I fixed Sizzix Adhesive Sheets to Distress Black HeavyStock, Distress Watercolor card and red Sizzix Surfacez cardstock, die-cut the alphabet, planes, clouds and arrows to decorate.
I decorated the inside flaps in the same way with panels and tickets trimmed from the Correspondence paper, added the alphabet die-cuts and fixed thin strips of Black foam adhesive to the back of the flaps to create pockets.

I used Tim Holtz/Sizzix Stacked Circles Thinlits to make notches on the pockets.
I decorated the last section with Idea-ology Agenda Fabric Tape, tickets trimmed from the Correspondence Paper, added the globe and the flight details - Phoenix to London Heathrow and London Heathrow to Aberdeen. I punched a hole on the spine of the folder and fed through an Idea-ology Elastic Loop to use as a closure.
I fixed the ends of elastic in place with strong adhesive tape and added a trimmed out ticket on top.
Now there is a place for your passport, boarding pass, London Underground ticket and luggage labels.


I'll be back soon to share more makes from the Vault 2 Collection. In the meantime, have fun with whatever you're making.
Hugs Kath xxx

Friday, April 5, 2024

Tim Holtz/Sizzix - Vault 2 Picture Show

Happy Friday my friends, just one more sleep until the YouTube Live launch of Tim Holtz/Sizzix Vault 2 Collection. I'm super excited and can't wait to see all the Makes. I've been missing from the cubbyhole this week, busy freshening up the utility room with a coat of paint, one of those "who's bright idea was this" kind of jobs but I did manage to sneak off while waiting for the paint to dry and make a few cards using the Vault 2 Picture Show Thinlits.

I began by creating 2 neutral backgrounds on A2 panels of Distress Watercolor card using Antique Linen and Walnut Stain Distress Oxide inks. I die-cut the slide and film strip from Vault 2 Picture Show and coloured with Walnut Stain Distress Oxide and Scorched Timber Distress Ink. I fixed torn strips of Idea-ology Photographic Collage Paper to scraps of Distress Watercolor card using Distress Collage Medium and die-cut to fit into the slide and film strip. 
I die-cut the viewfinder from Distress Kraft Heavystock and Distress Watercolor card coloured with Antique Linen and Walnut Stain Distress Oxide inks, assembled, fixed to the card panel and trimmed off the excess. I die-cut the upper section again from Distress Watercolor card, covered the centre with Idea-ology Photographic Collage Paper, trimmed and fixed to the viewfinder with Distress Collage Medium. I die-cut the inner sections of the wheel from Idea-ology Wallflower Paper Pad and fixed in place with Distress Collage Medium. I coloured Distress Watercolor card with Scorched Timber Distress ink, die-cut the flower twice using Vault 1 Wildflowers Thinlits, layered to create dimension and fixed to the panel with foam squares. I stamped the sentiments on both cards, inked with Black Soot Distress Archival. The sentiments are from Sizzix Good Vibes 664844 stamp set, designed by my amazing and super talented friend Pete Hughes.
I die-cut the butterflies from the same coloured card as the flower using Vault 2 Boutique Thinlits, added Distress Collage Medium to the bodies only and pulled the wings up to create dimension.
To finish I added extra torn strips of the Idea-ology Photographic Collage Paper to fill in some of the empty spaces, trimmed the panels to 4" x 5.1/4", inked the edges with Scorched Timber Distress Ink using a Tiny Blending Tool and fixed to an A2 white card blank, covered with Distress Kraft HeavyStock.


It's time to head off to M&S to stock up on snacks for the YouTube Live party, book myself a comfy seat in the front row and I'll be all ready for the fun to begin.  Hope to see you there.
Hugs Kath xxx

Monday, April 1, 2024

Simon Says - Whatever The Weather

Hi Everyone...welcome to another week on the Simon Says Stamp Monday Challenge Blog. Thank you for joining us for last week's challenge and we hope you can join us this week too because


The first challenge of a new month is when the team feature one particular brand or company and this month we are all using the fabulous exclusive products from our very own Simon Says Stamp. You don't have to use Simon Says products to join in the challenge but we would love to see what you make with them, if you have them in your stash. We are also welcoming the lovely and talented Estelle aka atouscrap as our Designer In The Spotlight. If you haven't visited her blog yet, do pop over and say hello, you will be in for a real treat.

The theme for this week is...
WHATEVER THE WEATHER
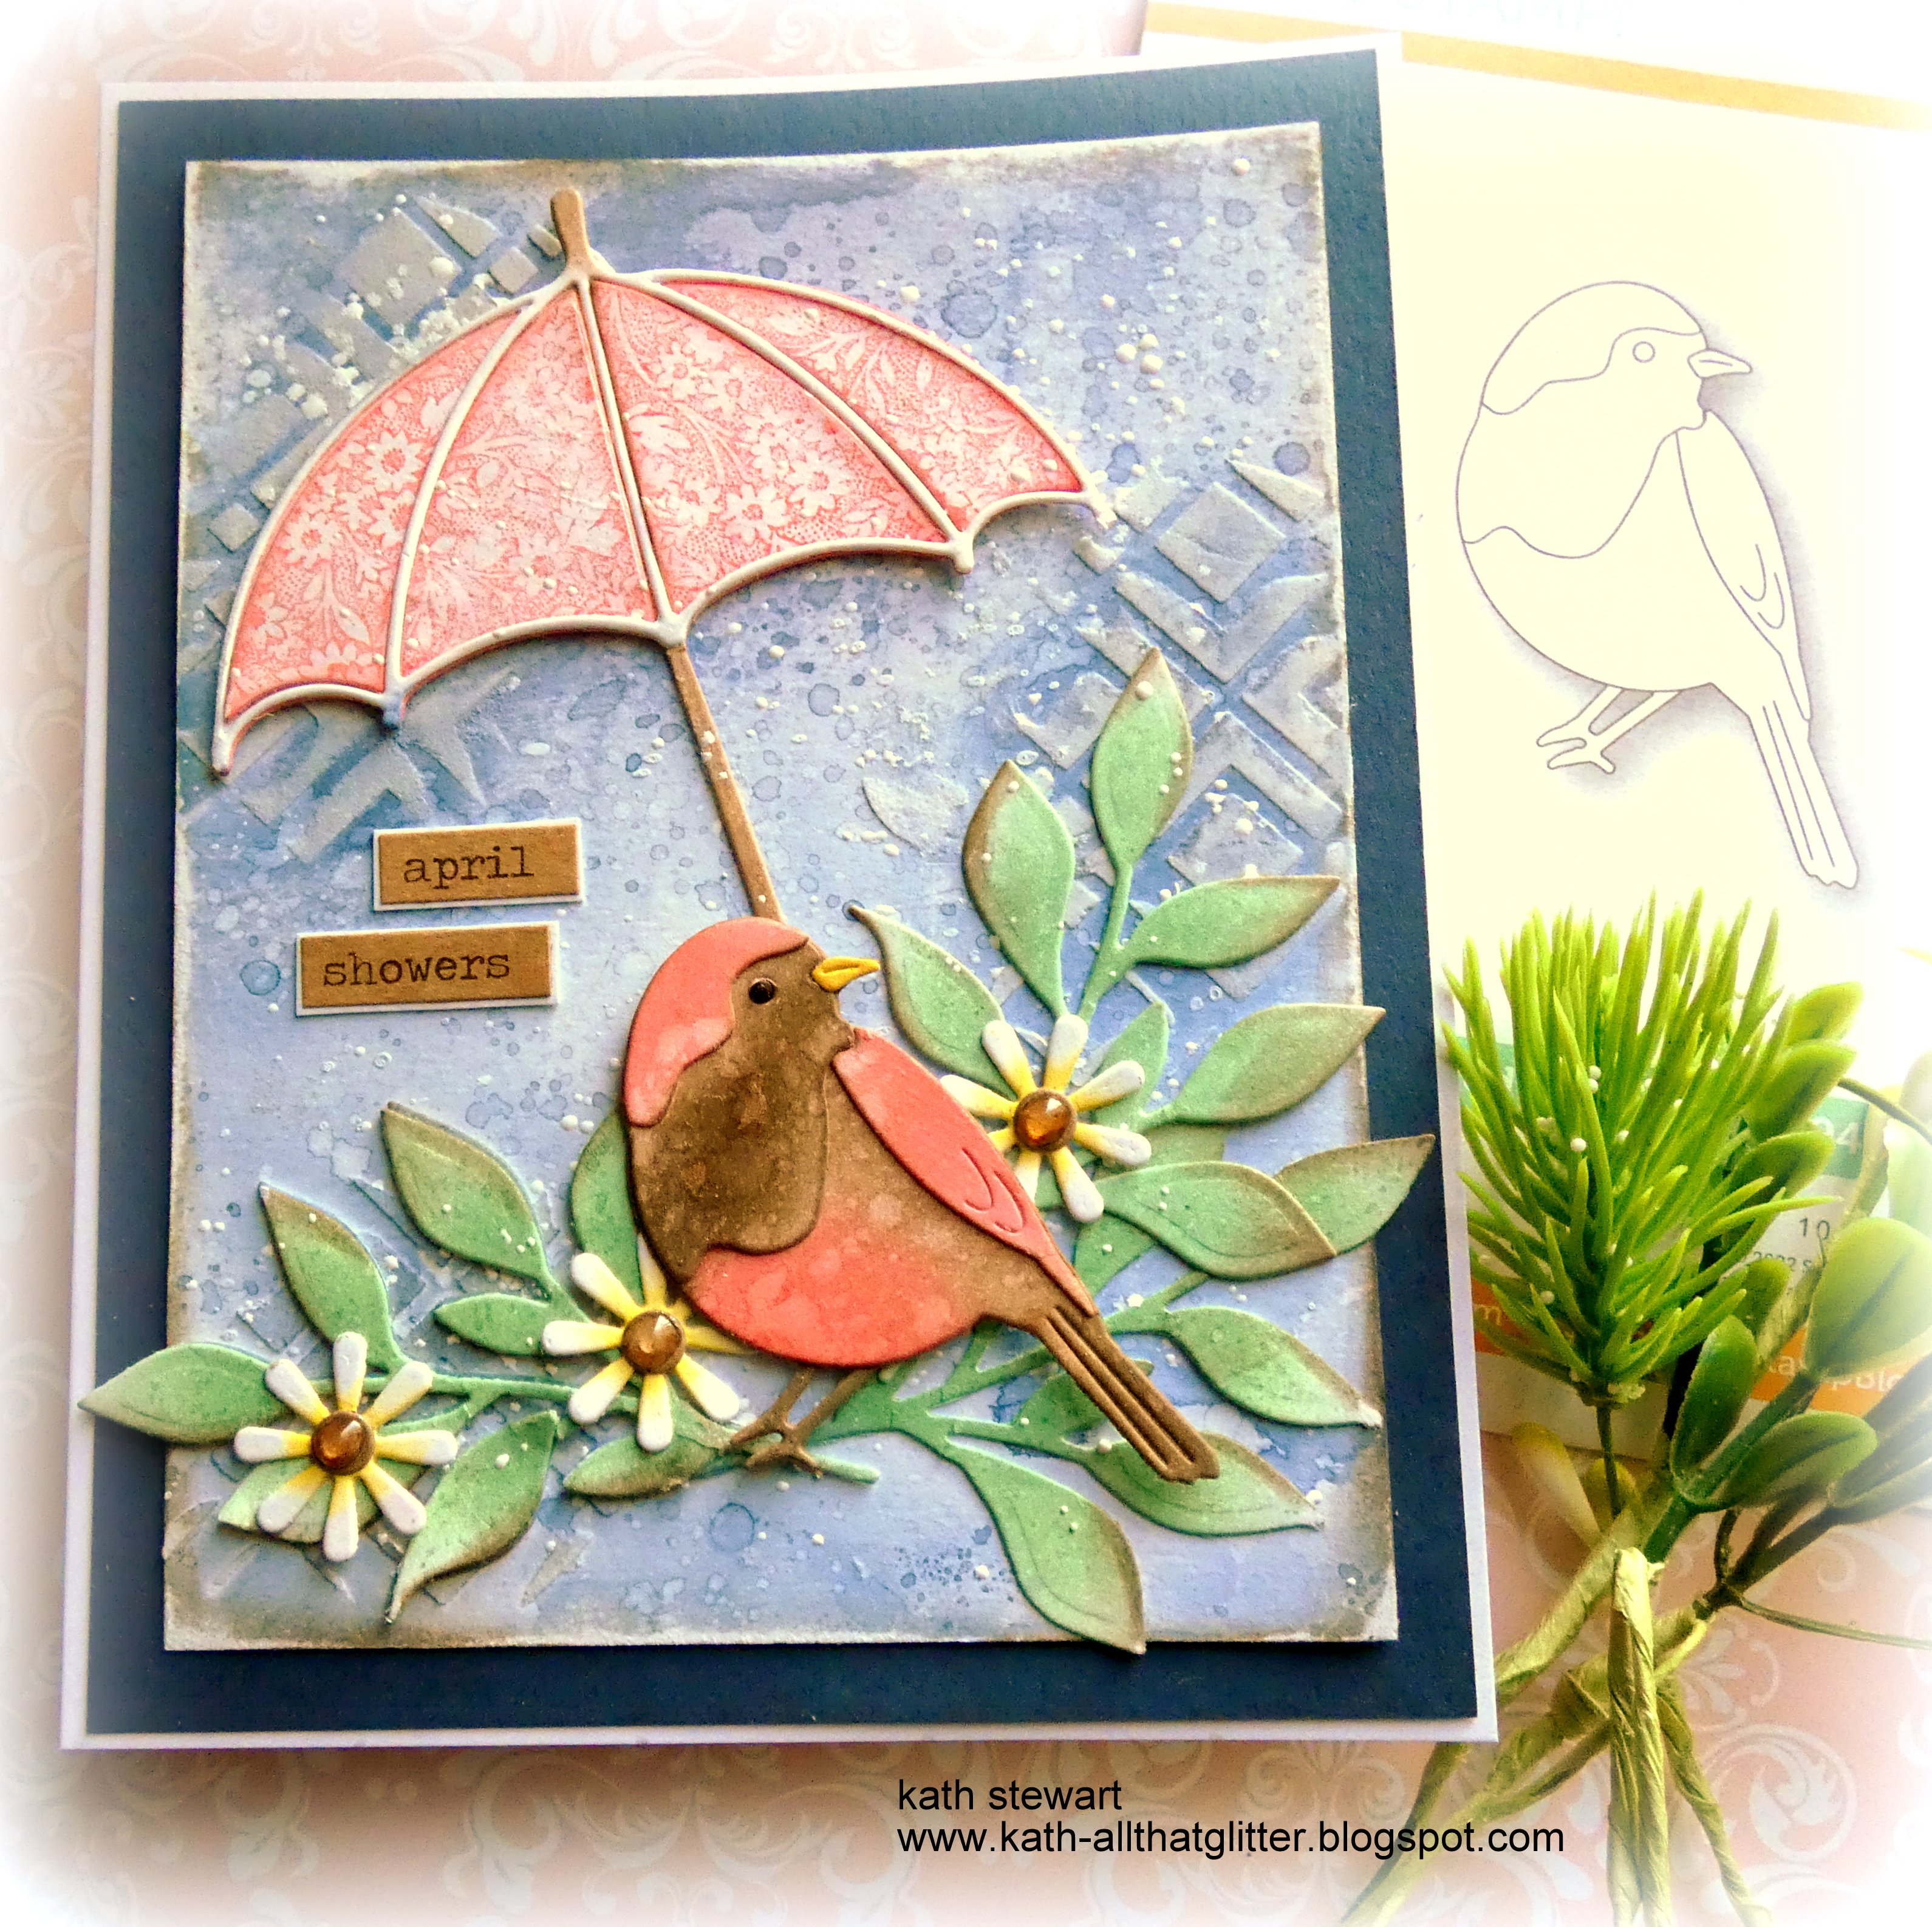
I created a card with the saying "April Showers Bring May Flowers" in mind, using Simon Says Leafy Sprig, Layered Warbler and Mother's Day Flowers dies along with the umbrella from Tim Holtz/Sizzix The Gent Thinlits stamped with Stampers Anonymous Tiny Prints.
I smooshed Stormy Sky and Faded Jeans Distress Oxide inks on to my Tim Holtz/Tonic Studios Media Surface Mat, spritzed with water, tapped an A2 panel of Distress Watercolor card into the inks, dried and repeated until I was happy with the background.
I applied Distress Texture Paste randomly through Simon Says Square Dance Stencil to add texture to the panel.
I die-cut Simon Says Leafy Sprig from Distress Watercolor card and coloured with Simon Says Aspen and Sage Pawsitively Saturated Mini Ink Cubes using Simon Says Blending Brushes.
I die-cut the umbrella using Tim Holtz/Sizzix The Gent Thinlits, coloured the base, frame and handle with  Abandoned Coral Distress Oxide ink and Cappuccino Pawsitively Saturated Ink. I inked the Tim Holtz/Stampers Anonymous Tiny Prints Background with Abandoned Coral Distress Oxide ink and stamped on to the next layer of the umbrella and fixed in place with Distress Collage Medium.
I fixed the umbrella and leafy sprigs in place with Distress Collage Medium.
I die-cut Simon Says Layered Warbler from Distress Watercolor card, coloured with Abandoned Coral Distress Oxide ink and Mocha Pawsitively Saturated Ink and assembled. I placed black card behind the eye, die-cut the beak from a scrap of card coloured with Fossilized Amber Distress Oxide ink and fixed to the panel with Simon Says Foam Squares.
I flicked water on to the bird and dried and added splatters of White Gesso on the background and leafy sprigs. I fixed Idea-ology Chit Chat Stickers to scrap card, trimmed to leave a border and fixed to the background with Distress Collage Medium.
I die-cut the flowers from Distress Watercolor card using Simon Says Mother's Day Flowers, coloured lightly with Fossilized Amber Distress Oxide ink and the centres with Mocha Pawsitively Saturated Ink.
I fixed the flowers in place with Distress Collage Medium, added Ranger Glossy Accents to the flower centres, matted the panel on to Simon Says Soft Navy Cardstock and fixed to a 5" x 7" white card blank.


You can find all the products I used over at Simon Says Stamp, just click on the links below


Why don't you pop over to the Monday Challenge Blog and check out the amazing creations from my very talented Design Team mates and as always you have until Monday 8am Ohio time...1pm UK time...2pm CET to join in with the chance to win a $25 voucher to spend online at Simon Says Stamp


You can also follow Simon Says Stamp on Instagram
and if you use Instagram...
please add #sssmchallenge to your entry uploads so we can see them on there too

I look forward to seeing what you create this week...
Have Fun and Happy Crafting
Hugs Kath xxx