Sunday, April 14, 2024

Tim Holtz/Stampers Anonymous - Paint By Number

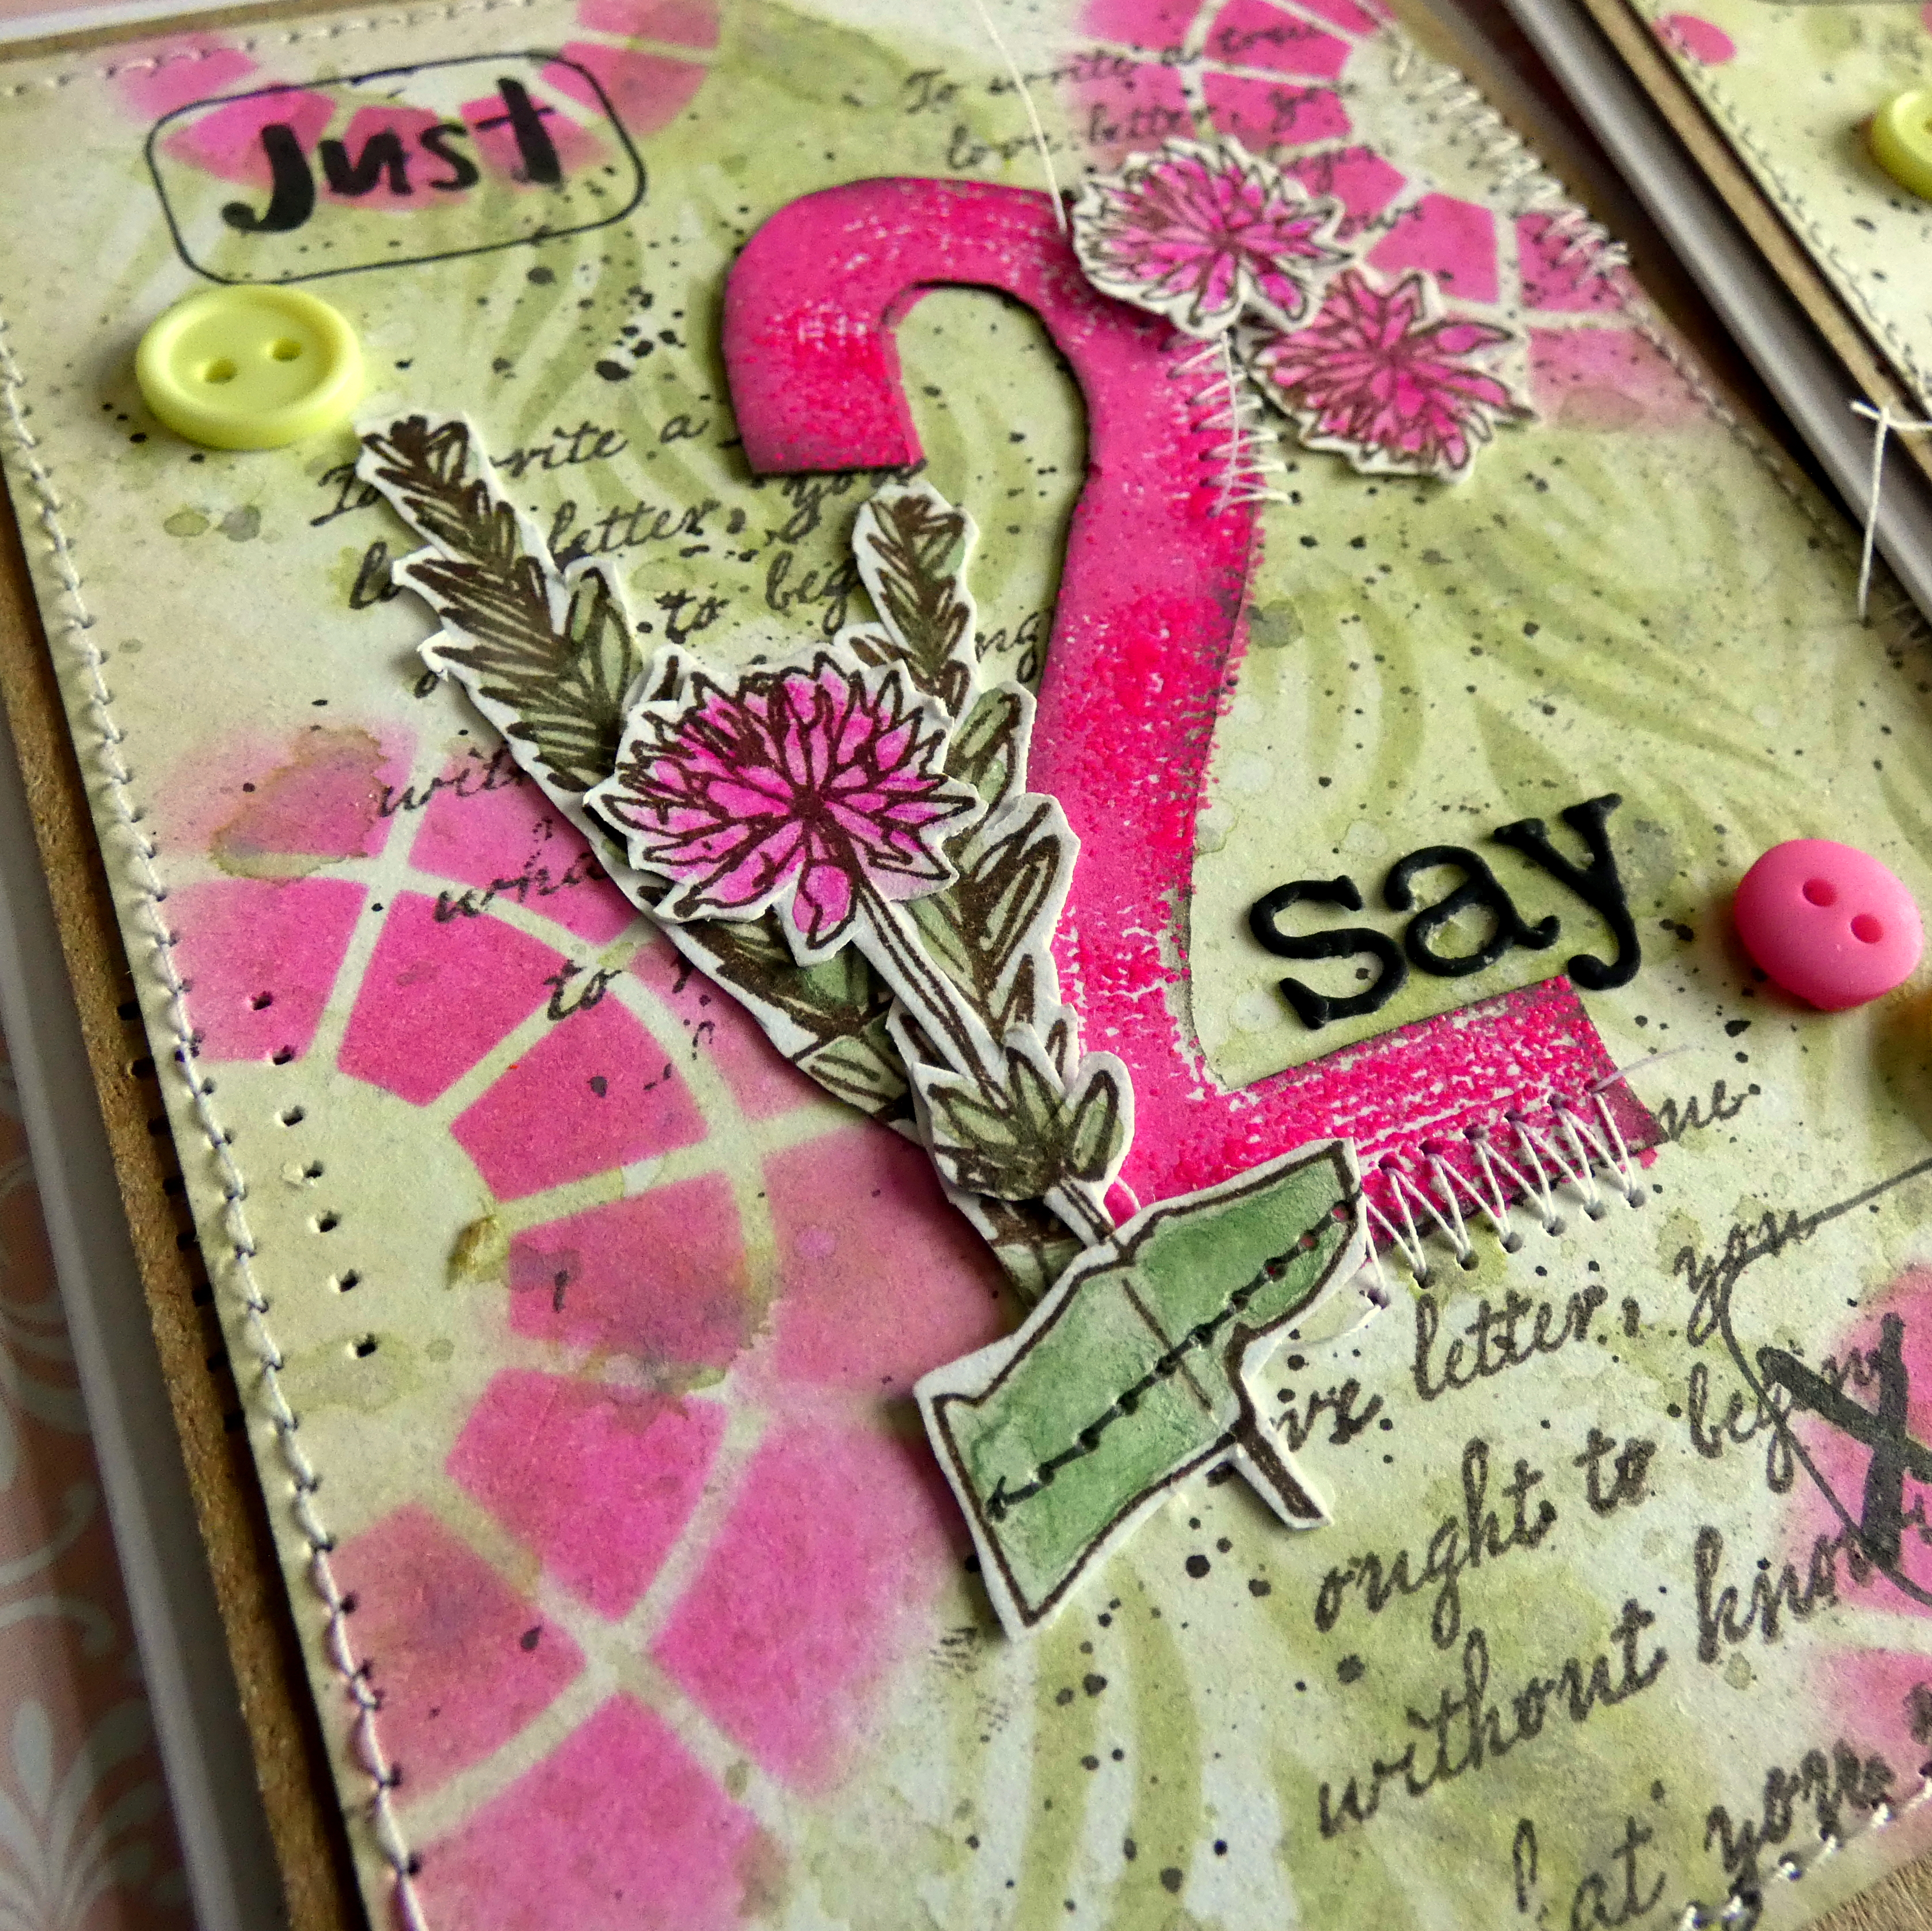
Hello my friends, I'm back to share the trio of cards I made for the YouTube Live launch of Tim Holtz/Stampers Anonymous new collection of stamps and stencils, using the Paint By Number stamp set, all the Mini Layering Stencils from Sets 59 and 60 and just for good measure, threw in a few of the beautiful botanical images from Forgotten Garden and sentiments from Abstract Florals. If you missed the Live, you can catch up on the replay and check out all the amazing projects from the Makers on Tim's Blog or YouTube Channel.
I trimmed Distress Watercolor card to create 3 - 3.3/4" x 5" panels and coloured with Bundled Sage Distress Oxide ink by smooshing the ink on to my Media Mat and spritzing with water. I stamped the numbers from Paint By Number on to the panels for placement, inked with Picked Raspberry Distress Oxide ink. I applied Picked Raspberry and Bundled Sage Distress Oxide inks through the Mini Layering Stencils from Sets 59 and 60 using Distress Tiny Blending Tools. I inked the sentiment stamp from Tim Holtz/Stampers Anonymous Nature Walk with Scorched Timber Distress Ink and stamped randomly over the panels.
I re-stamped the numbers on to Distress Watercolor card, sprinkled randomly with Picked Raspberry Embossing Glaze, heat set, fussy cut and fixed in place over the original stamped numbers to create some dimension.
I smooshed the Scorched Timber Distress Ink Pad on to my Media Mat, spritzed with water and used to add splatters on the backgrounds.
I fixed the panels to Distress Kraft HeavyStock panels measuring 4" x 5.1/4", machine stitched around the edges and added zig zag stitching randomly on the numbers.
I cut some of the sentiments from Tim Holtz/Stampers Anonymous Abstract Florals apart to get the words I needed and stamped on the panels using Black Soot Distress Archival Ink.
I outlined the word stamping by drawing around one of the rectangle shapes from the Labels Layering Stencil.
I stamped one of the images from Tim Holtz/Stampers Anonymous Forgotten Garden repeatedly on to Distress Watercolor card, inked with Ground Espresso Distress Archival ink and coloured with Picked Raspberry and Bundled Sage Distress Watercolor Pencils using a Detailer Water Brush.
I fussy cut the images and flower heads and fixed to the cards using Distress Collage Medium and Foam Squares.
To complete the sentiments, I fixed Sizzix Adhesive Sheets to Distress Black HeavyStock and die-cut using Tim Holtz/Sizzix Alphanumeric Tiny Type Lower Thinlits. To finish I added buttons from my stash in colours to match the Bundled Sage/Picked Raspberry theme.


I'll be back soon to share more projects using the rest of the stamps from this amazing release.
Hugs Kath xxx

Saturday, April 13, 2024

Tim Holtz/Stampers Anonymous - Forgotten Garden

Hello my friends, if you've just come from the YouTube Live launch of the new collection of stamps from Tim Holtz and Stampers Anonymous, you'll know what an awesome release it is and once again, regardless of your crafting style, there's something for everyone. If you missed the Live, you can catch up on the replay and check out all the amazing projects from the Makers on Tim's Blog or YouTube Channel. I love all the stamp sets but Forgotten Garden is one of my favourites and I used the botanical images to decorate a drawstring bag to hold lavender seeds, a small pillow, shaker card and tag. 


Let's start with the drawstring calico bag which I purchased in a pack of 20 from Amazon. I applied Rustic Wilderness Distress Paint through the Decor Leaf Mini Layering Stencil from Set 60 on the front and back of the bag using a Mini Round Blending Tool.
I decided to sacrifice another bag and trimmed to create 2 panels, one slightly larger than the other. I spritzed the larger panel with Bundled Sage Distress Oxide Spray and set aside to dry. I stamped the image from Forgotten Garden inked with Ground Espresso Distress Archival ink and coloured with Dusty Concord and Rusty Wilderness Distress Paints using a small watercolour brush. Once both panels were dry, I machine stitched them together and frayed the edges of both panels.
I applied Dusty Concord Distress Paint through the Spots Mini Layering Stencil from Set 59, spritzed the Dusty Concord Distress Paint left on my Glass Media Mat with water, added splatters to the panel, fixed the panel to the bag with fabric glue and added Idea-ology Specimen Remnant Rubs.

I filled the bag with the dried lavender seeds.
To create the pillow, I trimmed off the edge with the drawstring cord from another calico bag, stamped the images from Forgotten Garden with Ground Espresso Distress Archival ink, coloured with Dusty Concord, Crushed Olive and Rustic Wilderness Distress Paints and heat set to dry.
I applied Dusty Concord Distress Paint through the Deco Feather Mini Layering Stencil from Set 60 using a Mini Round Blending Tool on the back of the pillow.
I hand stitched Idea-ology Trimmings, from my stash, around the bottom of the pillow, added Idea-ology Specimen Remnant Rubs, filled with fibrefill and stitched close.

To finish I stitched a button to the front and a large button on the back to cover where the trimmings overlapped.


I'll be back tomorrow to share another project made for the Live and will share the shaker card and tag made with Forgotten Garden next week. In the meantime, have fun with whatever you're making.
Hugs Kath xxx

Tuesday, April 9, 2024

Tim Holtz/Sizzix Vault Watch Gears - Card 2

Hello my friends, I'm back to share the second card I made using the Vault Watch Gears Thinlits for the YouTube Live Launch of Tim Holtz/Sizzix Vault 2 Collection.

I began by smooshing Twisted Citron Distress Oxide ink on to an A2 panel of Distress Watercolor card. I die-cut the numbers from Vault Watch Gears to create a stencil with a scrap of cardstock, applied Villainous Potion Distress Oxide through the stencil repeatedly and applied around the edges using a Distress Tiny Blending tool, flicked on water and dried.
I applied Scorched Timber Distress Oxide ink through the Tim Holtz/Stampers Anonymous Gears Layering Stencil using a Distress Tiny Blending Tool.
I die-cut the watch from Distress Black Woodgrain/ Black HeavyStock and Idea-ology Gold Metallic KraftStock. I assembled, added gears die-cut from Distress Black Heavy/Stock and pieces of Mica Tiles  to the left side of the watch and fixed to the background with Distress Collage Medium. I die-cut the watch hands, those whirly wheel things from the Villainous Potion card and Twisted Citron card from yesterday's make, assembled and fixed to the panel with foam squares and Distress Collage Medium. I added the fall out circles from one of the gears to the watch hands and whirly things, die-cut from Idea-ology Gold Metallic KraftStock.
I die-cut the banner from Distress Black HeavyStock and Idea-ology Gold Metallic KraftStock using Vault Bouquet Thinlits and fixed together slightly offset.
I added the banner to the panel with foam squares to create dimension, fixed Tim Holtz/Sizzix Adhesive Sheets to Distress Black HeavyStock and die-cut the letters using Tim Holtz/Sizzix Label Thinlits.
To finish I matted the panel on to Distress Black HeavyStock and fixed to a white card blank.

I'm sure I'll be back soon to share more makes with this amazing Collection, in the meantime, have fun with whatever you're making.
Hugs Kath xxx

Monday, April 8, 2024

Simon Says - Spring Flowers

Hi Everyone...welcome to another week on the Simon Says Stamp Monday Challenge Blog. Thank you for joining us for last week's challenge and we hope you can join us this week too because


and the theme for this week is...
SPRING FLOWERS
I created a card to remind us that despite the crazy "can't make up it's mind" weather, signs of Spring are everywhere around us using Tim Holtz/Sizzix Vault 2 Bouquet and Alphanumeric Bulletin Thinlits.
I coloured a panel of A2 Distress Watercolor card with Mustard Seed and Fossilized Amber Distress Oxide inks to use as the background and a second panel with Twisted Citron and Peeled Paint Distress Oxide inks which I die-cut using Tim Holtz/Sizzix Alphanumeric Bulletin Thinlits.
I die-cut the doily from Distress Watercolor card using Tim Holtz/Sizzix Vault 2 Bouquet Thinlits, coloured lightly with Fossilized Amber Distress Oxide ink and a Tiny Blending Tool, trimmed and fixed to the panel with Distress Collage Medium.
I applied Rustic Wilderness Distress Oxide ink through the Bubble Mini Layering Stencil from Set 5 using a Tiny Blending Tool and added the alphabet letters popped up on foam strips to create dimension.
I die-cut the scrolls from the Vault 2 Bouquet Thinlits, coloured with Peeled Paint and Rustic Wilderness Distress Oxide inks and fixed to the panel with Distress Collage Medium.
I die-cut the roses and leaves from the Vault 2 Bouquet Thinlits from previously created backgrounds. It's many years since I last made these flowers and oh boy did I struggle to roll them into anything resembling realistic roses and after watching Tim's amazing demo on the YouTube Live launch of the Vault 2 release, I know why - Distress Watercolor card is too thick and the technique is easier using the Squeezers Tool from the Tim Holtz/Sizzix Shaping Kit rather than the quilling tool which came with the original release of the Tattered Floral dies.
But I persevered and many bad words later, I had 3 passable, if you half close your eyes and look from a distance, flowers.
I used hot glue to fix the flowers in place and tucked the leaves in place, popped up on foam squares.
I die-cut the banner from Vellum, folded at each side, added an Idea-ology Clipping Sticker and fixed in place with foam strips, strategically placed behind the sticker. 
To finish, I added a die-cut butterfly using slivers of black card for the body and antennae, matted the panel on to Distress Grey Woodgrain Cardstock and fixed to the front of a white card blank. Armed with the hints and tips from our adorable Professor, I'm planning another flower making session using more suitable paper, such as Idea-ology Backdrops and ditching the quilling tool in favour of my trusty Squeezers from the Tim Holtz/Sizzix Shaping Kit.


You can find all the products I used over at Simon Says Stamp, just click on the links below


Why don't you pop over to the Monday Challenge Blog and check out the amazing creations from my very talented Design Team mates and as always you have until Monday 8am Ohio time...1pm UK time...2pm CET to join in with the chance to win a $25 voucher to spend online at Simon Says Stamp


You can also follow Simon Says Stamp on Instagram
and if you use Instagram...
please add #sssmchallenge to your entry uploads so we can see them on there too

I look forward to seeing what you create this week...
Have Fun and Happy Crafting
Hugs Kath xxx