

Hi everybody.....at long last the Christmas Hanger Tutorial as promised...sorry you had to wait so long but as this was a workshop piece I couldn't post until they were all done and dusted. I decided to do a stamped version but you could use double sided papers and in that case you would miss out the stamping section from the instructions below.....
Edited to add: For all those folks who have e-mailed about the template.....I don't have a PDF that I can send you but if you draw out a rectangle using the measurements below....you can then freehand draw your own template and cut it out.
Edited to add: For all those folks who have e-mailed about the template.....I don't have a PDF that I can send you but if you draw out a rectangle using the measurements below....you can then freehand draw your own template and cut it out.

Step 1...Trace the template onto White cardstock and you will need 8
Stamp snowflake image in Versamark and heat emboss with White Embossing Powder
Stamp snowflake image in Versamark and heat emboss with White Embossing Powder

Step 2...Colour with Tim Holtz Distress Ink Broken China using blending tool and then buff with kitchen towel to remove any ink from the snowflakes

Step 3... Over stamp with Hero Arts Cling Music Background inked with Tim Holtz Brushed Corduroy and the Fiskars Stamp Press is just the bees knees when you are working with these large Cling Backgrounds

Step 4...Stamp the reverse with Hero Arts Large Canvas Stripes Background inked with Brushed Corduroy I find the easiest way to do this is to lay each petal on the inked stamp and press

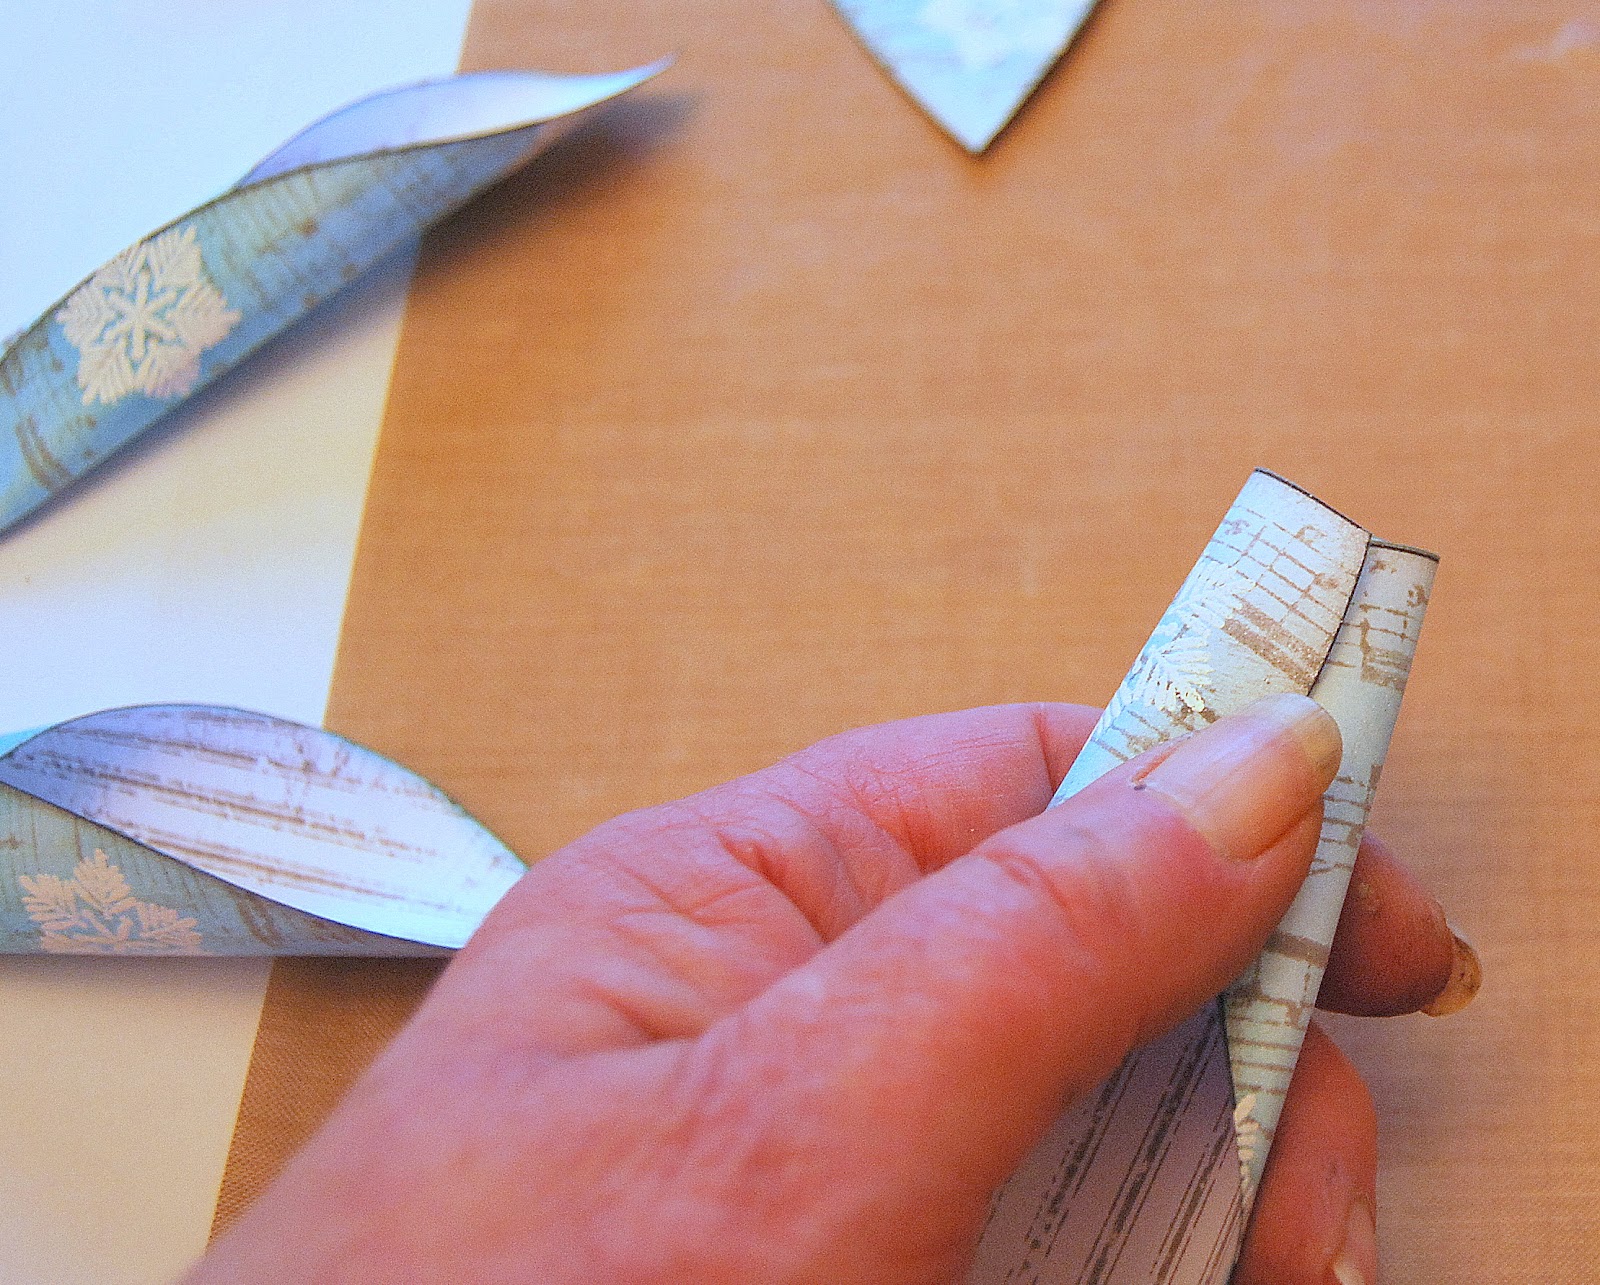
Step 5...Cut out each petal..ink the edges with Brushed Corduroy and roll together as shown...you will need 4 with the striped side outwards and 4 with the snowflake side outwards......then flatten the end and staple
Step 6...Trace the template again onto Kraft Cardstock and again you will need 8...cut out and ink the edges with Brushed Corduroy......cut 2 - 5" circles from cardstock

Step 7...fix the Kraft petals to the circle as shown....


Step 8...fix the stamped petals making sure that the button when fixed will cover the staples

Step 9...now the real fun.....decorate as you wish. To fix the ribbon and button securely.....hold button in place and pierce through two diagonal holes with a pokey or pricking tool.....feed wire through from the reverse.....place ribbon in between the wires and then feed them through the button and twist until held in place. You can hide the wire with the cord bow.


Hope you enjoyed my little tutorial and I would love to see your finished Christmas Hangers...so leave a comment or e-mail me with a link so I can come visit you
Hugs Kath xxx
Morning Kath
ReplyDeleteThis is such a great decoration, thanks for sharing. A lot of work has gone into it but its well worth it for the great end result.
Hope you have a good day....Im just doing some blog hopping before I see what work has in store for me today.
Hugs Sally xxx
Thanks for the instructions for the snowflake hanger Kath - I actually tried to make one of these (but smaller than yours) based on one of your earlier photos, here it is http://playingwithribbon.blogspot.com/2010/10/christmas-ornament-and-red-green-card.html but can see where I went wrong, now I know what to do, It'll be a lot easier! Thanks you very much, Mary
ReplyDeleteHi Kath I am a daily visitor of your blog, I don´t write always a message because you have so much followers and comments. This tutorial is so great! wonderful and I certainly will try do make the decoration. Thanks for sharing.
ReplyDeleteHave a nice day, Ageeth
This looks wonderful Kath, thanks for the tutorial.
ReplyDeleteEveline.
Morning Kath - hope you have recovered from all the hilarity from yestereday - might give this a go since I never made it to any of the workshops you did on it!!! Have a great week - we have a couple of days of school this week so waiting in for the gasman!!!....xxx
ReplyDeleteWell worth waiting for Kath (just hope I have time to make one or two!!) tfs.
ReplyDeleteHave a lovely day.
HW
x
oh wow Kath this is fab!!!
ReplyDeleteClever clogs that you are, thanks so much for this. I'm going to have a bash, wish me luck
This is gorgeous. Am going to try and do one of these soon. Thanks for the tutorial x
ReplyDeleteoh dammit - I had great plans for today and now I'm gonna have to go and try to make one of these lol
ReplyDeletethanks for the tut Kath, will let you know how I get on
Debz
x
Love your tutorial, but where do we get the template from?
ReplyDeleteA wonderful tutorial,Kath.
ReplyDeleteLove this Kath and am going to give it a try.
ReplyDeleteHi Kath-Awesomely beautiful but I too am a bit flumoxed by the template s'pose it would work if the shape you create approximates to the one you have done. Reminded me of the bottom of my iron which just proves I've been doing too much HW lately and better get back to crafting pronto! Hugs BettyXXX
ReplyDeleteoh kath that is beautiful, thank you so much for the tutorial too hun xxxx
ReplyDeleteSuch a wonderful creation and thanks for sharing your tutorial! Have a great day and hugs to Buddy.
ReplyDeleteHi Kath,
ReplyDeleteThanks for the hanger tutorial, it is really beautiful.
xxx
wow Kath this is beautiful, thanks for the tutorial I will have to try this. Holly says hi and sends a hug for buddy. Have a great day
ReplyDeleteTracy x
Fabulous tutorial Kath, the finished result is beautiful x
ReplyDeleteJenny x
Wow! Incredible! Love it!
ReplyDeleteOh wow Kath, thanks for a fab tutorial!
ReplyDeleteHi ya Kath
ReplyDeletewow hun this is totally gorgeous, fabulous tutorial,you are so clever hun,sue.x
Thanks so much this is so lovely. Hugs Marja
ReplyDeleteBeautiful idea Kath, it looks so lovely, thanks for sharing it with us.
ReplyDeleteAnd now I'm confused-on my dashboard there's an extract from your blog which seems to be posing a question about knitting so I shot over expecting to read some fascinating insight and ....nothing...it's just not there. Come on Kath I'm dying to know what you wanted to find out about chunky cardigans. Lately I've even been contemplating dragging my knitting machine out and actually dreamt about it! BettyXXX
ReplyDeleteWhat a beautiful festive make Kath, Thank You so much for sharing the making of one with us all.
ReplyDeleteIm really looking forward to having a play with one!
Keryn x
Wow, this is great! Thanks for the tutorial. We are going to try to make it..
ReplyDeleteMarina
Hi Kath, thanks for the brilliant tutorial. If I can find time , I want to make one of these. Making Xmas presents at the moment. See you tomorrow . Hugs x ChrisB
ReplyDeleteWow - what a gorgeous decoration!! Thanks for posting the instructions!! Juliexx
ReplyDeleteThanks for a great tutorial Kath. I love every one of the hangers you've shown on your blog. I'll need to have a shot at making one too. If I can find the time lol!!
ReplyDeleteKat xx
WOW thankyou Kath, I love this, your finished snowflake is stunning, I may just try this! Joey.xxx
ReplyDeletewhat a beautiful project.
ReplyDeleteBeautiful decoration, Kath and an
ReplyDeleteexcellent tutorial!!
Would certainly like to have a go at these.
ReplyDeleteThey're beautiful.
Your stamping buddy is very handsome :o)
Oh My goodnesssss!!!! This is so lovely!! Do you mind if I make one and put it on my blog? I'll totally give you credit for the design. You are so talented my friend!
ReplyDeleteHugs xx
Kath I cannot tell you how absolutely blown away and how far my jaw went through the floor boards when I saw this gorgeous creation, you have definitely inspire me to give this a go, keep it coming Kath, you inspire me always. Hugs!
ReplyDeleteA fantastic tutorial Kath - thank you so much!
ReplyDeleteLove Lynda xxx
Wow! Fantastic!
ReplyDeleteThis is such a beautiful project, I would love to make one for myself! Thanks for sharing.
ReplyDeleteCarole x
This is just gorgeous Kath, I can feel a little scraplift coming on...
ReplyDeleteluv
En xx
Thanks for this Kath. Finally got around to making mine! :)xx
ReplyDeletethanks! I'm linking to your tutorial tomorrow at
ReplyDelete'deze is ook leuk' :D
Thank you so much for this wonderful tutorial! Love your snowflake!
ReplyDeleteHi Kath, I made this Snowflake Hanger, Looks more like a flower but I enjoyed it and will make more in the furture. Thanks
ReplyDeletehttp://www.pumpy-pumpys.blogspot.com
Bye for now.
Hello there Kath, Thanks for looking, yes I did use one of those bows. give Buddy a big kiss from me. xxx
ReplyDeleteLove this. Posted it to my web page. I'm a follower now.
ReplyDeleteso lovely!! thanks for this tutorial!
ReplyDeleteWat prachtig decoratie.
ReplyDeleteBedankt voor het delen.
Groetjes Margreet
Gorgeous!!
ReplyDeleteread your editor comment about not having a pdf file for your template. Just eye balling your template it looks like I could just trace around my ironing board. =] It is a beautiful ornament which i plan on making this year. Thank you for sharing your talents.
ReplyDeleteThis is so pretty and such a clever idea! I can't wait to make some for Christmas, Valentines Day, Easter... just everything. I think I'm even going to make one for my MIL for her Birthday.
ReplyDeleteI just love furry boy... canine have a very special place in my heart. I have two myself and every time I see them and get a wet sloppy kiss, I feel truly Blessed.
Thank you so much for sharing and have a very Blessed day/week/month/year... and so on! :)
This is such a gorgeous project! Thank you for the tutorial. I found this post from Pinterest. :)
ReplyDeleteVia de link Scrappedlives kwam ik terecht op jou site waar deze bewonderenswaardige Snowflake Hanger Tutorial staat. Ik heb het gevolgd en vind het resultaat onwijs leuk bedacht, mijn complimenten hiervoor!
ReplyDeleteVia de link Scrappedlives kwam ik terecht op jou site waar deze bewonderenswaardige Snowflake Hanger Tutorial staat. Ik heb het gevolgd en vind het resultaat onwijs leuk bedacht, mijn complimenten hiervoor!
ReplyDeleteHi! I think this is a great project! I'm going to try it tomorrow night at a crafting friends get-together. I want to make it with a Christmas theme. Of course, it could be decorated for several other holidays. I re-pinned this to my Pinterest page too. Thanks for sharing the tutorial.
ReplyDeleteI found this on Pinterest but was wondering. When it came to fixing the stamped petals onto the kraft petals did you staple them or glue them?
ReplyDeleteThis comment has been removed by a blog administrator.
ReplyDelete