Hi folks, I'm a bit late to the blog party today but you can blame the dodgy Furry Alarm clock for that. I'm sharing a tag book I made to store the new Shifter Stencils from Tim Holtz and Stampers Anonymous
I was jumping up and down with excitement when the new Halloween release stamps and stencils from Tim Holtz and Stampers Anonymous arrived in the cubbyhole.
I'm always excited about new red rubber but I have to say, after watching Tim's Facebook Live video, which you can watch
HERE, (the stencil reveal is around 17m.45s) I was even more excited than usual about the amazing Shifter Stencils. I'm a huge fan of Layering Stencils but oh boy, stencils have just been taken to a whole new level and I couldn't wait to try them out.
I store all my Layering and Mini Layering Stencils in tag shaped books using book rings. They are easy to flip to find the one you want, the stencils are easy to remove and replace when you're done but these new guys are very special, a little bit different from the normal layering stencil and when Tim mentioned that there are more shifter stencils in the pipeline, I knew that they were going to need their very own storage.

and here is the latest edition to the Layering Stencil storage collection, decorated, of course, with the Shifter stencils.
I used thick matboard for the covers, trimmed to 4.1/4" x 8.3/4", slightly larger than the stencils and using the stencil carrier sheet as a template, snipped off the corners. But before the fun could begin, I needed to follow the advice of our adorable Professor to make the grid lines more visible. I painted over the stencil area with Black Soot Distress Paint, quickly wiped it off with a paper towel which leaves the paint in the grid lines. As Distress paint is permanent when dry, you will only have to do this once and believe me, it does make matching up the grid lines easier.
I wanted to go for a neutral colour palette so I lined up the Stripes Stencil on the cover, held in place with washi tape and applied a light coat of Frayed Burlap Distress Oxide ink using a mini round blending tool.
I removed the stencil, wiped any excess ink off with a paper towel to make sure it was clean and ready for the next colour.
I lined up the stencil using the grid lines, applied Antique Linen Distress Oxide ink, removed the stencil and wow you get this amazing effect. I then applied Antique Linen Distress Oxide around the edges.
This was so much fun that I decided to use all 3 stencils on the cover. I repeated the process with the Diamonds Stencil using Frayed Burlap and Hickory Smoke (remember Distress Oxide inks are a fusion of dye and pigment inks so will layer beautifully on top of each other.
By this stage, I'm on a "having the best fun" roll so decided to add a little bit of plaid using the Stripes Stencil sideways but only stencilled once with Frayed Burlap. Then it was the turn of the Dots Stencil, again using Frayed Burlap and Hickory Smoke.
I stamped the script background image from Tim Holtz/Stampers Anonymous Entomology inked with Black Soot Archival randomly on the cover
I added white circles by tapping a Distress Paint dabber top into Picket Fence Distress Paint and splatters of Black Soot Distress Paint using the Distress Splatter Brush
I die-cut Tim Holtz/Sizzix Wildflowers Thinlits from white and black card and fixed in place with small dots of Distress Collage Medium Matte using a Ranger Fine Applicator Tool.
I trimmed down the carrier sheets which come in the packaging to use as a backing for the stencils in the tag book and as luck would have it, was left with the heading section with lots of cool typography, too good to throw away, so I trimmed them out, edged them with Black Soot Archival ink pad and fixed to the cover.

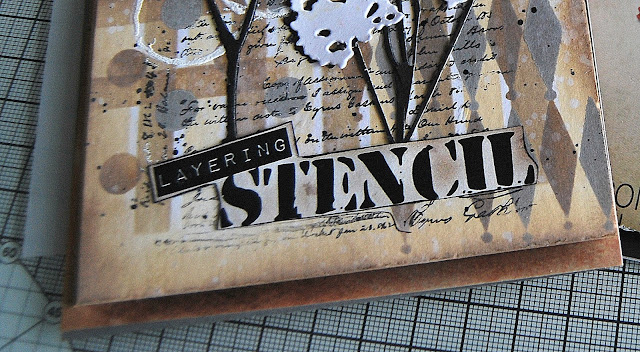
I added an Idea-ology Heart Charm strung with twine and a twine bow
an Ideaology Philosophy Tag fixed in place with a brad, used the Tiny Attacher to add staples around the cover and used a Black Soot Paint Dabber around the edges.
The reverse side of the matboard was a dark grey so I painted the outside of the back cover with Hickory Distress Paint, fixed a book ring and the job's a good un.
The new boys are looking a little bit lonely in their new home but fingers crossed "hint...hint Mr H" there will be more new additions coming VERY SOON. In the meantime, I'm itching to get inky with the new stamps and will be sharing some spooky creations with you all in the not too distant future
Edited to add: I use matboard for making journal and book covers because it's nice and sturdy and holds up well to inks, paints and mixed media techniques without warping. I got loads of offcuts from a local picture framing store so it may be worth enquiring in your area. If that's not an option, Sizzix Matboard is a great quality alternative and I have linked it below.


Kath, this is amazing! I store my stencils in a similar way, yet never thought to add a cover...now you’ve got me thinking! Love seeing the shifters in these colors, and I am absolutely adding these to my stencil collection-hoping for more designs as well, I see these as being used often!!! (hmmm maybe I don’t need a cover for this set after all...;))
ReplyDeleteStunning creation and what a great idea.
ReplyDeleteA great tutorial Kath, I always love seeing how you store your crafty goodies!
ReplyDeleteI can't seem to leave my craft room at the moment, between playing with the Shifter Stencils and the Alcohol Lift goodies I think I may be here a while longer!! Hugs, Anne xx
PS - oh, and the new Halloween stamps too!!
Gorgeous Kath, loving the colour palette and loved your step by steps. Tracy ❤️❤️😘
ReplyDeletePerfect!!! Love the cover and so very practical of course!
ReplyDeleteFabulous cover for your new stencils. I love the colours and design.
ReplyDeleteHugs
Linda xxx
Great cover, I don't have enough stencils to worry about yet, but I too, have them on a book ring, a very small one so far. lol Love your colour choices and those stencils are a must get. Thanks for sharing Kathy. Love your art.
ReplyDeletea nice idea for the templates .
ReplyDeleteI like that !
Wonderful tutorial and amazing cover for your stencil storage!! Thank you for the inspiration! x
ReplyDeleteA great addition to the stencil collection!
ReplyDeleteSally xx
my stencils are a mess, I need to do this. I love that the mat board is heavy enough that you can stand up the sets in the basket...that would be so convenient!
ReplyDeleteVery cool! I love the design and the colors you used.
ReplyDelete