


and the theme for this week is...
STENCIL IT

I used lots of stencils to decorate my Summer Garden Canvas and started off by applying Ranger Opague Crackle Texture Paste through the Tim Holtz Trellis Layering Stencil.

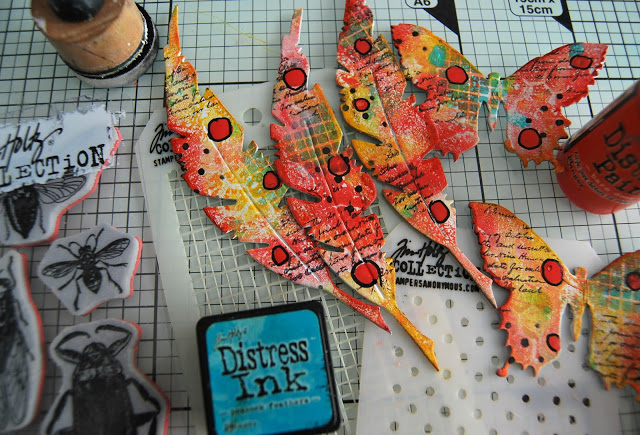
and while it was drying, I looked out my new toy, the Gel Press which may well be my latest addiction. I added small dots of Distress and Dina Wakley paints and brayered lightly so as not to end up with a muddy mess...


and pressed the die cuts which I had cut from chipboard using Tim Holtz/Sizzix Writing Desk, Butterfly Duo and Wish BigZ dies on to the plate to transfer the paint. (Writing Desk is not in stock over at Simon Says Stamp so instead I have linked to Feather Duo which would work just the same).

I stamped the die-cuts with the script stamp from Tim Holtz/Stampers Anonymous Entomology with Black Soot Archival ink, added detail using Mini Layering Stencils from Sets 20 and 22 with Evergreen Bough and Black Soot Distress Inks and added dots of Fired Brick Distress Paint using the eraser on the end of a pencil and a little Distress Crayon shading on the edges.

I used Ranger's Black Fude Pen to added circles around the dots
I then turned my attention back to the canvas, added drops of Distress Resist Spray and once they were dry, spritzed with Worn Lipstick and Mustard Seed Distress Spray Stain, spritzed with water and patted lightly with kitchen towel to remove excess colour.


I decorated the canvas using the same stamps and stencils as I had used on the diecuts.

I added Idea-ology Rose Design Tape, circles of white twine, and Idea-ology Tiny Text Remnant Rubs to the background and the die cuts. I darkened the edges of the die cuts using Ranger's Black Fude Pen and fixed the feathers in place with Distress Collage Medium and 3D foam. I added white dots to the red circles using a Sakura White Gelly Roll Pen and Idea-ology Quote Chips.


I added the die-cut Butterflies and a Paper Doll. I painted the bow in her hair with Distress Collage Medium Matte and Fired Brick Distress Paint.


You can find all the products I used over at the fabulous Simon Says Stamp online store...just click on the links below...


Why don't you pop over to the Monday Challenge Blog and check out the amazing creations from my very talented Design Team mates and as always you all have the chance to win a $50 gift voucher to spend at Simon Says Stamp. You have until Monday 8am Ohio time...1pm UK time...2 pm CET to join in...

You can also follow Simon Says Stamp on Instagram
and if you use Instagram...
please add #sssmchallenge to your entry uploads so we can see them on there too

I look forward to seeing what you create this week...
Have Fun and Happy Crafting
Hugs Kath xxx
Gorgeous Kath, I adore the colours. Tracy ❤️
ReplyDeleteFabulous Kath, love the colours and wonderful textures. Wonderful composition too.
ReplyDeleteHugs
Linda xxx
Absolutely gorgeous canvas Kath! I love how you used the gel plate to make the design for the die cuts and the background colours and textures are fabulous! Totally love this! :-)
ReplyDeleteluv
Lols x x x
I am completely and totally in love with this gorgeous canvas Kath, the colours are fabulous, I love the beautiful feathers and butterfly. You have certainly done an amazing job with your Gelli plate!! Love this so much!! Hugs, Anne xx
ReplyDeleteThis is awesome! so awesome! love all the details!
ReplyDeleteYour work always blows me away Kath. So pretty.
ReplyDeleteFabulous creation, Kath, stunning design. xx
ReplyDeleteThe colours are simply fab Kath, really gorgeous creation..x
ReplyDeleteI'm in love with how you made the feathers!!! SOOOOO Amazing!!!
ReplyDeleteI love how you created your die cut pieces. The bright colours are not usually my thing but on this project they look fabulous
ReplyDeleteWow, the colours and shading and patterning on your gelli-printed die-cuts are just stunning - what a great technique. Love how they pop against the textured background - brilliant!
ReplyDeleteAlison x
BEAUTIFUL color combo, Kath! Love how pieced everything together! It's a pop of sunshine in an art journal and I love it!
ReplyDelete*mwah*
Steph
Simon Says Stamp!
Kath, what a fun mix of color and images on your canvas!! Love what you have done here, and your use of the stencils is wonderful! There is so much to discover each time I look at this, each time I find something new. Amazing piece!!! xx Maura
ReplyDeleteFabulous mix of happy colours and this is such a fun piece with so many layers and details...this is lovely Kath! Hugs xx
ReplyDeleteWow! I really wasn't expect such a great effects of using the gel press plates. I am convincing myself they are worth having. The colors you received on the feathers are just amazing! I love the soft background too and the black stamping is fantastic. Hugs, Macarena
ReplyDeleteThis is such a gorgeous creation, Kath. Love the fabulous colors and texture you created on the background. :)
ReplyDeleteWow, wow, wow! I felt like the detail shots of this project were a treat because I love how this turned out! The color palette is one of my favorites of yours ever and I really liked seeing the gelli plate in use. Thank you for sharing the steps in this work of art!
ReplyDeleteWhat a gorgeous piece, Kath! Love the colors and the red dots are so fun! The feathers and butterflies are stunning! Hugs, Sandra
ReplyDeleteBrilliant! the textures and colors of your embellishments are fabulous and the design absolutelt stunning!! you're amazing Kath! Barbara
ReplyDelete