Hi Everyone...welcome to another week on the Simon Says Stamp Monday Challenge Blog. Thank you for joining us for last week's challenge and we hope you can join us this week too because
and the theme for this week is...
HOME DECOR
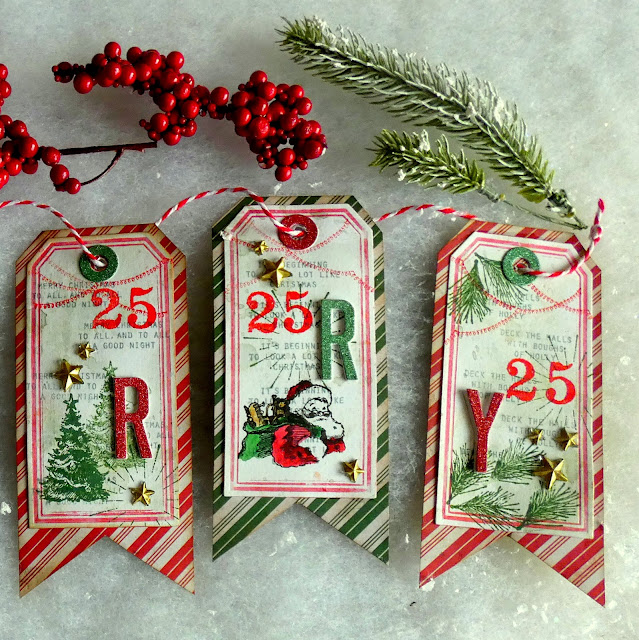
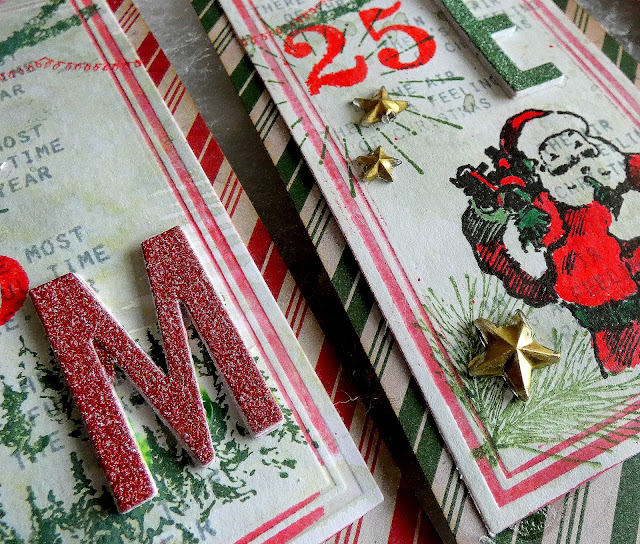
I created a Christmas Banner using Tim Holtz/Sizzix Framed Tags/Alphanumeric Shadow Upper Thinlits, Stampers Anonymous Darling Christmas/Merchant stamp sets and Idea-ology Backdrop Christmas/Christmas Deco Sheets and Mirrored Stars.
I trimmed an A4 sheet of Distress Watercolor card in half and coloured with Iced Spruce Distress Oxide ink using the smooshing technique on my Glass Media Mat. I inked the raised edges of the medium size tag from Tim Holtz/Sizzix Framed Tags Thinlits with Barn Door Distress Archival ink using the small Distress Brayer and die-cut 5 tags.
I stamped different sentiments from Tim Holtz/Stampers Anonymous Darling Christmas, inked with Iced Spruce Distress Oxide ink, repeatedly over the tags to create a tone-on-tone background effect.
I stamped the images from Darling Christmas, inked with Rustic Wilderness Distress Oxide ink. I stamped the Santa images, inked with Black Soot Distress Archival and coloured with Distress Watercolor Pencils Set 3, lifting the colour from the pencils with a wet brush.
I stamped the garland images inked with Candied Apple and Rustic Wilderness Distress Oxide inks.
I stamped "25" from Tim Holtz/Stampers Anonymous Merchant, inked with Candied Apple Distress Oxide ink.
I fixed Christmas Deco Sheets which are adhesive backed to scraps of white card and die-cut using Tim Holtz/Sizzix Alphanumeric Shadow Upper Thinlits. I also die-cut the hole re-inforcers from Framed Tags Thinlits.
I die-cut 3 extra of each letter from Distress Watercolor card and layered to create dimension.I fixed the letters in place with Distress Collage Medium, trimmed 2.3/4" wide strips from Tim Holtz/Idea-ology Christmas Backdrops paper and cut a notch at the bottom.
I decided in my wisdom to colour Idea-ology Mirrored Stars with Gilded Foundry Wax which requires the use of a heat gun to get the desired shiny effect and this is where I need to say - "don't do as I do, do as I say"
because the mirrored stars are probably some kind of plastic and one or two of mine seemed to slightly melt at the tips so it's not something I will be trying again. Not every "what if" experiment works out as hoped, note to self - next time - use Alcohol Ink.
I fixed the tags to the backing sheets and threaded twine through the holes, ready for hanging
Why don't you pop over to the Monday Challenge Blog and check out the amazing creations from my very talented Design Team mates and as always you have until Monday 8am Ohio time...1pm UK time...2pm CET to join in with the chance to win a $25 voucher to spend online at Simon Says Stamp
You can also follow Simon Says Stamp on Instagram
and if you use Instagram...
please add #sssmchallenge to your entry uploads so we can see them on there too
I look forward to seeing what you create this week...
Have Fun and Happy Crafting
Hugs Kath xxx


A Christmas banner for the win, thanks for sharing.
ReplyDeleteLove them
ReplyDeleteWow! I just love this and appreciate your breaking it down into steps for those of us who are new at this!
ReplyDeletethese are marvelous and love your directions....really helps those of us that just don't have that artistic genius you possess.
ReplyDelete