

Hi my friends, I'm sharing the Slider Pop Out Card I made for the YouTube Live launch of Tim Holtz/Sizzix Chapter 2 using Modern Floristry and Bold Text Thinlits and the Woven 3D Texture Fade. If you missed the Live, you can rewatch on Tim's YouTube Channel HERE to check out the new dies and 3D Texture Fade Embossing Folders and be inspired by the projects from the Makers shared on Tim's Blog HERE.
 Although it looks complicated to make, it really wasn't, the most difficult part of this adventure was getting photos, lying on the floor, hanging from the chandelier and everything in between and it didn't help that the sun was streaming through the window and the deadline for the courier pick up was fast approaching.
I trimmed Distress Watercolor card to create a 5" x 7" card blank and 2 - 4.3/4" x 6.3/4" panels from Distress Watercolor and used a nesting square die to die-cut a 3.1/4" aperture on the front of the card and the two panels. I trimmed Distress Watercolor card to 7" x 6.3/4" and scored at 2.1/2" and 4.1/2" to create the pop out mechanism.
 I spritzed the panels and one of the die-cut squares with Speckled Egg and Frayed Burlap Distress Oxide inks.
I trimmed Distress Watercolor card to 7" x 6.3/4" and scored at 2.1/2" and 4.1/2" to create the pop out mechanism.I spritzed the panels and one of the die-cut squares with Speckled Egg and Frayed Burlap Distress Oxide inks.

 I applied strong double sided adhesive tape to the right hand side panel of the pop out insert and fixed in place on the card blank.
I folded the pop out insert back on itself, created 2 tabs and fixed to the edge of the panel with the folded side of the tabs right up against the edge using strong double sided adhesive tape. At this stage, I left the carrier tape in place on the tabs.

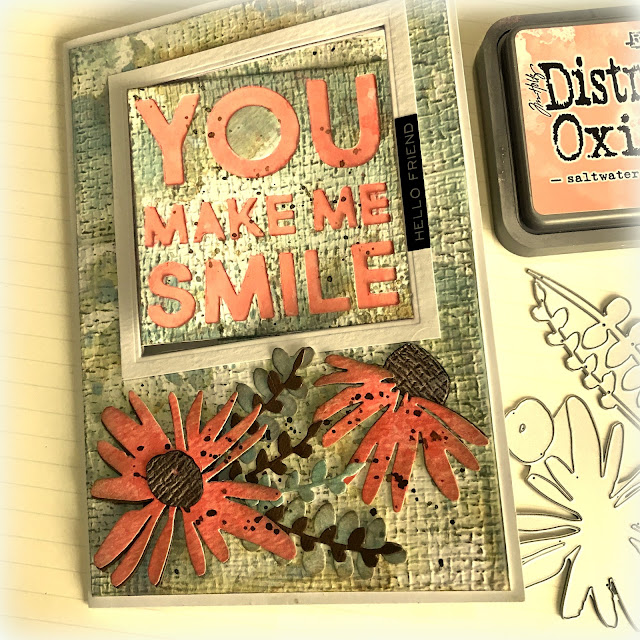
I trimmed 1/16" off all sides of the Bold Text panel and fixed to a panel of the same size, coloured with Saltwater Taffy Distress Oxide ink. I closed the card, applied strong double sided adhesive tape to the section of the pop out insert which showed through the aperture and fixed the Bold Text panel in place.

I opened the card, removed the carrier tape from the tabs and pressed them into place.

This is what the card looks like once you have completed this stage.

I die cut the Modern Floristry Thinlits from Distress Watercolor card coloured with Saltwater Taffy and Speckled Egg Distress Spray Stains and Distress Oxide Sprays and a scrap of Sizzix brown card from the Neutrals pack


Hugs Kath xxx
So beautiful and creative the textured background is stunning loving the words too x
ReplyDeleteBeautiful and so creative, makes me want to get in my craft space and get going, if only I could move, as soon as I can I am havign ago at this Kath, thanks for the inspiration.xx
ReplyDeleteI I really love this card. Thank you for taking the time to post the directions. Question: Are the words
ReplyDelete"YOU MAKE ME SMILE" cut separately and glued on top of the panel or does the Taffy color just show through from the taffy inked panel behind the woven texture panel? The picture looks like they are on top, but directions only refer to cutting out the Bold Text Thinlit once. Thank you
The construction is impressive. I love your design and the color palette is so awesome! Thanks Kath for your continued inspiration.
ReplyDelete